Character Planning, Ideas and Conceptualization
To begin formulating ideas for my character, I first had to narrow my vision using the parameters specified within the brief. The brief was quite free, the only restriction being that the character must be a humanoid design. Immediately, this constricts the anatomy of the character. Humanoid to myself means two arms, bipedal, a human like torso and an upright posture.
From these restrictions, I knew already that my design would be a creature/alien of some form, as I enjoy sci-fi and fantasy designs, and horror, such as the works of H.R Gieger (Alien), Guillumero Del Toro (Pans Labrynth), Bryan Woods, Scott Beck (A Quiet Place), Luke Starkie (Creature Artist), Jerad S. Marantz (Steppenwolf Designer), Glen Schofield (Dead Space Lead Designer), Preston Watamaniuk (Mass Effect 3). These are just a few of my influences, but they drive my creativity in certain directions, leading me to my own art form and style.
To begin with, I created a type of story for my design, a background of its made-up traits and biology. Since the freedom for design was high, it was difficult to narrow down a creature. To start generating ideas, created a Pinterest board and browsed many designs. After reviewing some designs, I then decided on a fantasy creature, likening something that you would find in a Witcher novel. The Drowner – from the witcher games – had caught my attention, and I decided from here to create a Drowner inspired creature. A drowner is humanoid, and its main biome is the swamps and marshes of the world within the game.
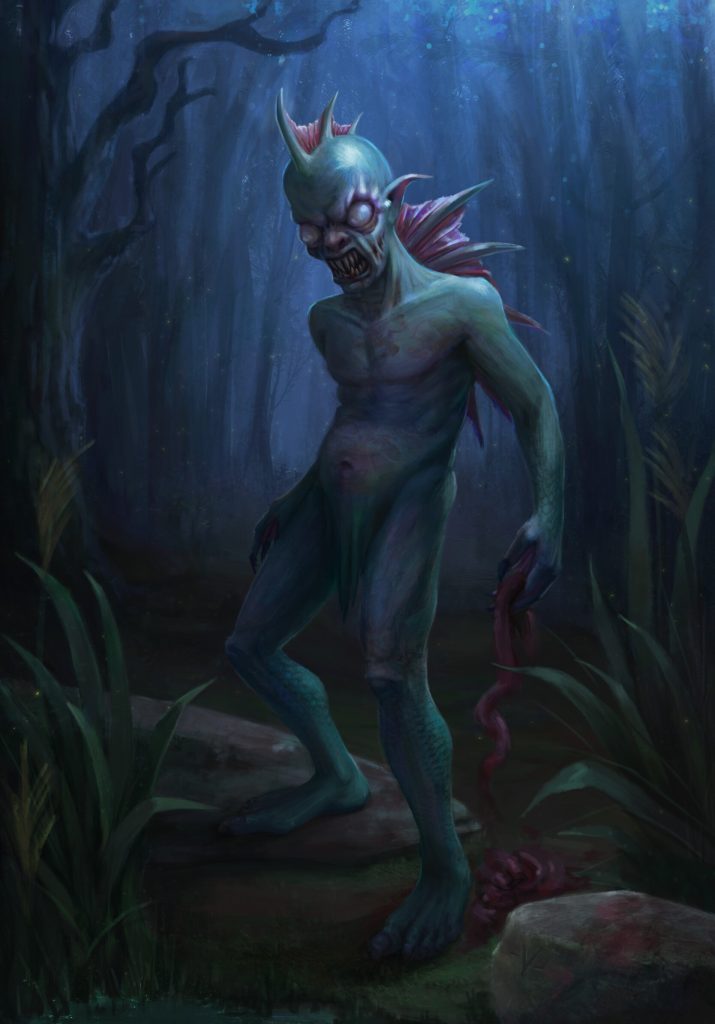
Now that I had an idea, I needed to narrow the anatomy and overall design, what makes a Drowner, a Drowner? For myself it was backstory of the creature and the fish-like appearance of it – fins, scales, webbing, bloated features and algae/seaweed that textured the creatures body. A Drowner in the Witcher is a person which has died due to drowning in a swamp, they are then re-animated as a Drowner. This defines the features, taking inspiration from the look of a human when left deceased in water, pale skin, bloated features and moss and muck covering the corpse. This mixed with the feel of creatures that usually inhabit a swamp (amphibians, reptiles and birds) creates for me a Drowner.
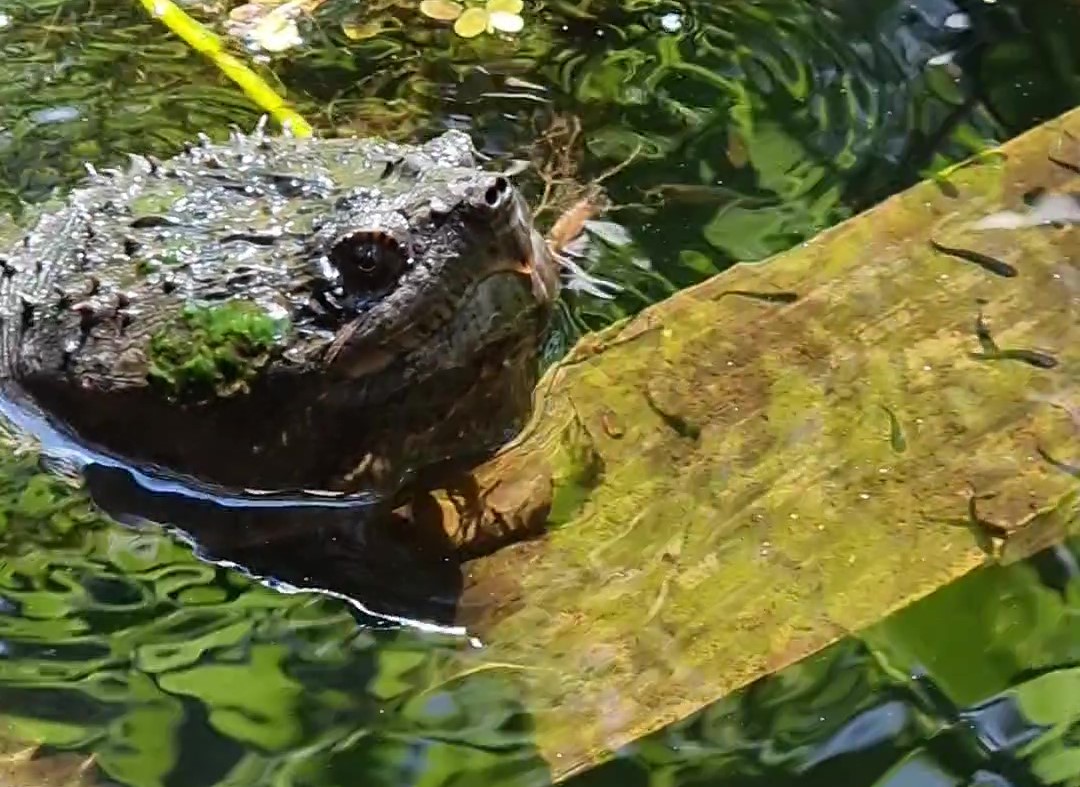
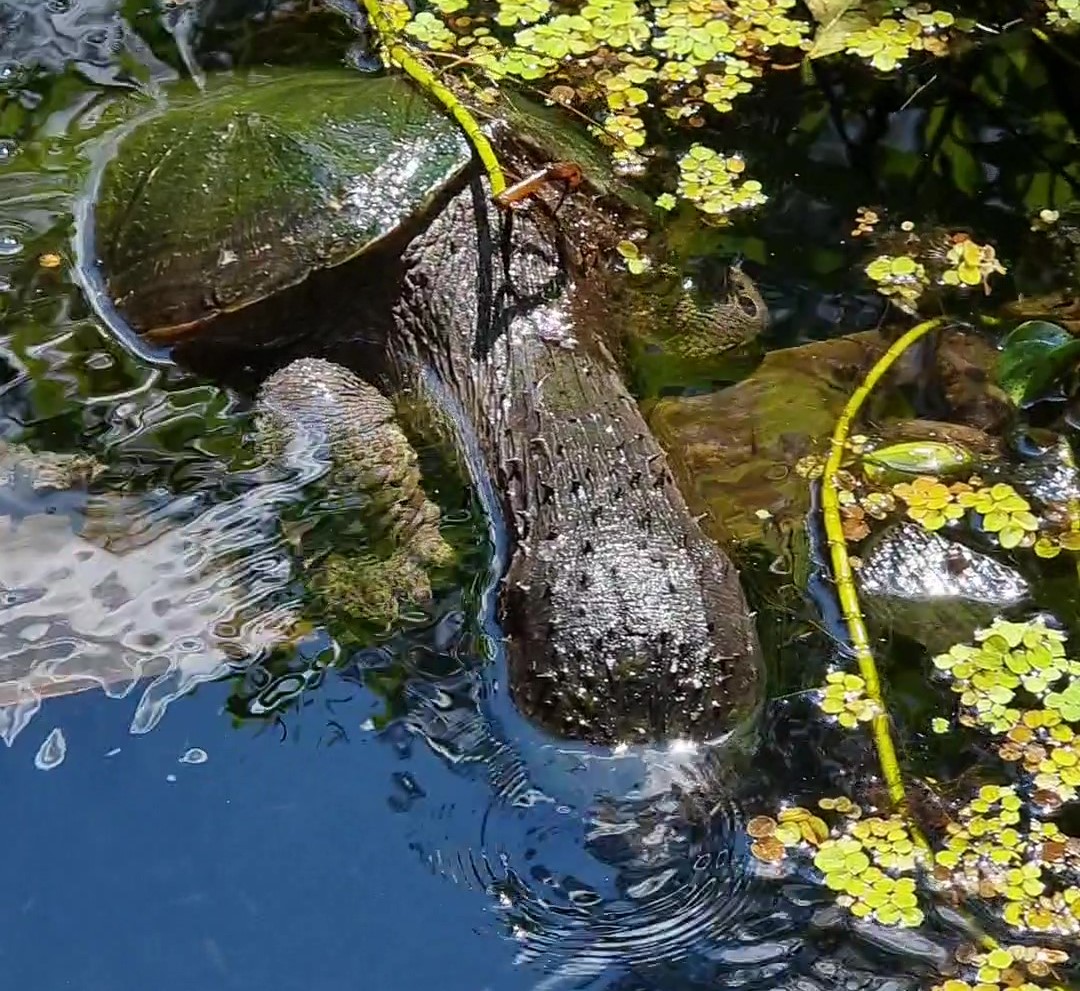
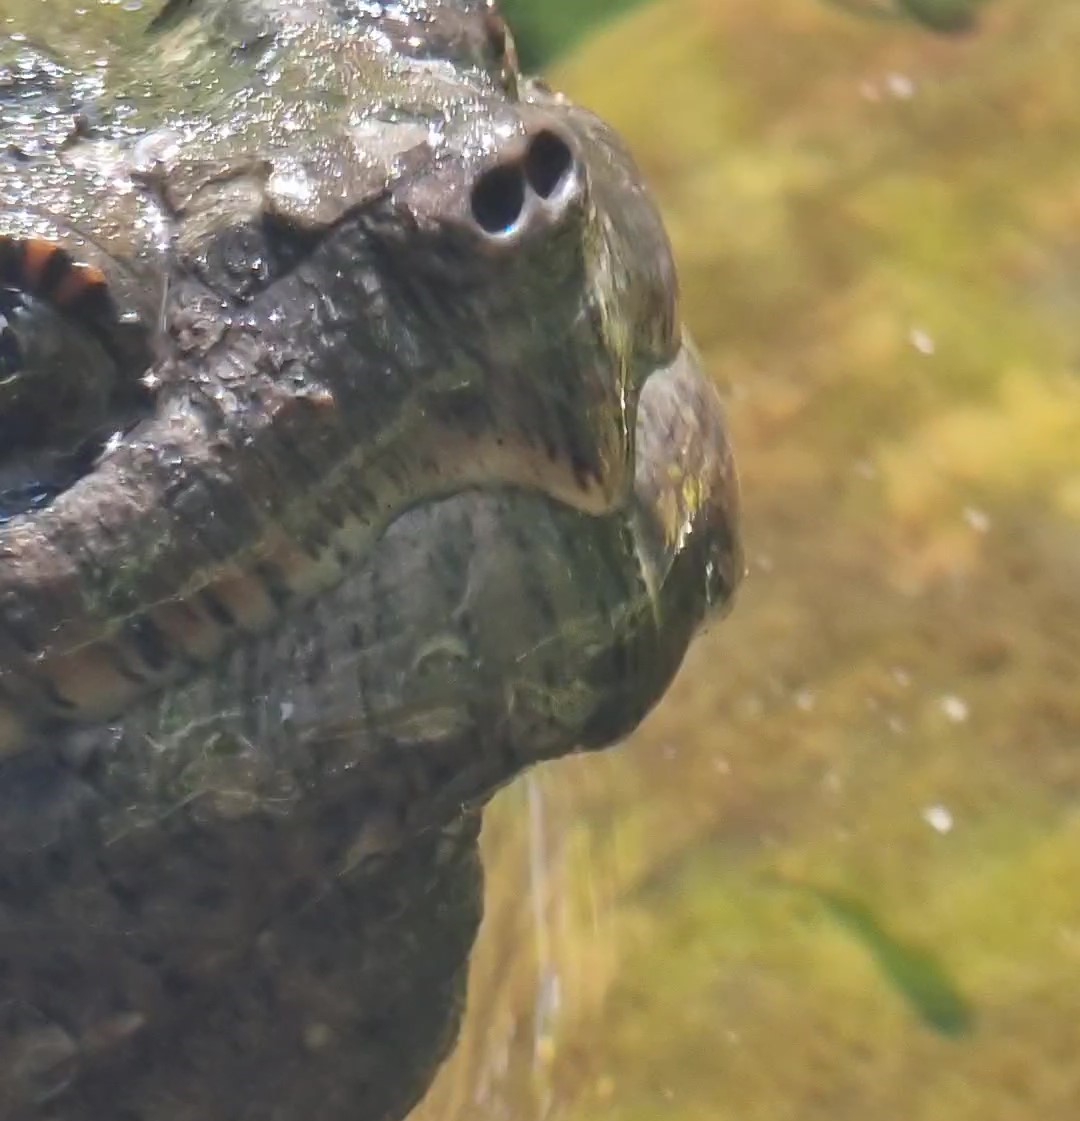
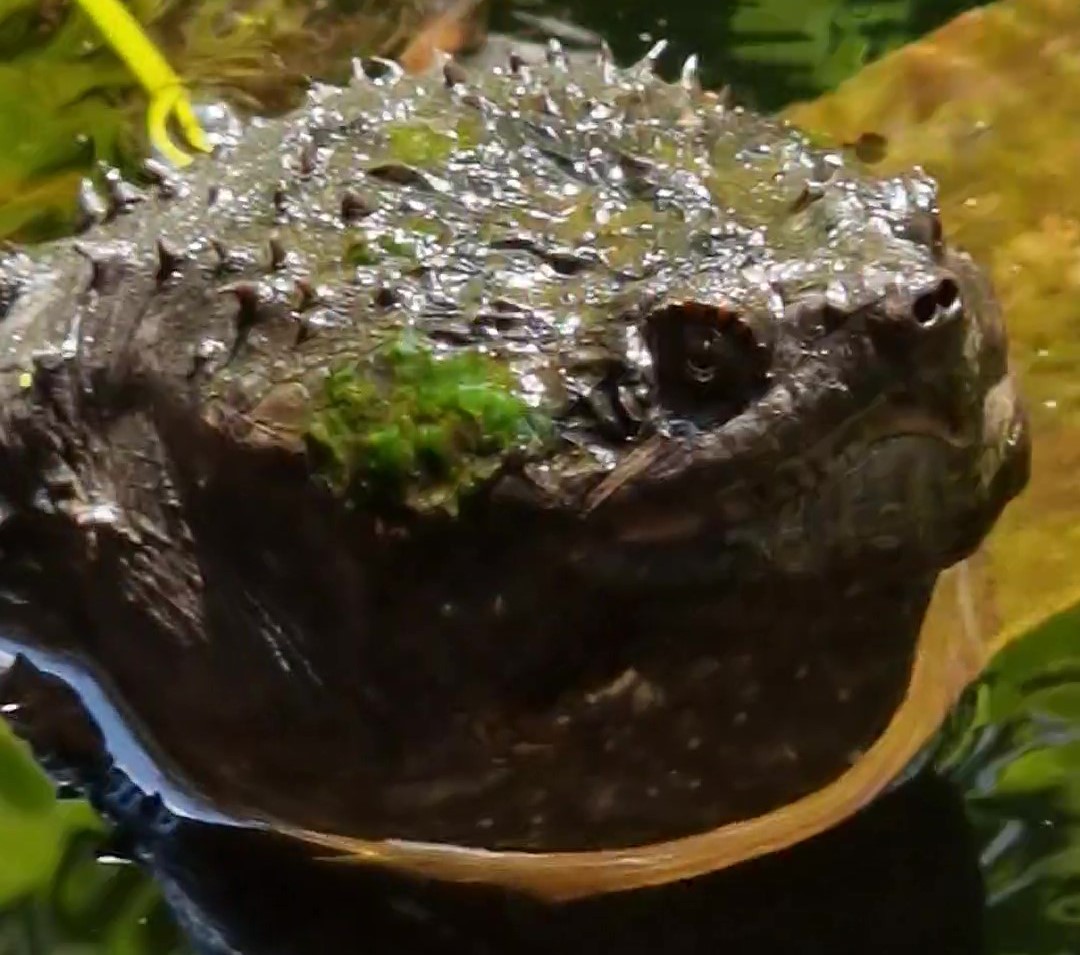
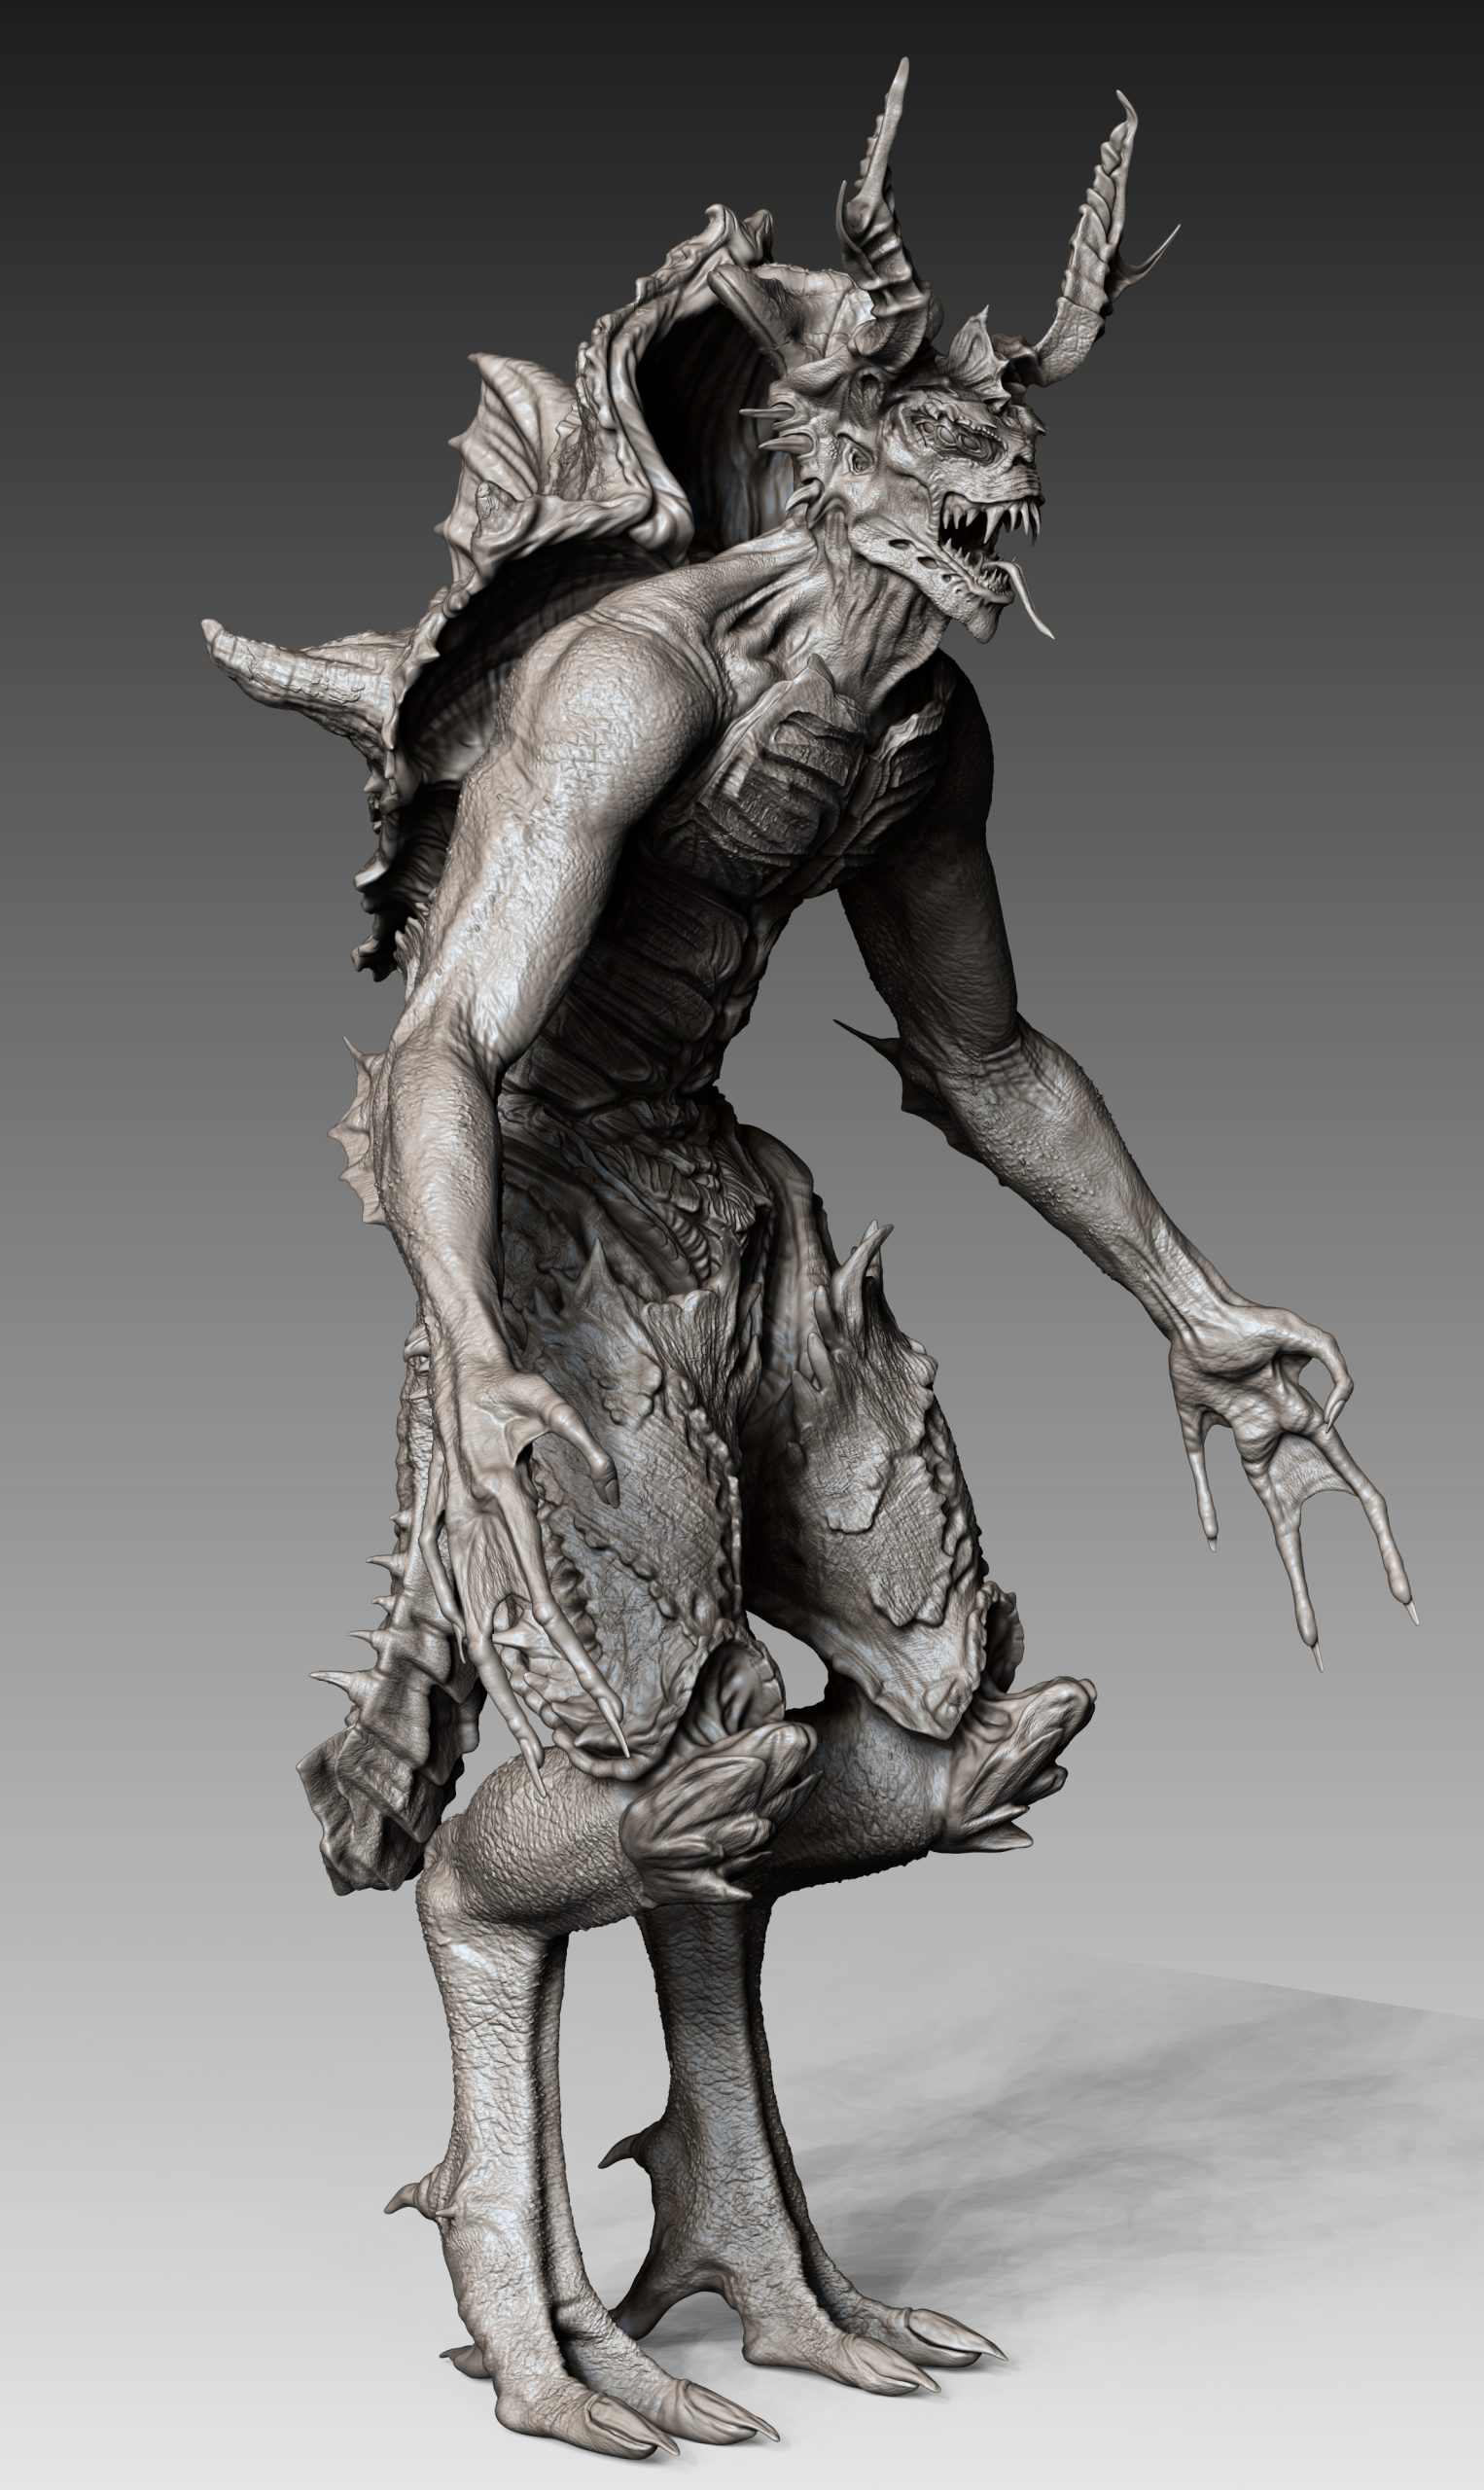
For my design I wanted a more demon-like creature; something that was more imposing and aggressive looking, not as creepy like the original design. I imagined a demon of the swamp, a creature more inclined to moving around on the land of the swamp than the water. While on holiday in America, I happened to visit a reptile sanctuary called Gatorland. During this visit, we took a walk through a typical swamp in the Everglades and I was caught off guard by a snapping turtle. I was able to record it and take some images for later viewing. The features of this animal are very interesting, regarding their spikey shells, scaly skin, moss covered bodies and an aggressive, protective nature. I remembered this creature and so it became the main tooling point for my design. The creature would have a shell, long thin appendages, fins, membranes and a deadly mouth, like the real turtle. Mixing these ideas with the inspiration of a Drowner-esque creature and swamp demon, I now had a specific image for the creature I wanted to create.
I then returned to pinterest to refine my ideas and find more specific inspiration and reference. I collected images of various turtles, reptiles, birds, eyes, legs, feet, hands, mouths and overall designs, these were crucial to the creation of my crature and ensuring the correct anatomy and design, I wanted my creature life like, not stylised or cartoony.
https://pin.it/3pDQvmw – Character design Pinterest
https://pin.it/7vnATGk – Legs Pinterest
https://pin.it/7socxb9 – Hands Pinterest
Working with ZBrush

Working with Zbrush was incredibly fun and such an explorative journey. Previous to this sculpt, I only had minor knowledge with the program and hadn’t much experience sculpting something to this degree. My previous knowledge within Zbrush was limited to working with small details, such as adding engraving to hard surface models like weapons, sculpting an organic creature, that had to be anatomically correct was a whole new challenge. However, I had some help and a lot of guidance from a friend, who has sculpted for over eight years, and is a professional within the industry already. From his knowledge and guidance I quickly grew, learning the basics of anatomy and the principles of designing creatures. Most of all, Luke (professional) demonstrated how fancy brushes and exspensive IMM brushes are not necessary in the creation of a high qaulity creature, that most of any detail and shape can be achieved with the standard brushes ZBrush has to offer.
Brushes
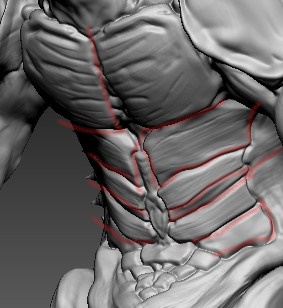
Ths most common brushes which I ended up using from his suggestions where the standard brush; excellent at adding quick shape and build-up of the material. The Clay Buildup tool is one of the best tools for building up additional shape but best of all, when used lightly and consistently in the same driection, can even give you ‘free detail’ from the strokes and stryations it tends to make in the clay. The Dam standard tool is excellent at cutting into the clay to create trenches and harsh creases. When used lightly (by dropping the intensity) it can also be used to define detail in areas, such as mapping out muscles and tendons. The inflate brush was mainly used for areas such as fingers, where the mesh can become a little thin and require a little thicknening out. Mainly however, I used it mostly to repair glitches/holes in the mesh, by inflating the holes first then dyna-meshing the model, it helps close these awkward holes. The move tool is extremely important and once again, should really be used with the inetnstiy turned down, this way the tool can be used to nudge and ease certain areas of the model around, allowing quick editing and anatomy tweaking, I used this brush frequently, mainly for positioning certain things such as spikes and fingers, arms, jaw placement, eye placement, the tool is dynamic and very useful overall. Hpolish is a tool which requires a little bit of experimentation and practice since using it can be quite tricky to achieve the sort of polished edge you require. The user must make sure the orientation of the brush matches the direction you would like the brush to flatten/polish off. I used this later after much practice and I mainly used it to polish off the shell areas of the creature to add a nice solid carapace look, like that of a turtle. Slash3 is very similar to dam standard, however, it is very aggressive and carves right into the model, its good for quick/deep trenches and holes. The snake hook is basically a free spike tool. The user grabs the area they want to stretch and pull in the direction they would like it to go. This, like the Hpolish brush can be tricky to use and requires a bit of practice. I used this brush for pulling out the inital base of the teeth, the horns, spikes, tongue, anything that protruded.
Extruding or Appending?
I was taught two ways of building a character, Appending many simple shapes to a scene to create the initial base, or, free form extrusion, where most of the model will be pulled out from one subtool and dynameshed constantly to keep the models topology equal. The latter method means starting with a ball/cyclinder, sculpting a rudimentary bust, then, using the move tool, pull out from below the bust to build up the torso shape and wastline. This method is fast and efficent but requires practice. The simpler method is appending shapes, which can be done very quickly and effectively using ZSpheres. I opted initially to use the extrusion method as I wanted a challenge, I got it to work and was able to create a head and torso from the same shape. However, I later changed my mind and remade the torso using ZSpheres.
Zspheres are an efficent and easy way to quickly map out key form of a creature/character. They allow tubes to be created by manipulating the size of spheres and their positioning relative to one another. I used Zsphere in the inital mapping and creation of the arms, hands, fingers, legs and toes. Each ball acts like a knuckle or joint, by pressing ctrl once one has been drawn allows you to extend the ball into a tube, pressing ctrl again allows you to draw with the spheres. Once happy with the shape, you press ”A” to preview the sphres as a mesh, if everything is fine, you then convert it to a polymesh3D.
Sculpting the head and my processes
Briefly breaking down the steps i took to sculpt the head.
1 : Start with a ball, from here using the move tool, manipulate the overall shape to form a basic head shape, Dyna-meshing when necessary. I take extra care at the rear of the head, always rotating around the sculpt to make sure the anatomy looks correct. I achieve this through the use of a model I have on my desk, made by 3dTotal, it is excellent reference for the general shape of male anatomy.
2 : Begin adding form with the clay buildup tool, using low intesity to control the buildup rate easier. Building up the cheek bones, jaw line and brow.
3 : Smooth out key areas – jawline, browline, cheek shape, nose ect. This just makes the bust look cleaner and easier to work with.
4 : Using the standard brush, form more rounded areas like the ears and nose smoothing as I go to keep the shape clean.
5 : Use the move tool to move the form around, rotating constantly to check the shape.
6 : Use Dam standard/Standard reverse to refine detail and carve out key anatomy and shape.
7 : Begin Sub-dividing the model to create higher resoloution shapes. I only take this step once I am completely happy with the overall shape, that I dont need to add or remove any major details, as dyna-meshing can be a pain with multiple sub-division levels.
This was mainly the simplified process I took throughout the entirety of this model and the overall character changed alot as I worked. I was taught by my friend that the worst thing you can do is become too atached to a sculpt, to not be afraid to change the shape and form of the character, add or remove details. You can find by doing this you discover more interesting and better designs, becoming too fixated on certain details or becoming too attached to certain parts can infact have a negative impact on the sculpt. Another tip I was given, was to work within layers when making these changes. Layers in ZBrush work like layers in Photoshop, they are dynamic and not permanent, can be altered and removed. By working in a layer, the sculptor can see the difference between the original sculpt and the changes that have been made, via a slider on the layer. If happy with the changes, you simply bake the layer and it becomes semi-permanent (still undoable via CTRL+Z). If the sculptor is not happy with the changes, they can simply delete the layer, removing the changes.
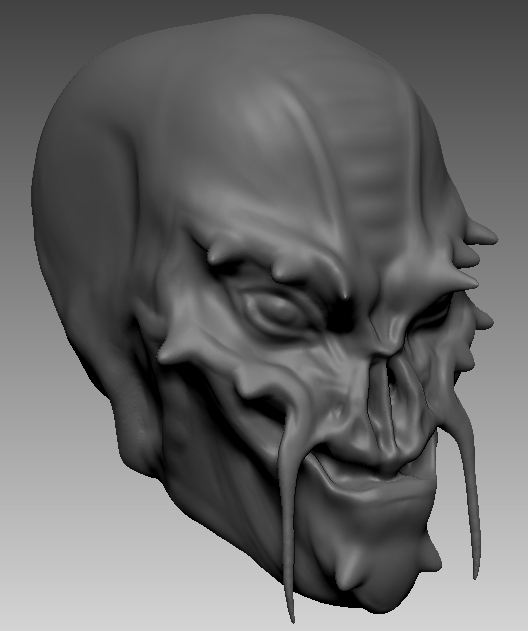
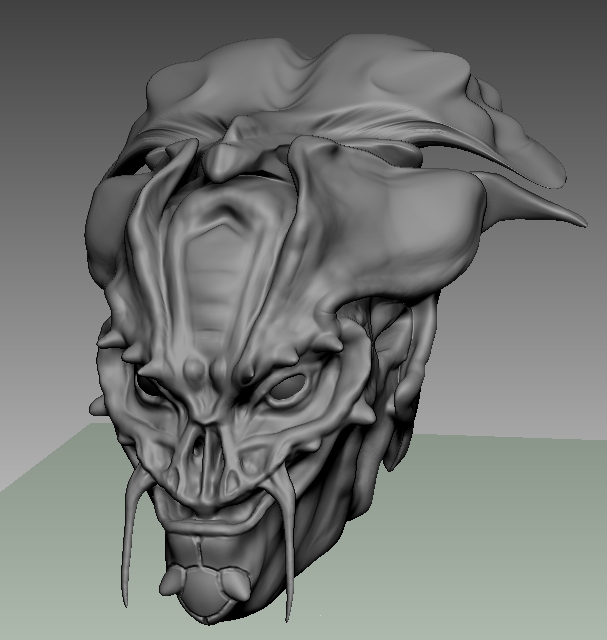
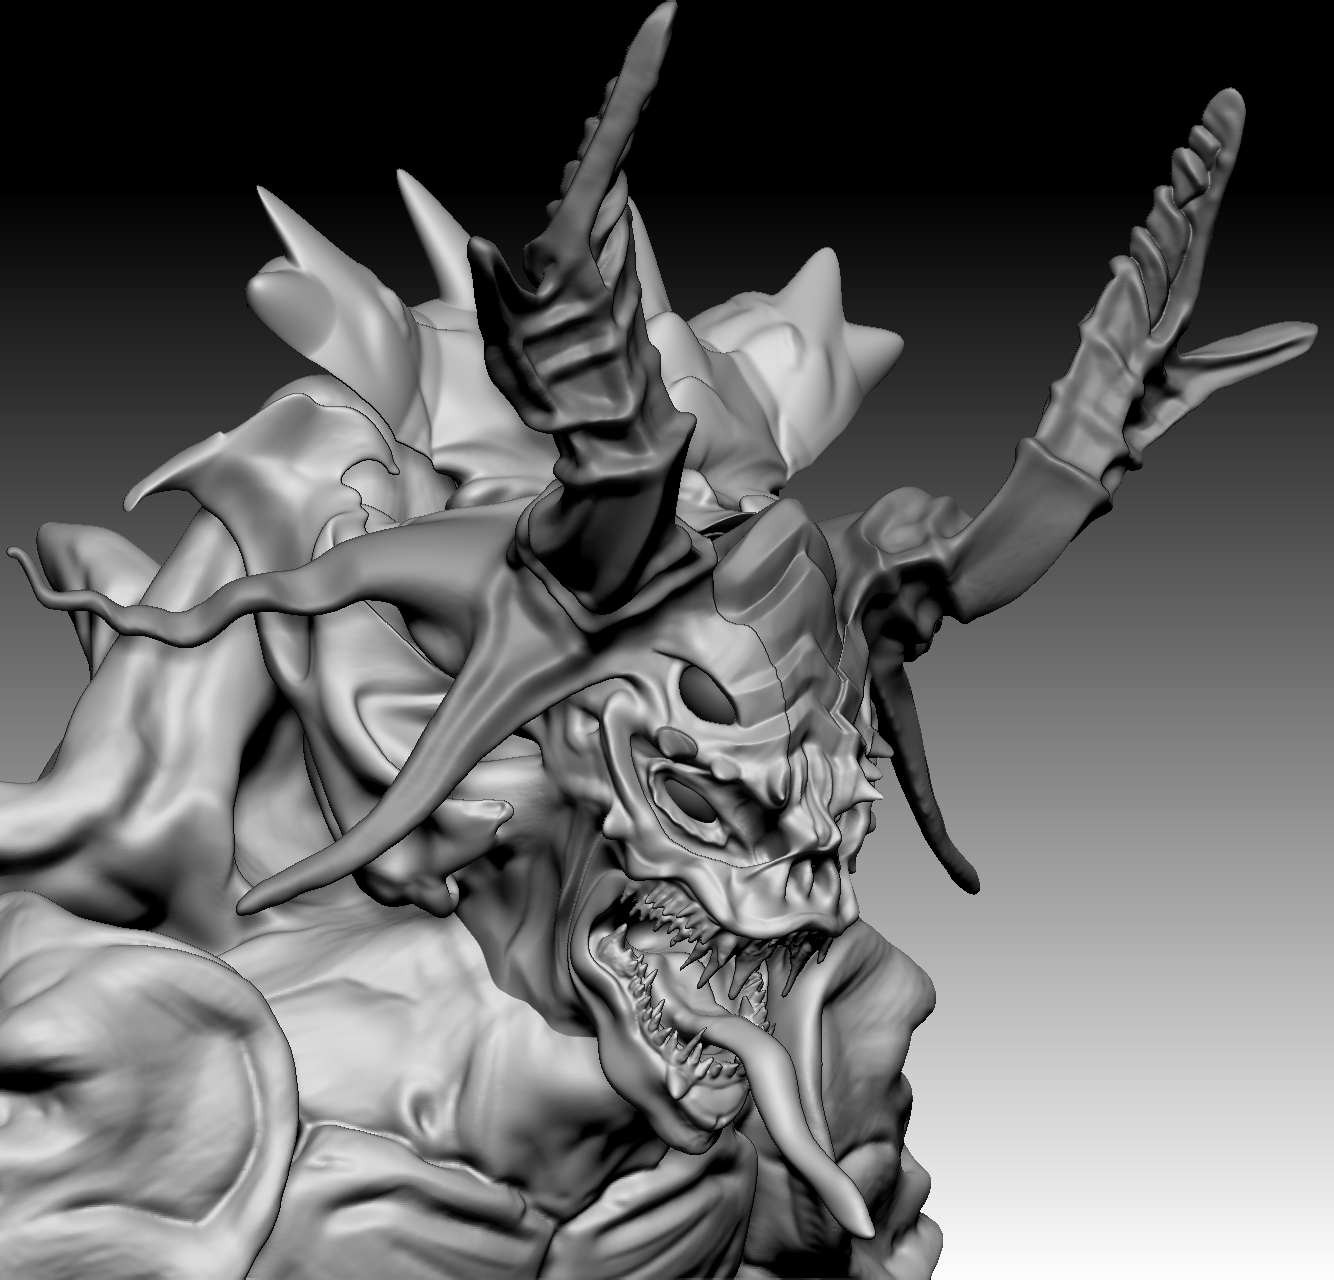
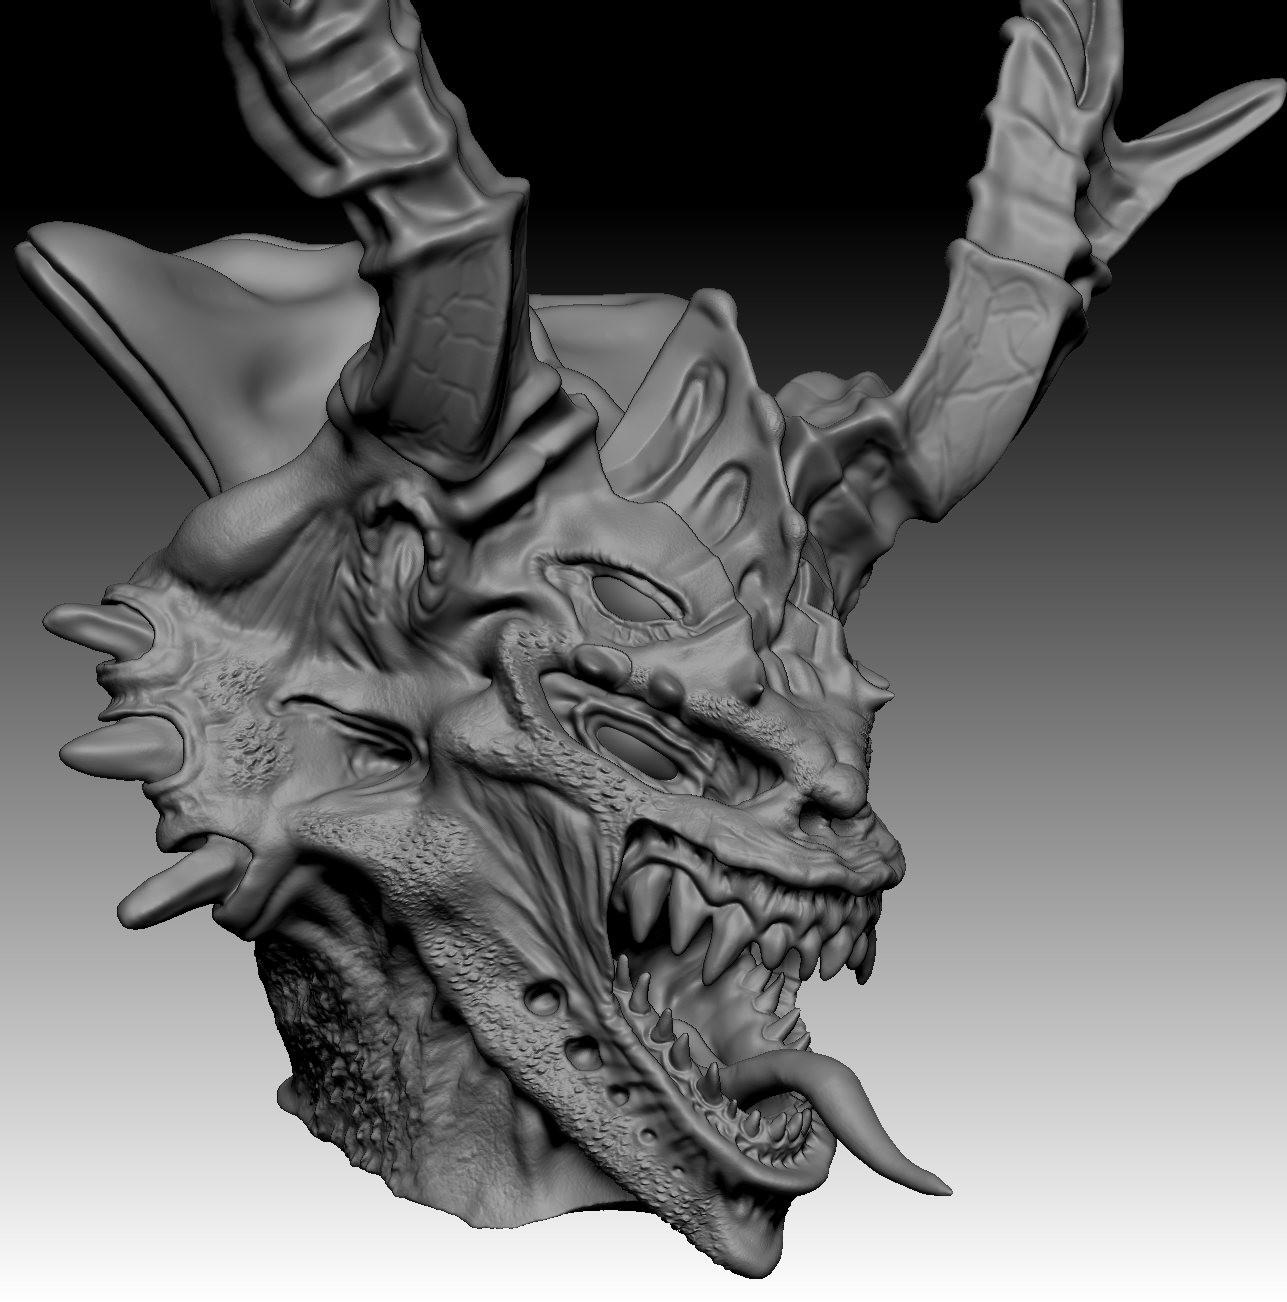
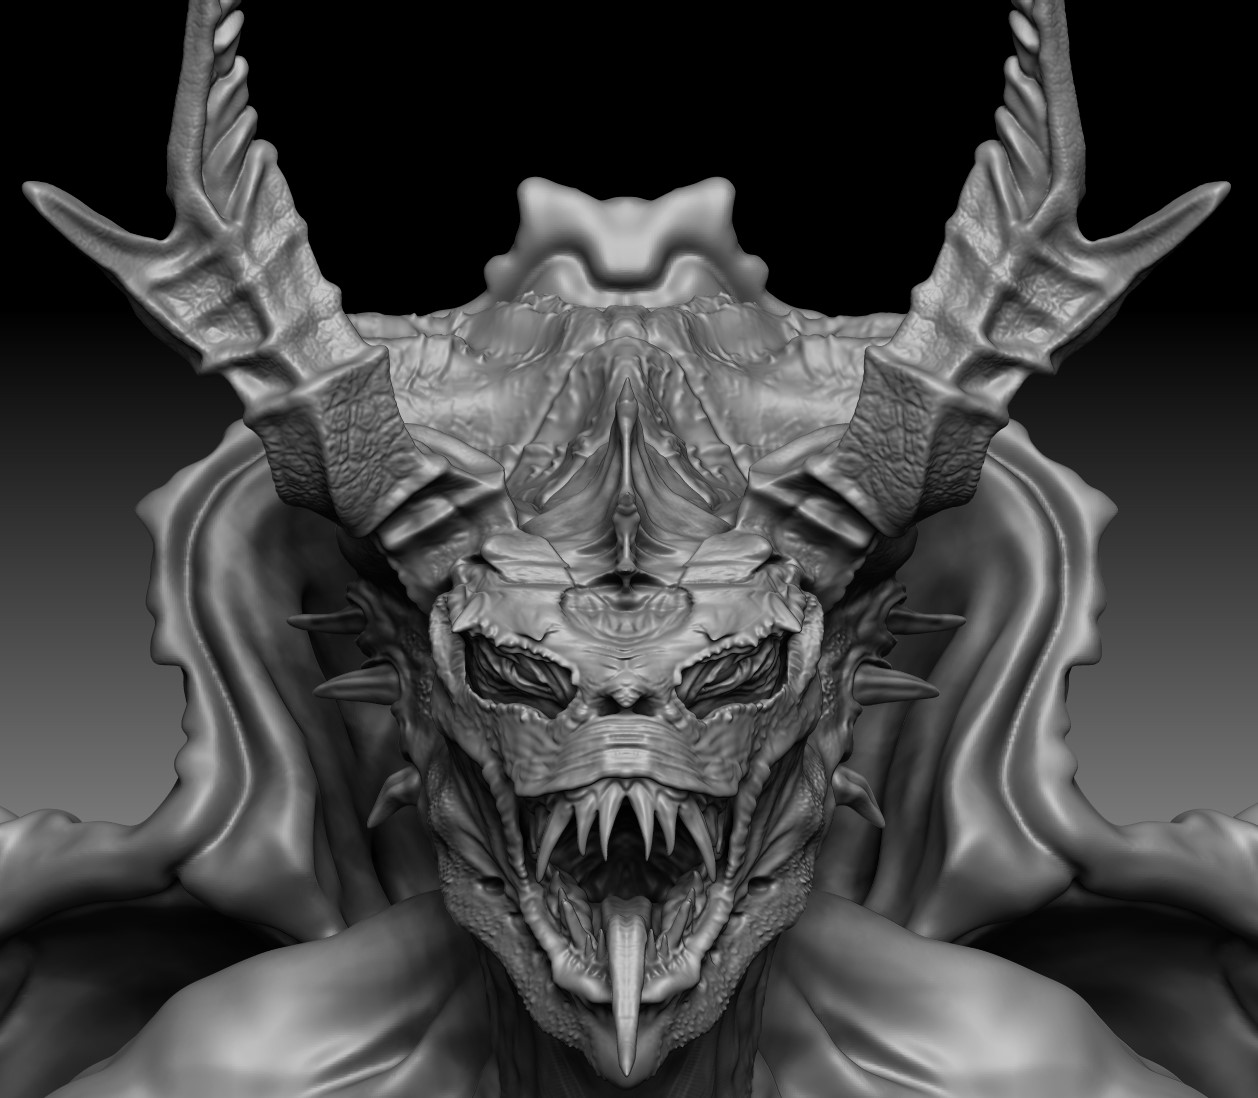
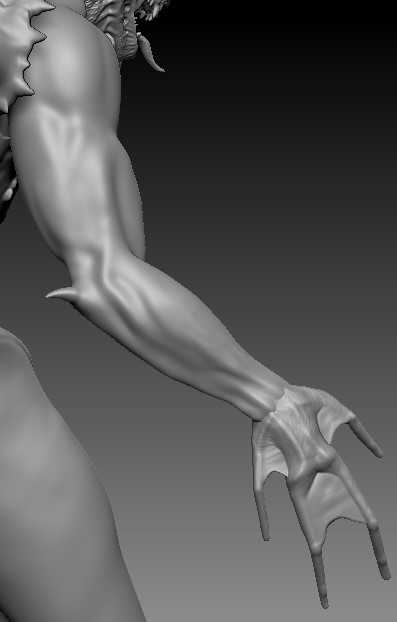
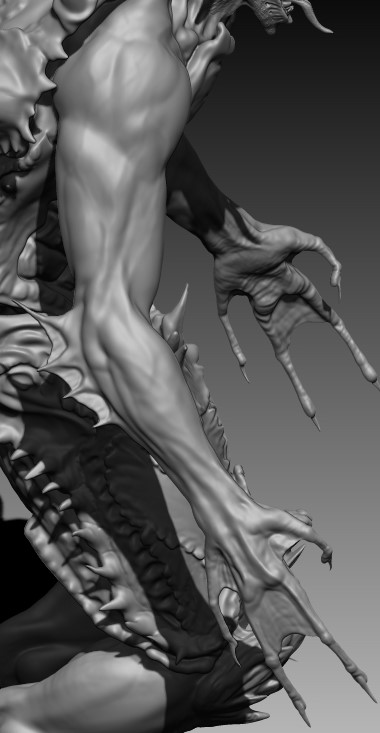
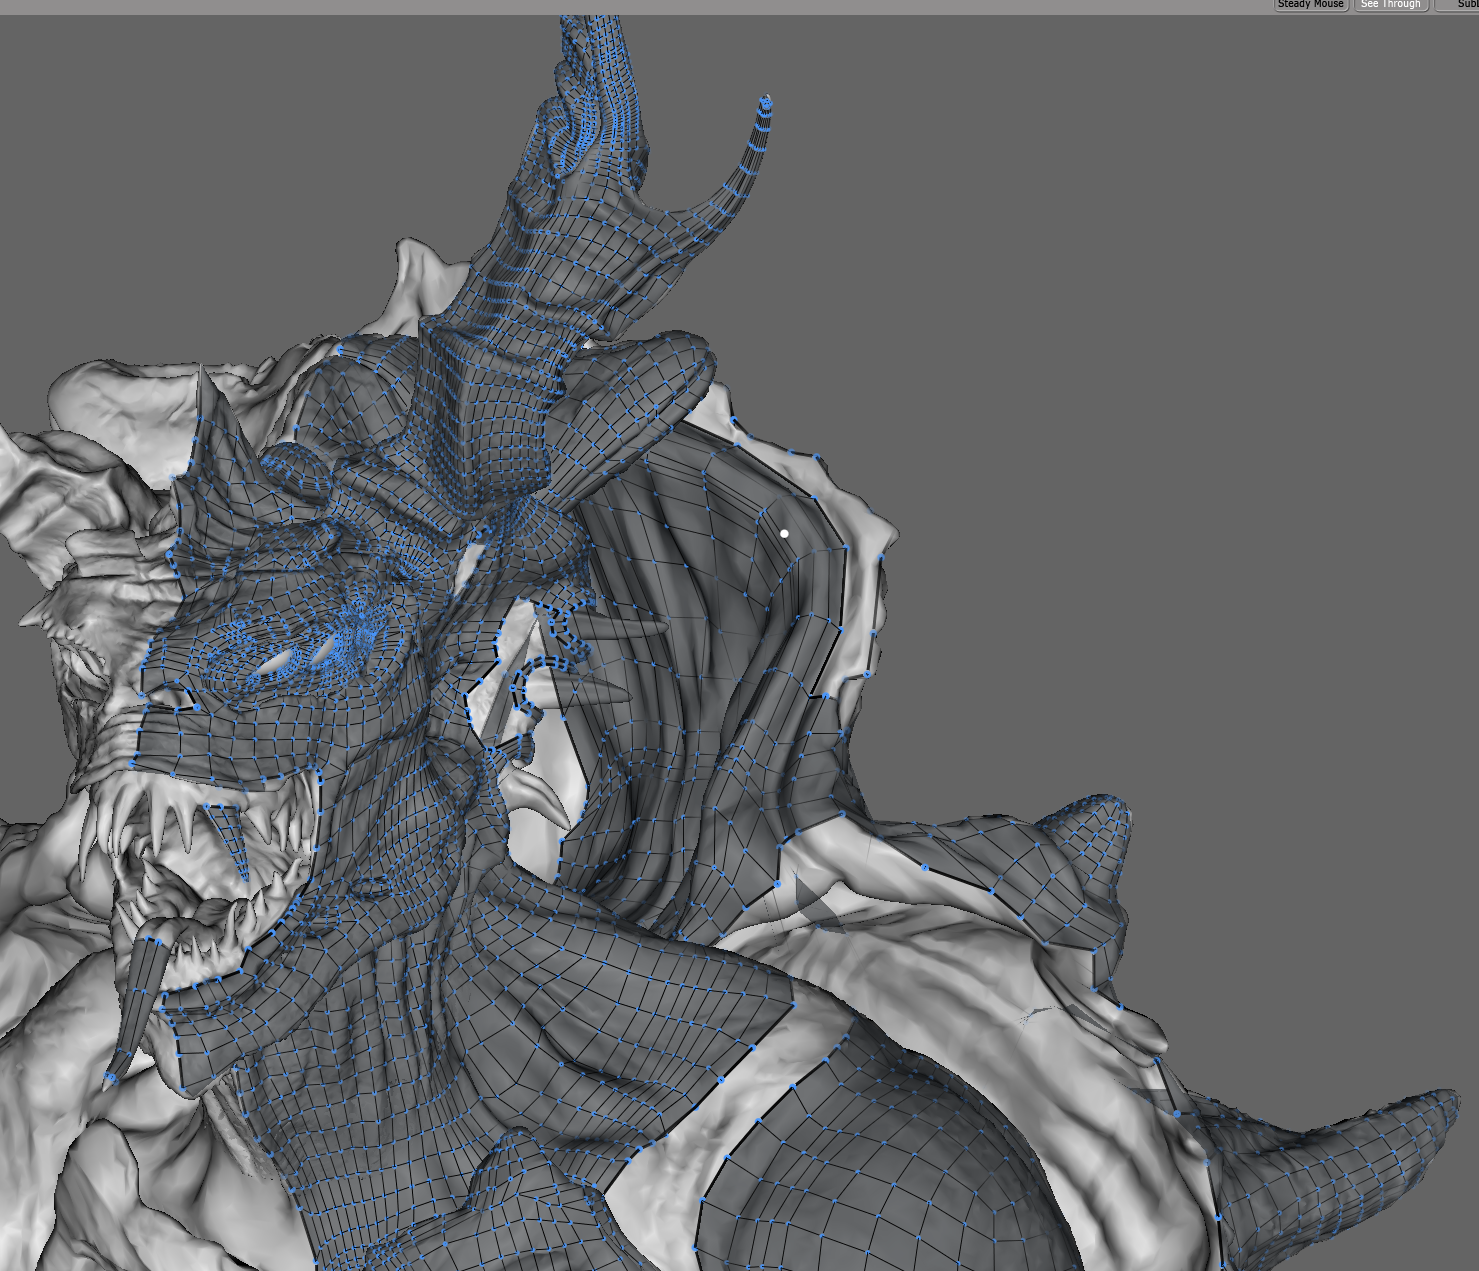
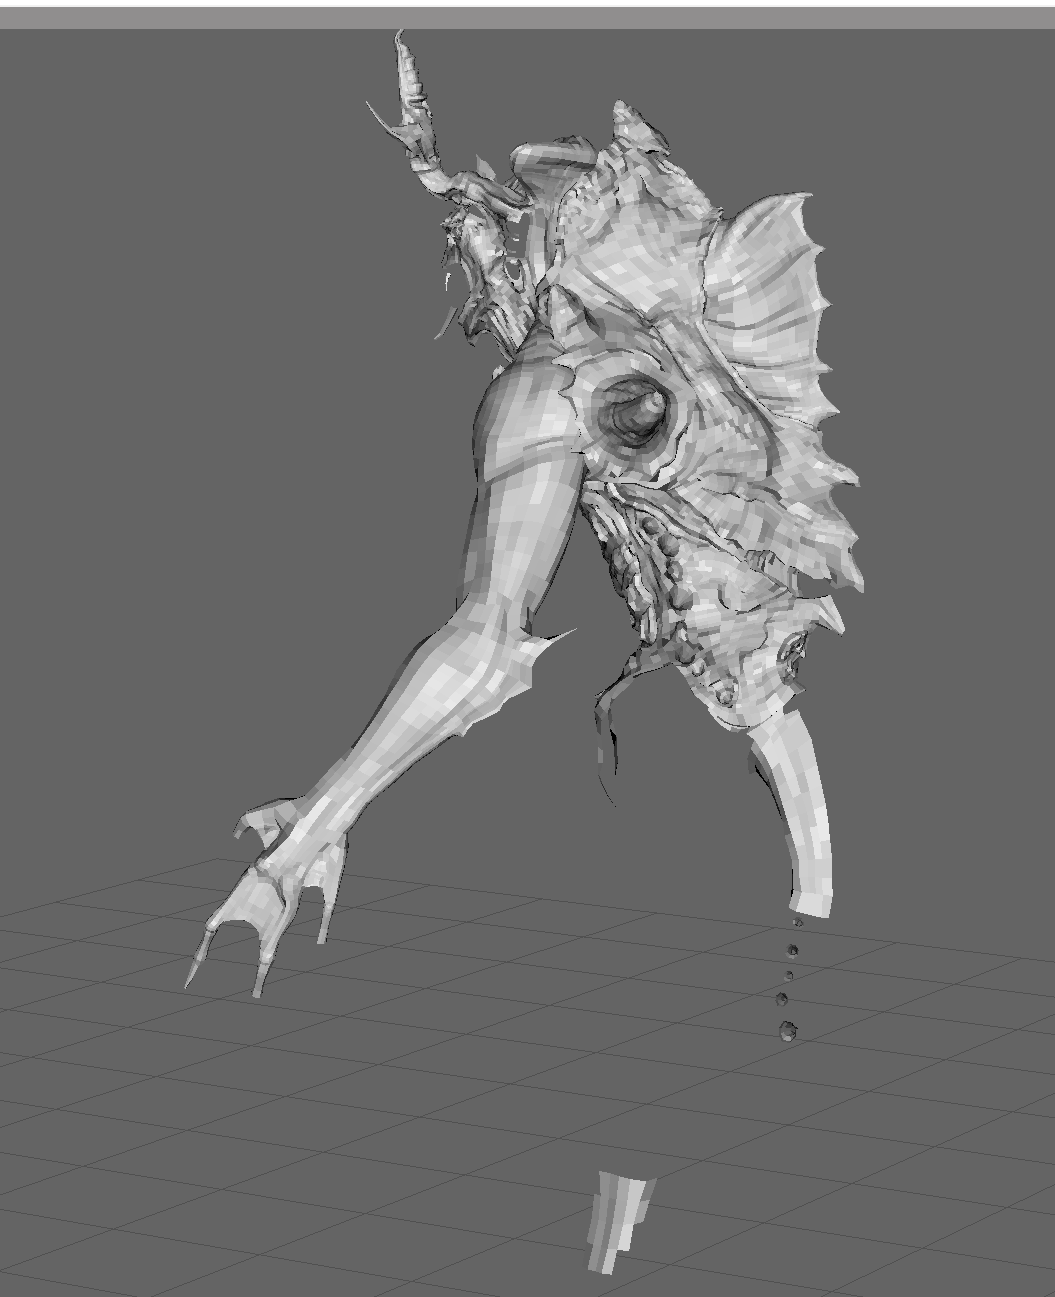
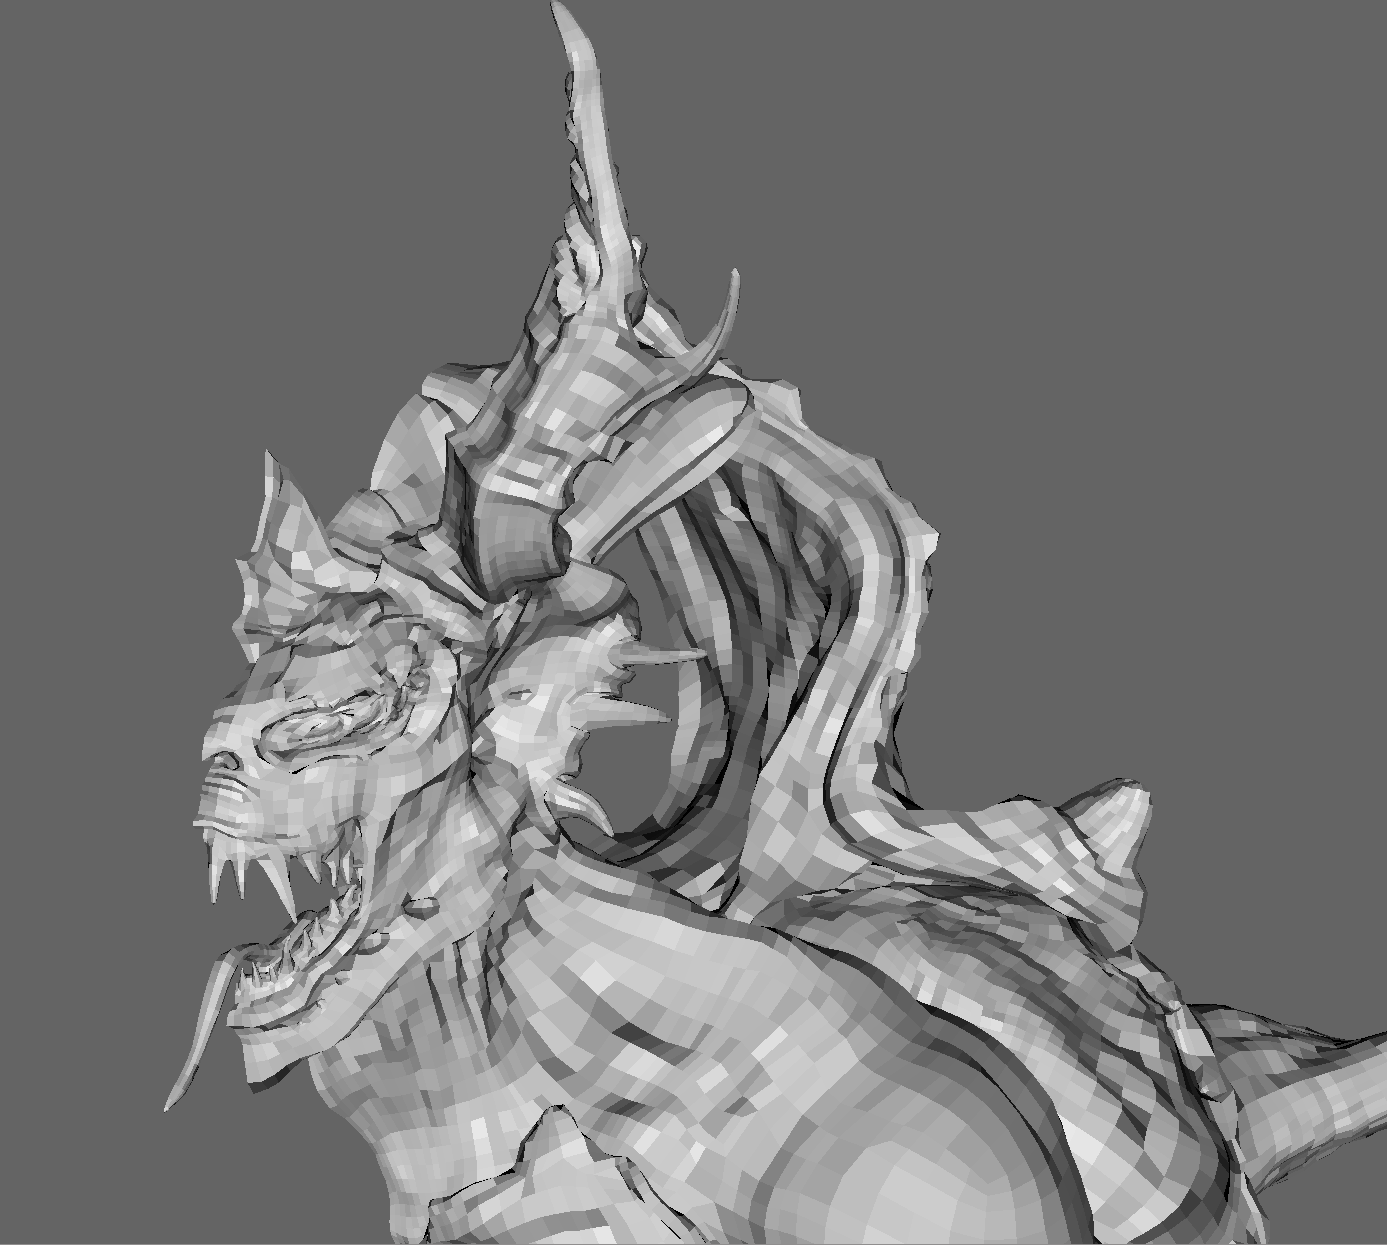
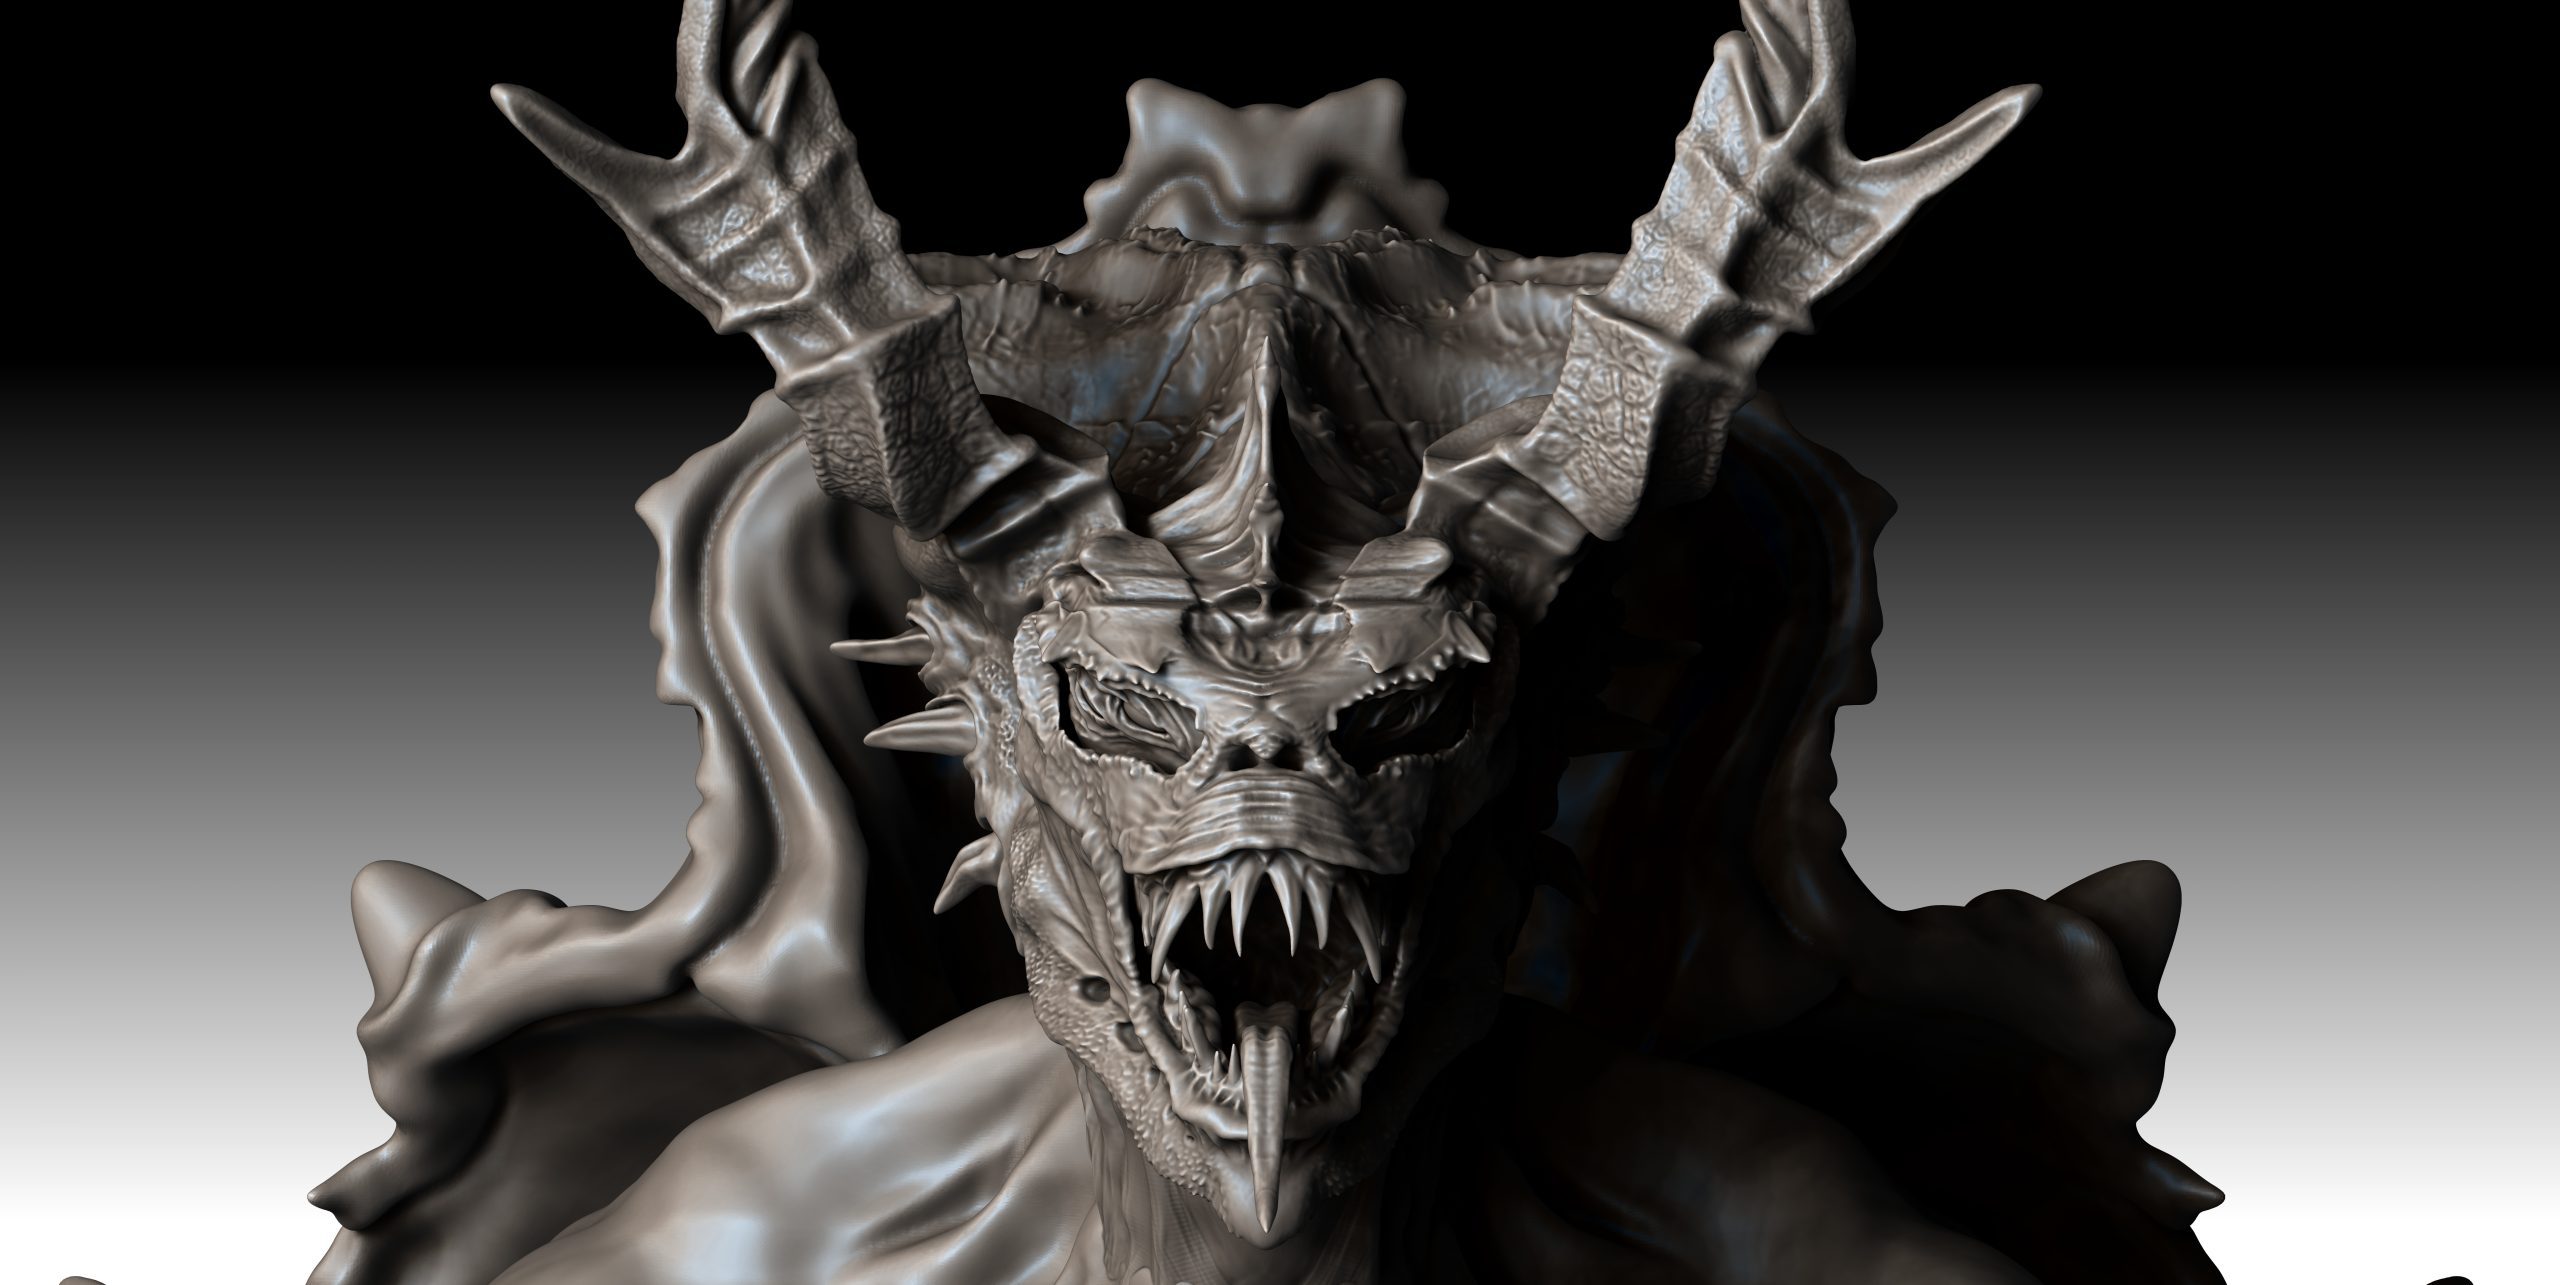
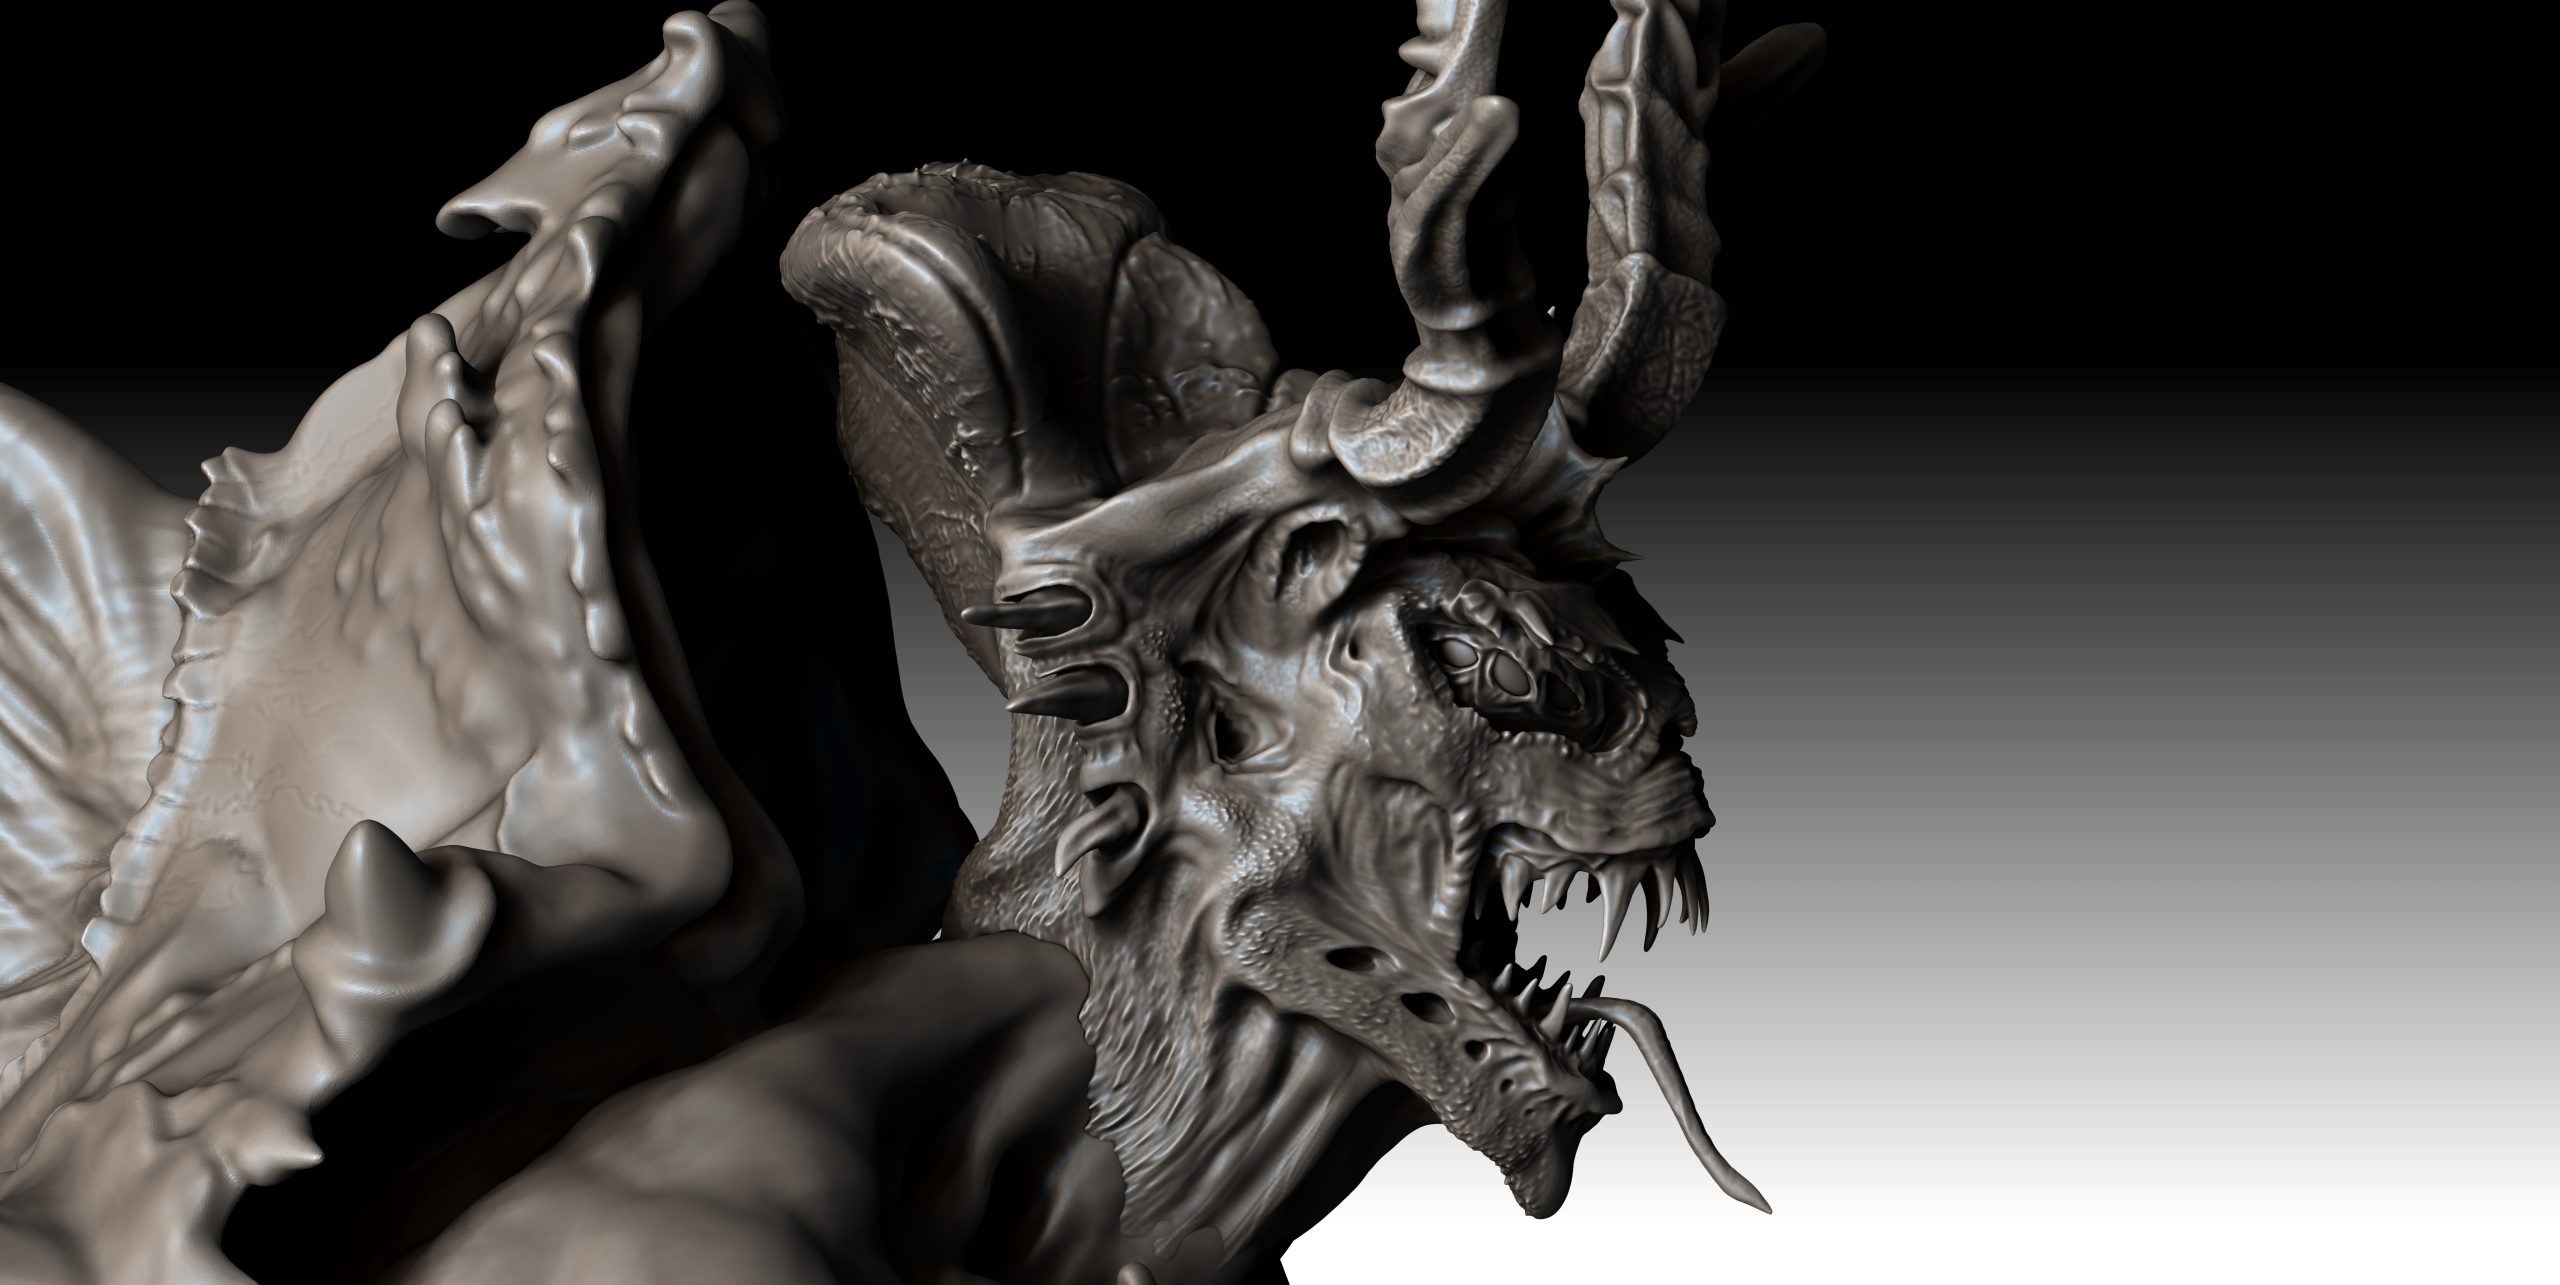
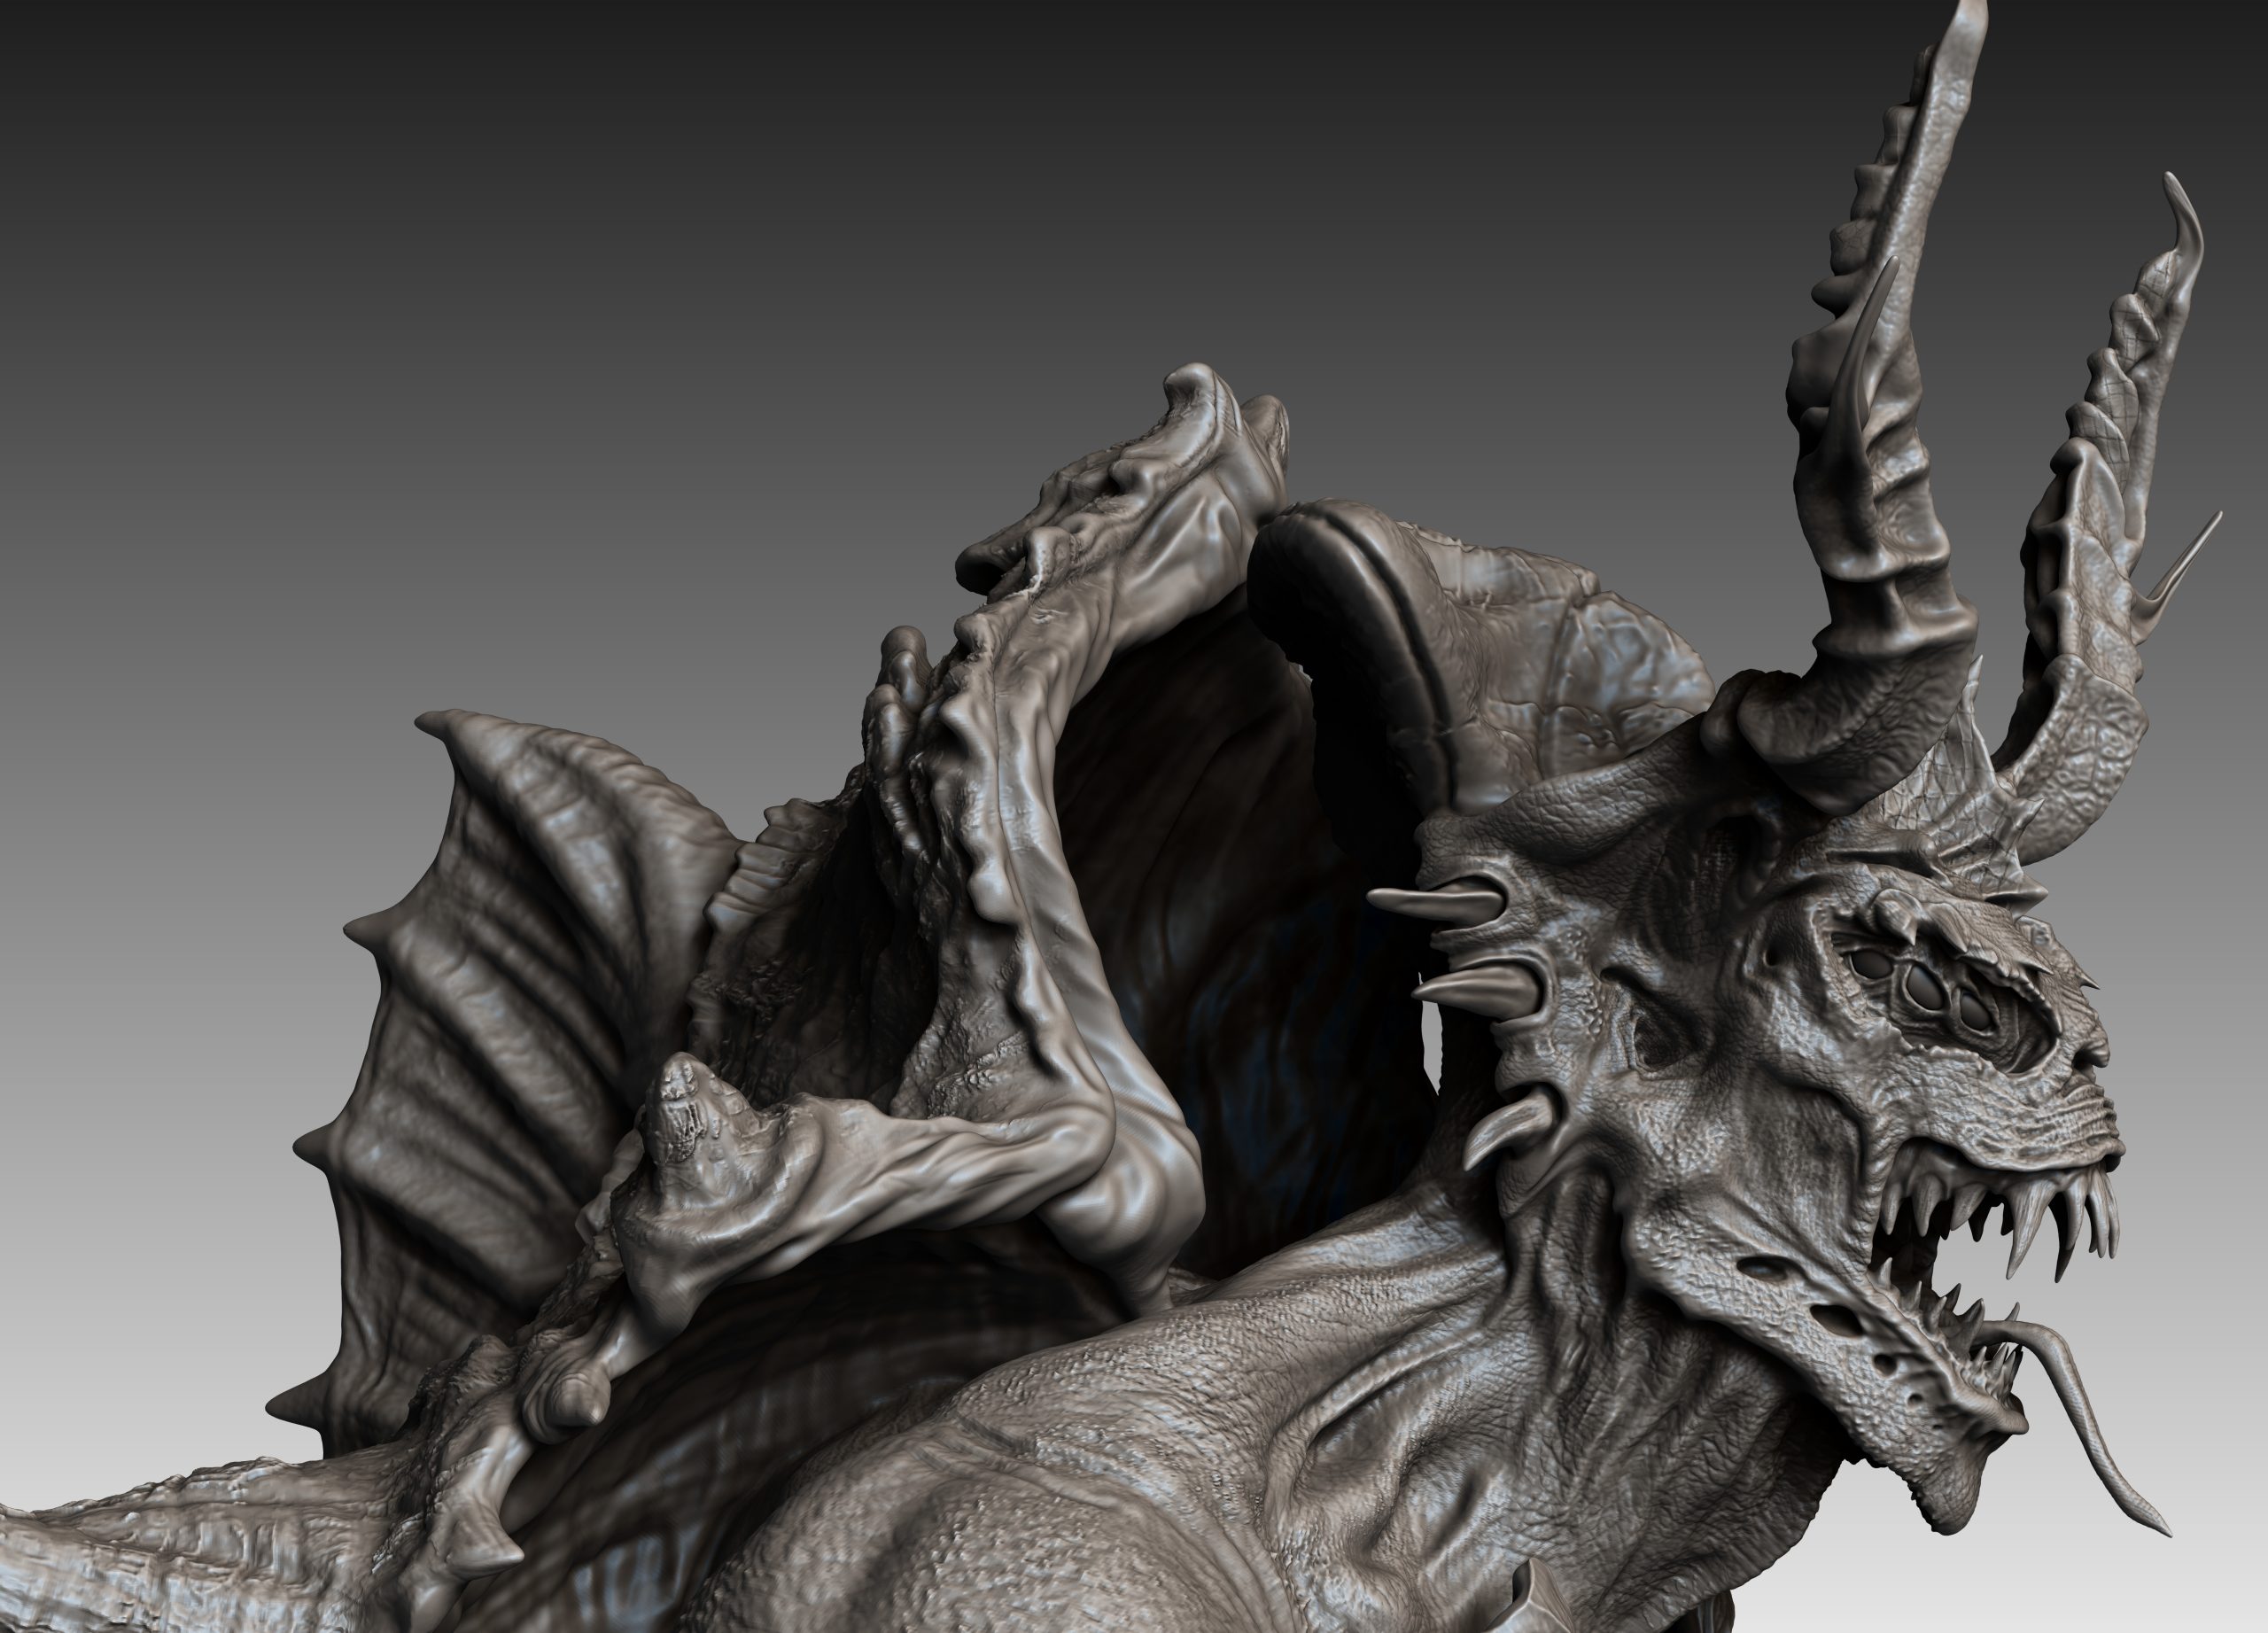
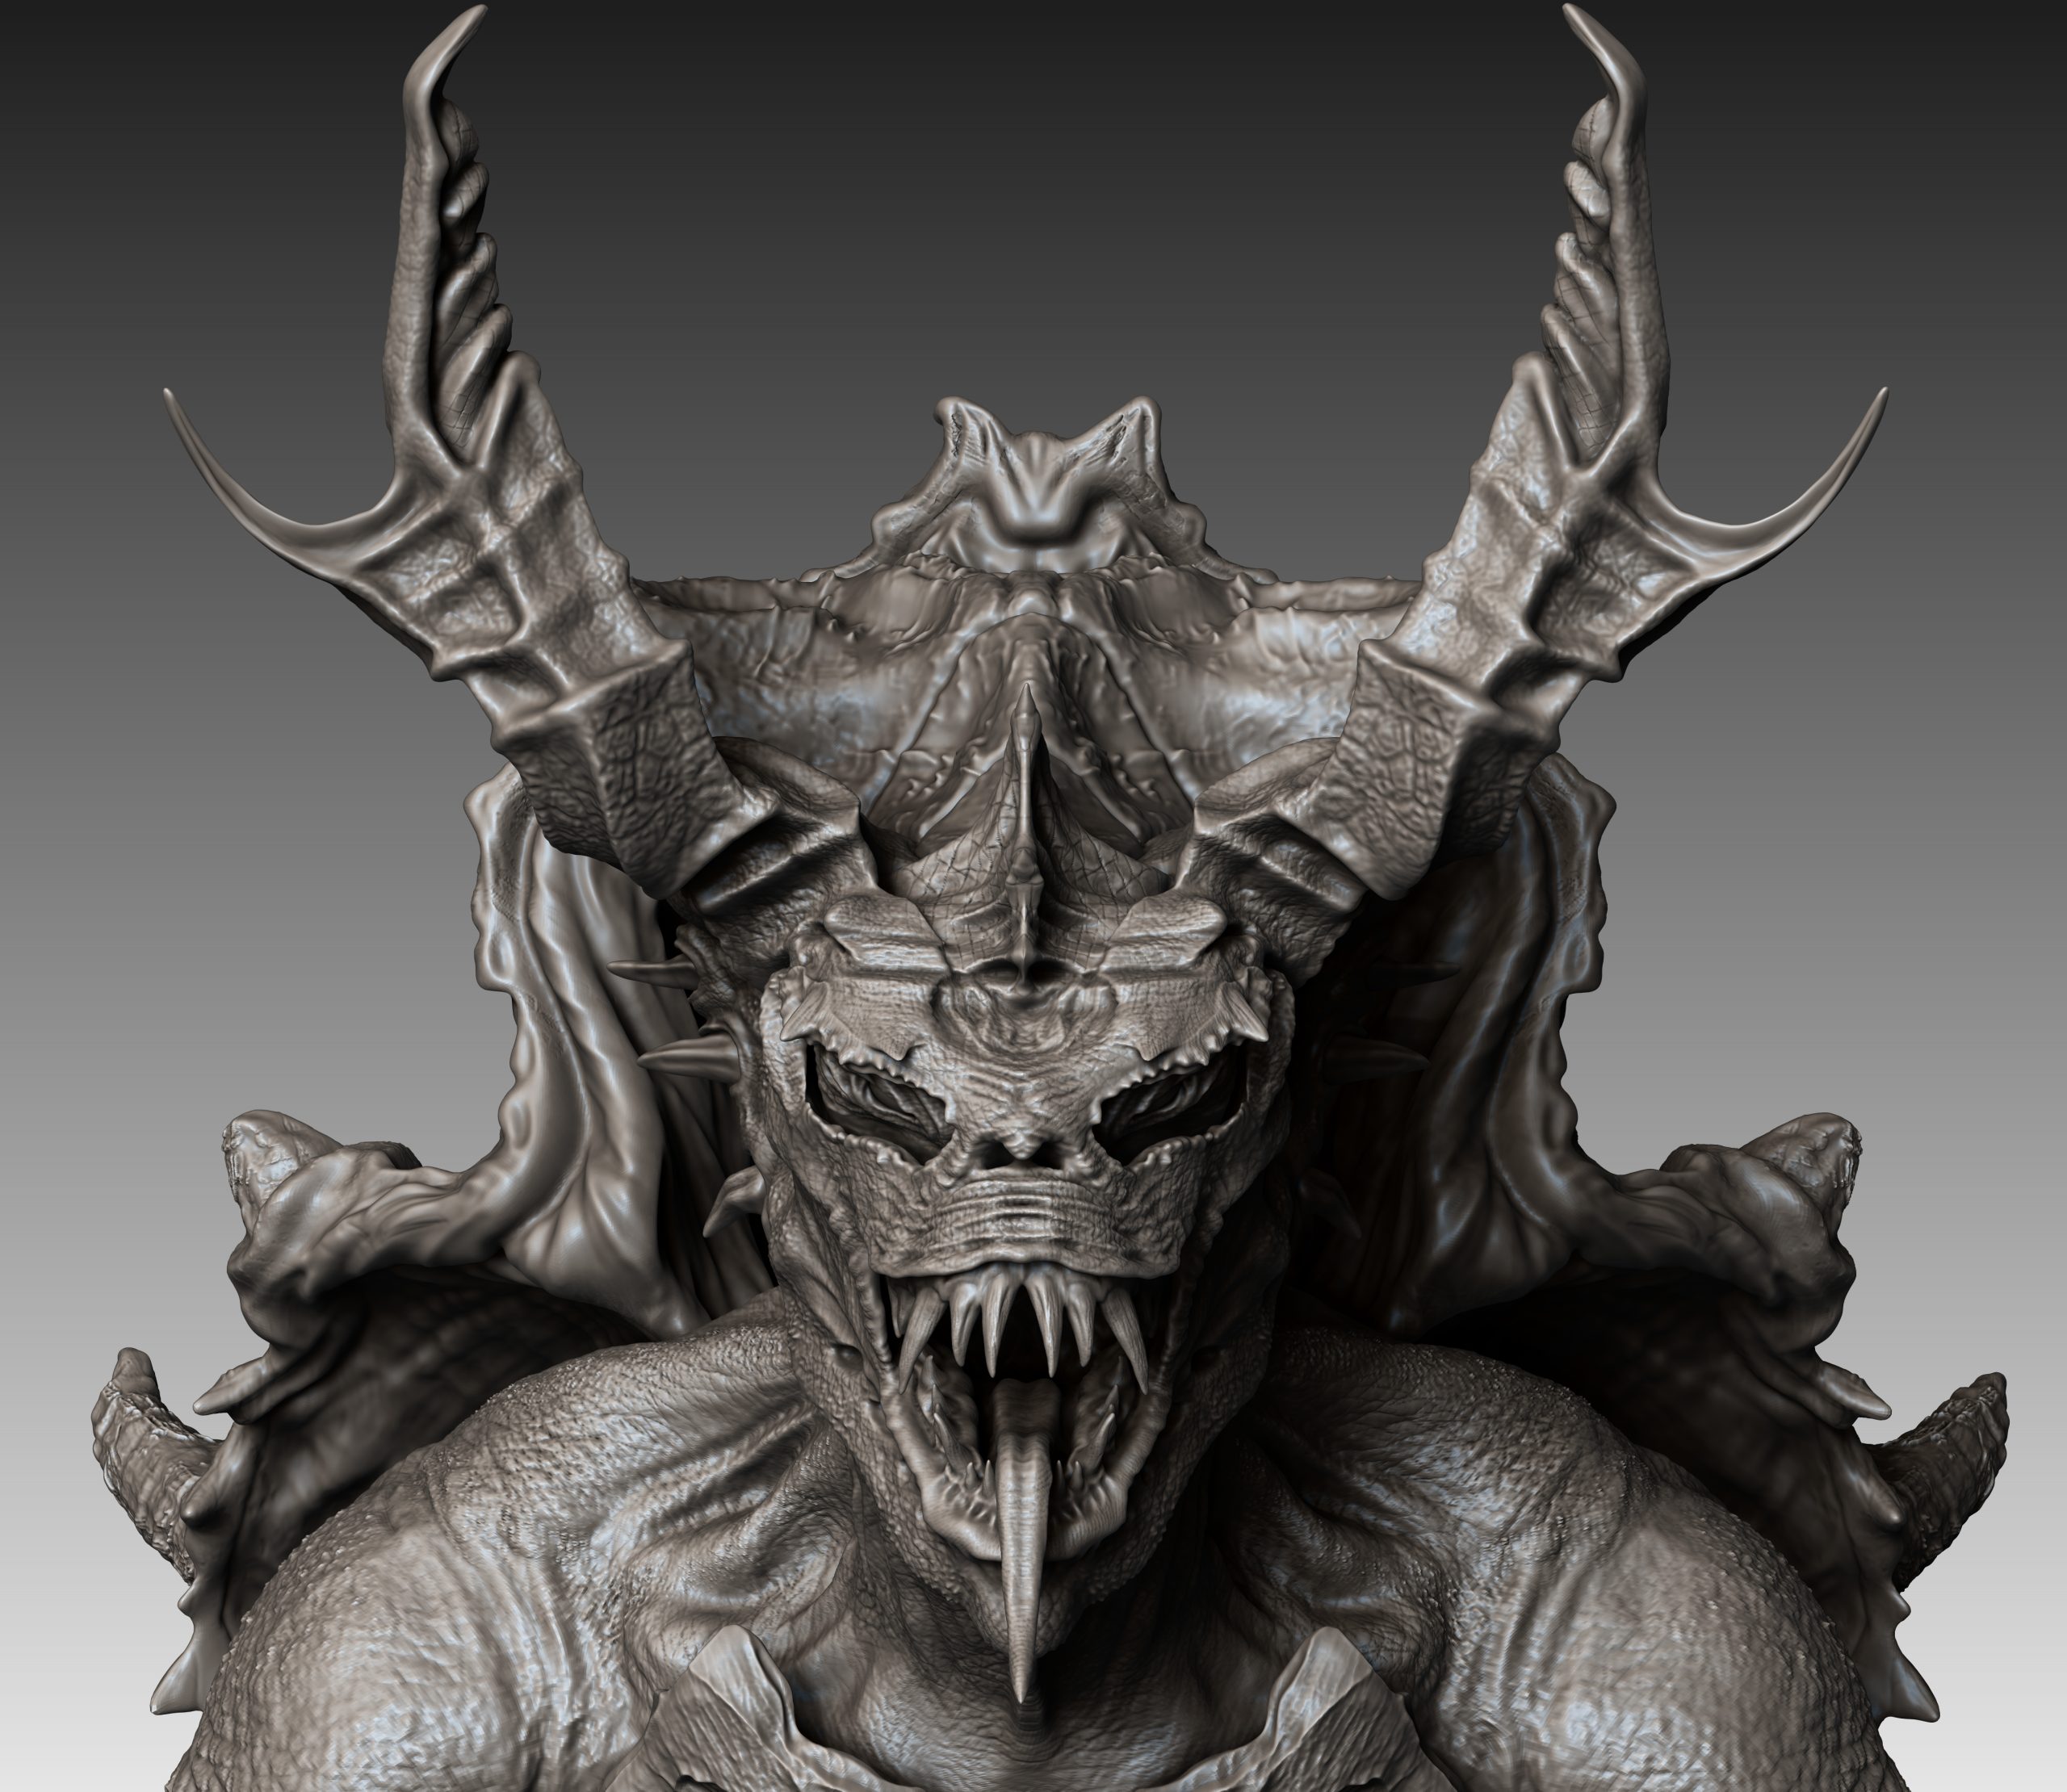
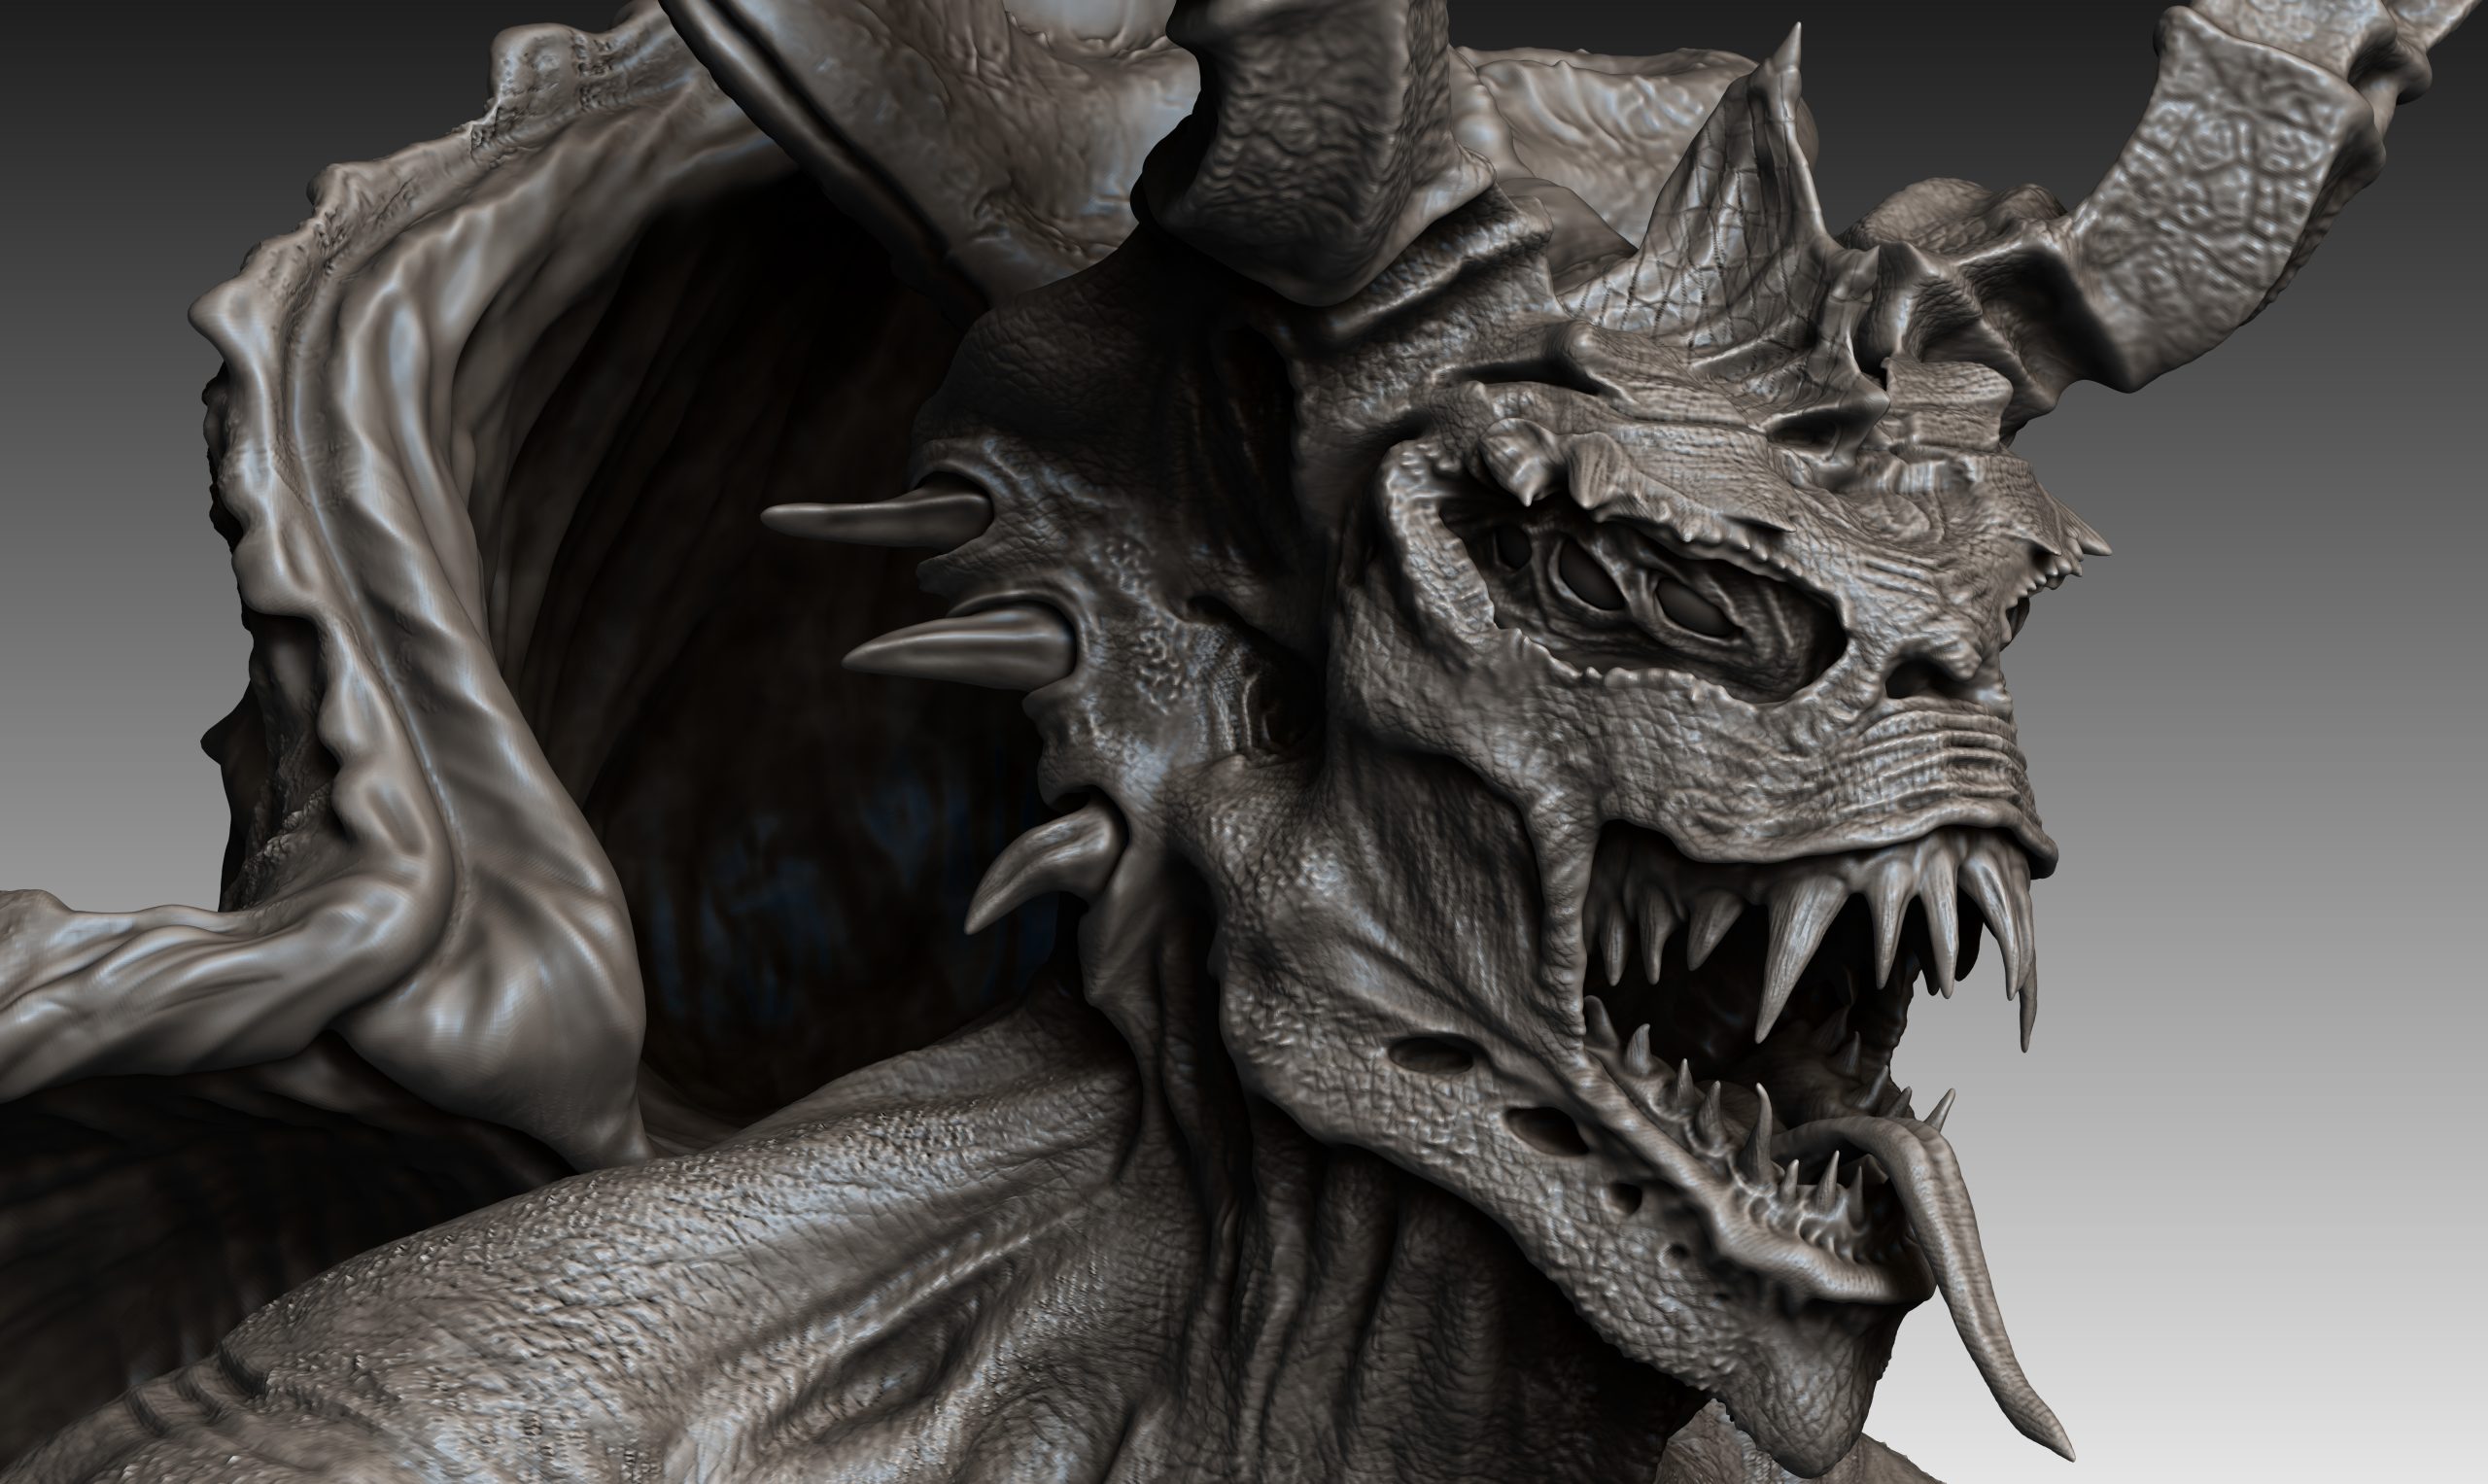
It can be seen in the images above the contionous and rugged development the head undertook. As I worked on this creature, I was continously thinking of different ways I could try to make the character more unfriendly and vicious. In the image marked phase 1, I believed that at this stage the head was too passive looking, not aggressive enough, so I began by adding more features to the character like in phase 2. I from there began the body, however part way through the sculpt of teh body, I changed my mind and decided it now looked too alien, I wanted something more bestial. I began by adding a mouth, large teeth and a long tongue, this seemed intantly to add more ‘threat’ to the head, however I was still unsatified and so I began adding spikes and horns to the frill, as well as more eyes and a plated appendage to the front, which can all be seen in phase 3.
Phase 4, would demonstrate the addage of ‘less is more’. Later i had looked at the head and decided it was too busy, that there was too much going on and the sculpt had lost some of its features to other features. I removed some of the horns and simplified the frill to match the now sculpted shell, adding an armoured frill to side of the head and refining the ear holes. I refined the teeth and removed the head plate and changed it into a sail. All these changes set to fit the original design and inspiration of a Florida snapping turtle, I believe the changes made it look more amphibious and the imagery easier to read overall.
By the image in phase 5, I had done much of the sculpt, but still felt more could be perfected in the head. The teeth where refined further, becoming sharper and more forward facing. I re-designed the muzzle and lips to look more retractable, removed the upper set of eyes and instead, added 3 eyes in a single row. This changed the shape of the head, making it less tall and more humanoid looking, up close however, the multiple eyes add a very un-nerving tone to the profile of the browline. Overall at this point, more finishing details where added, such as the texture of skin, wrinkles and patterning.
Sculpting the torso, arms and legs
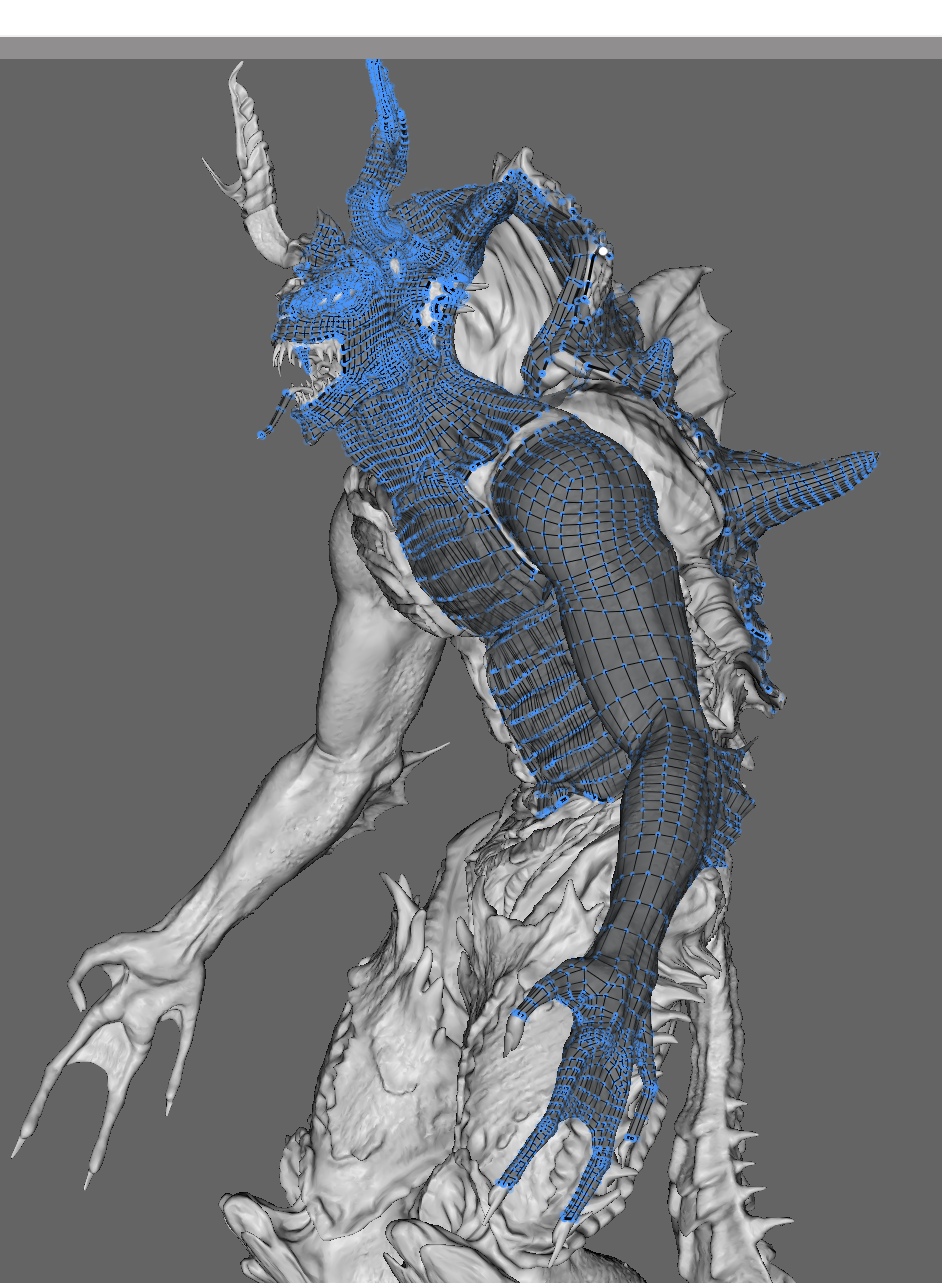
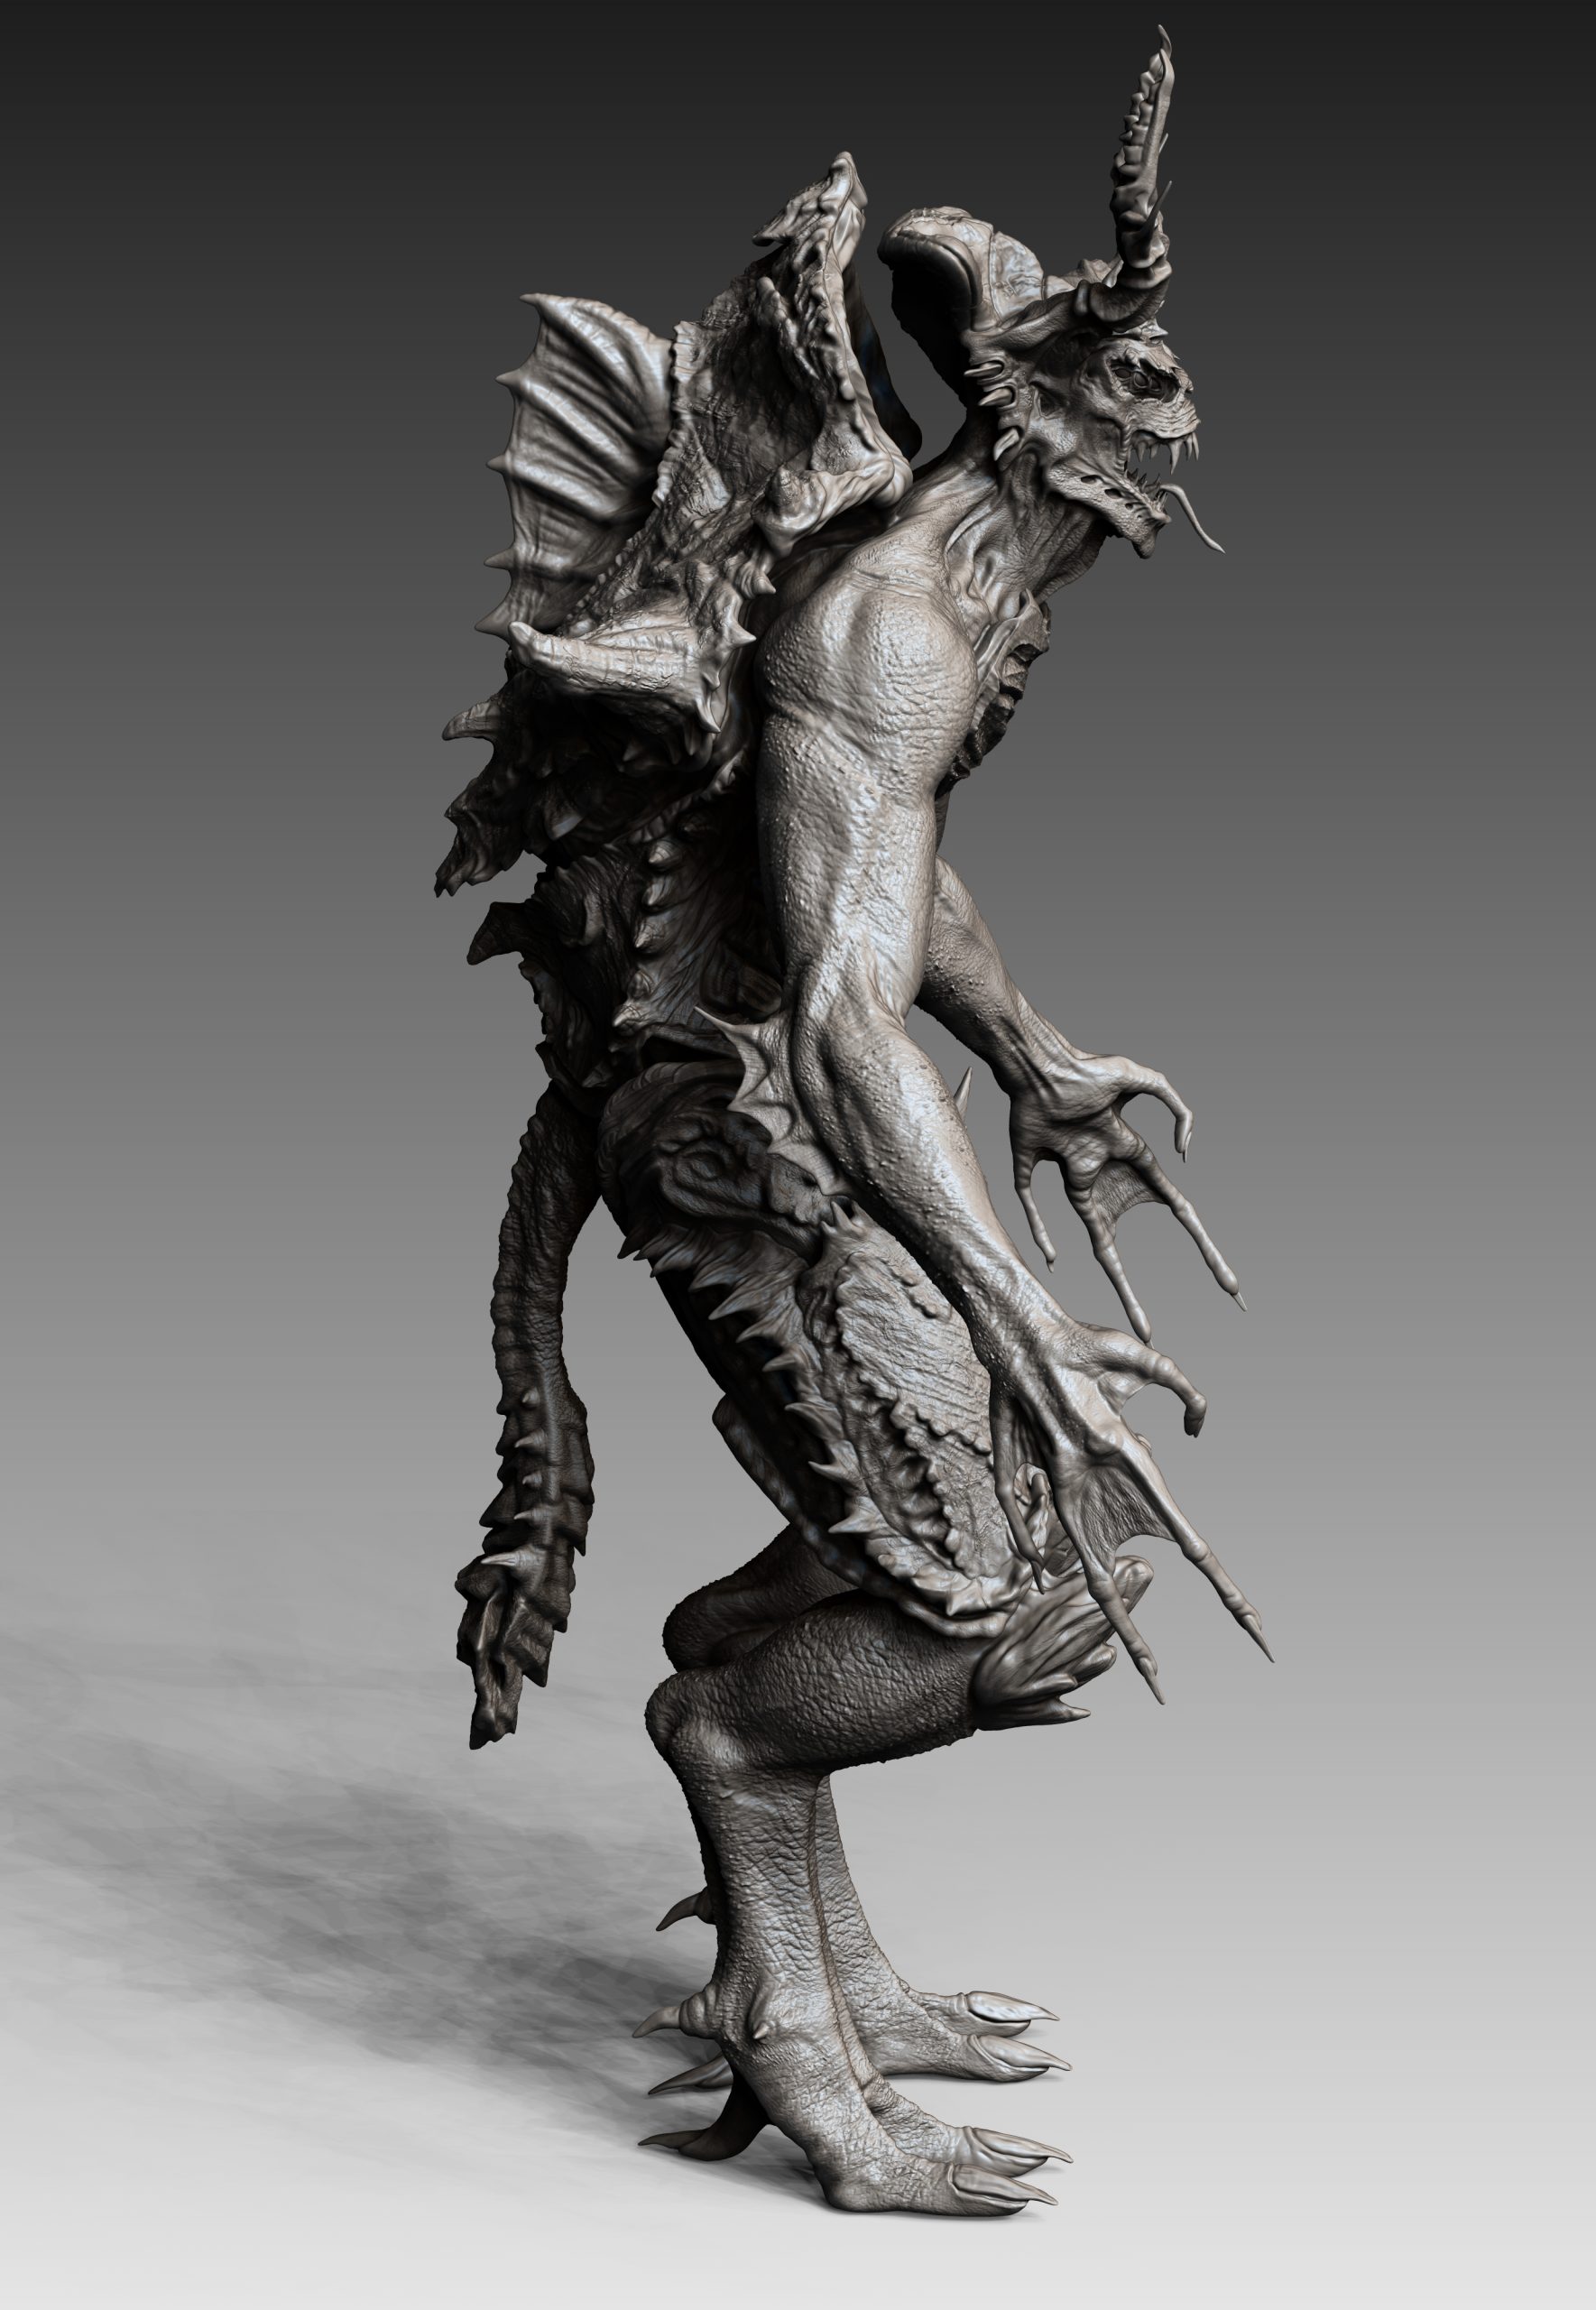
When it came to sculpting the torso, I began by pulling out the basic shape and sculpting it naturally. However after a while of sculpting and a bit of guidance from my friend, I removed these changes and decided to use Zspheres, as they made it easier to create the posture I was looking for, a hunched over position. This way with Zspheres I had complete control on the length, width and posture of the overall body. Even after the body was made with Zspheres, the move tool was necessary to pull some of the form into position – like width of the forearms – the shoulder positioning and the girth of the stomach and waistline.
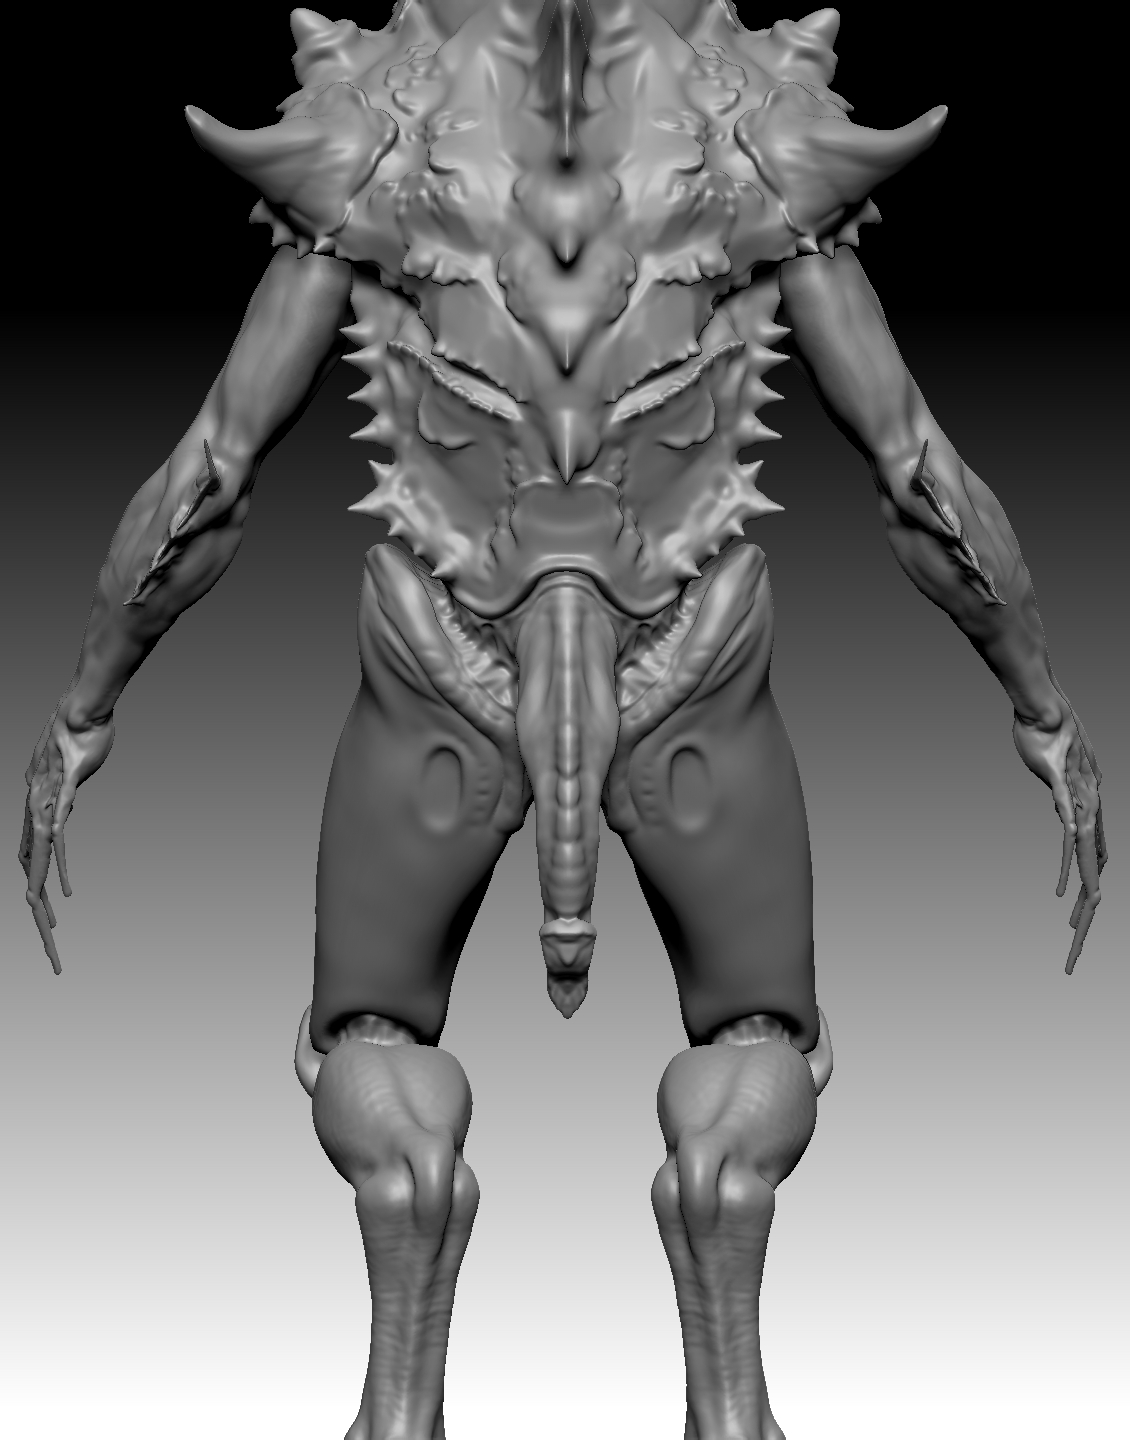
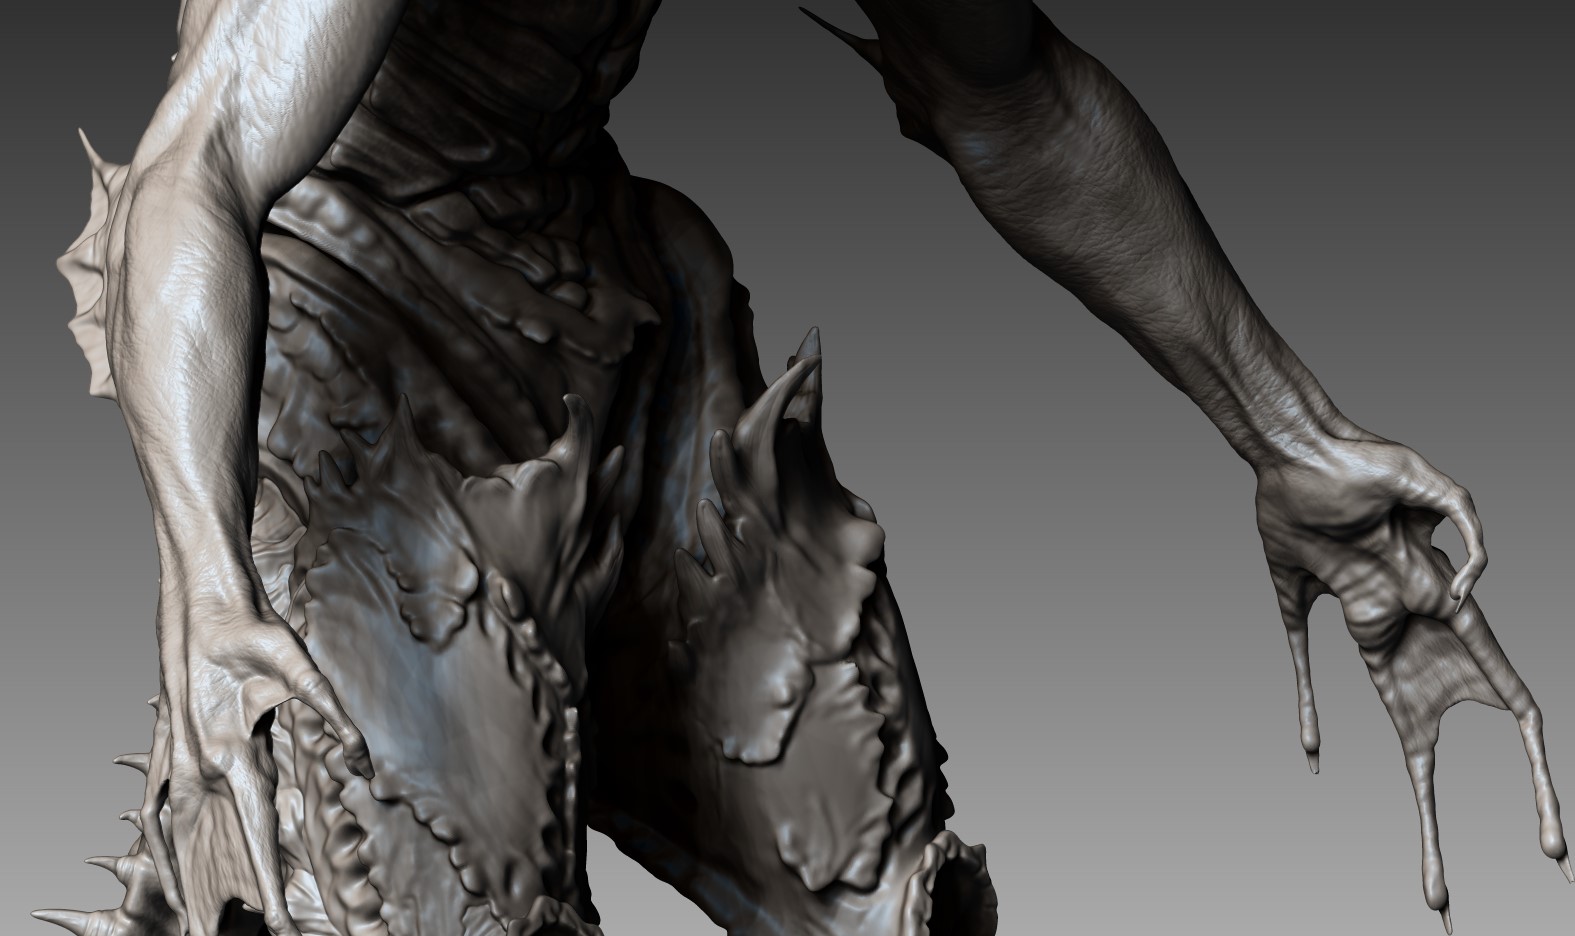
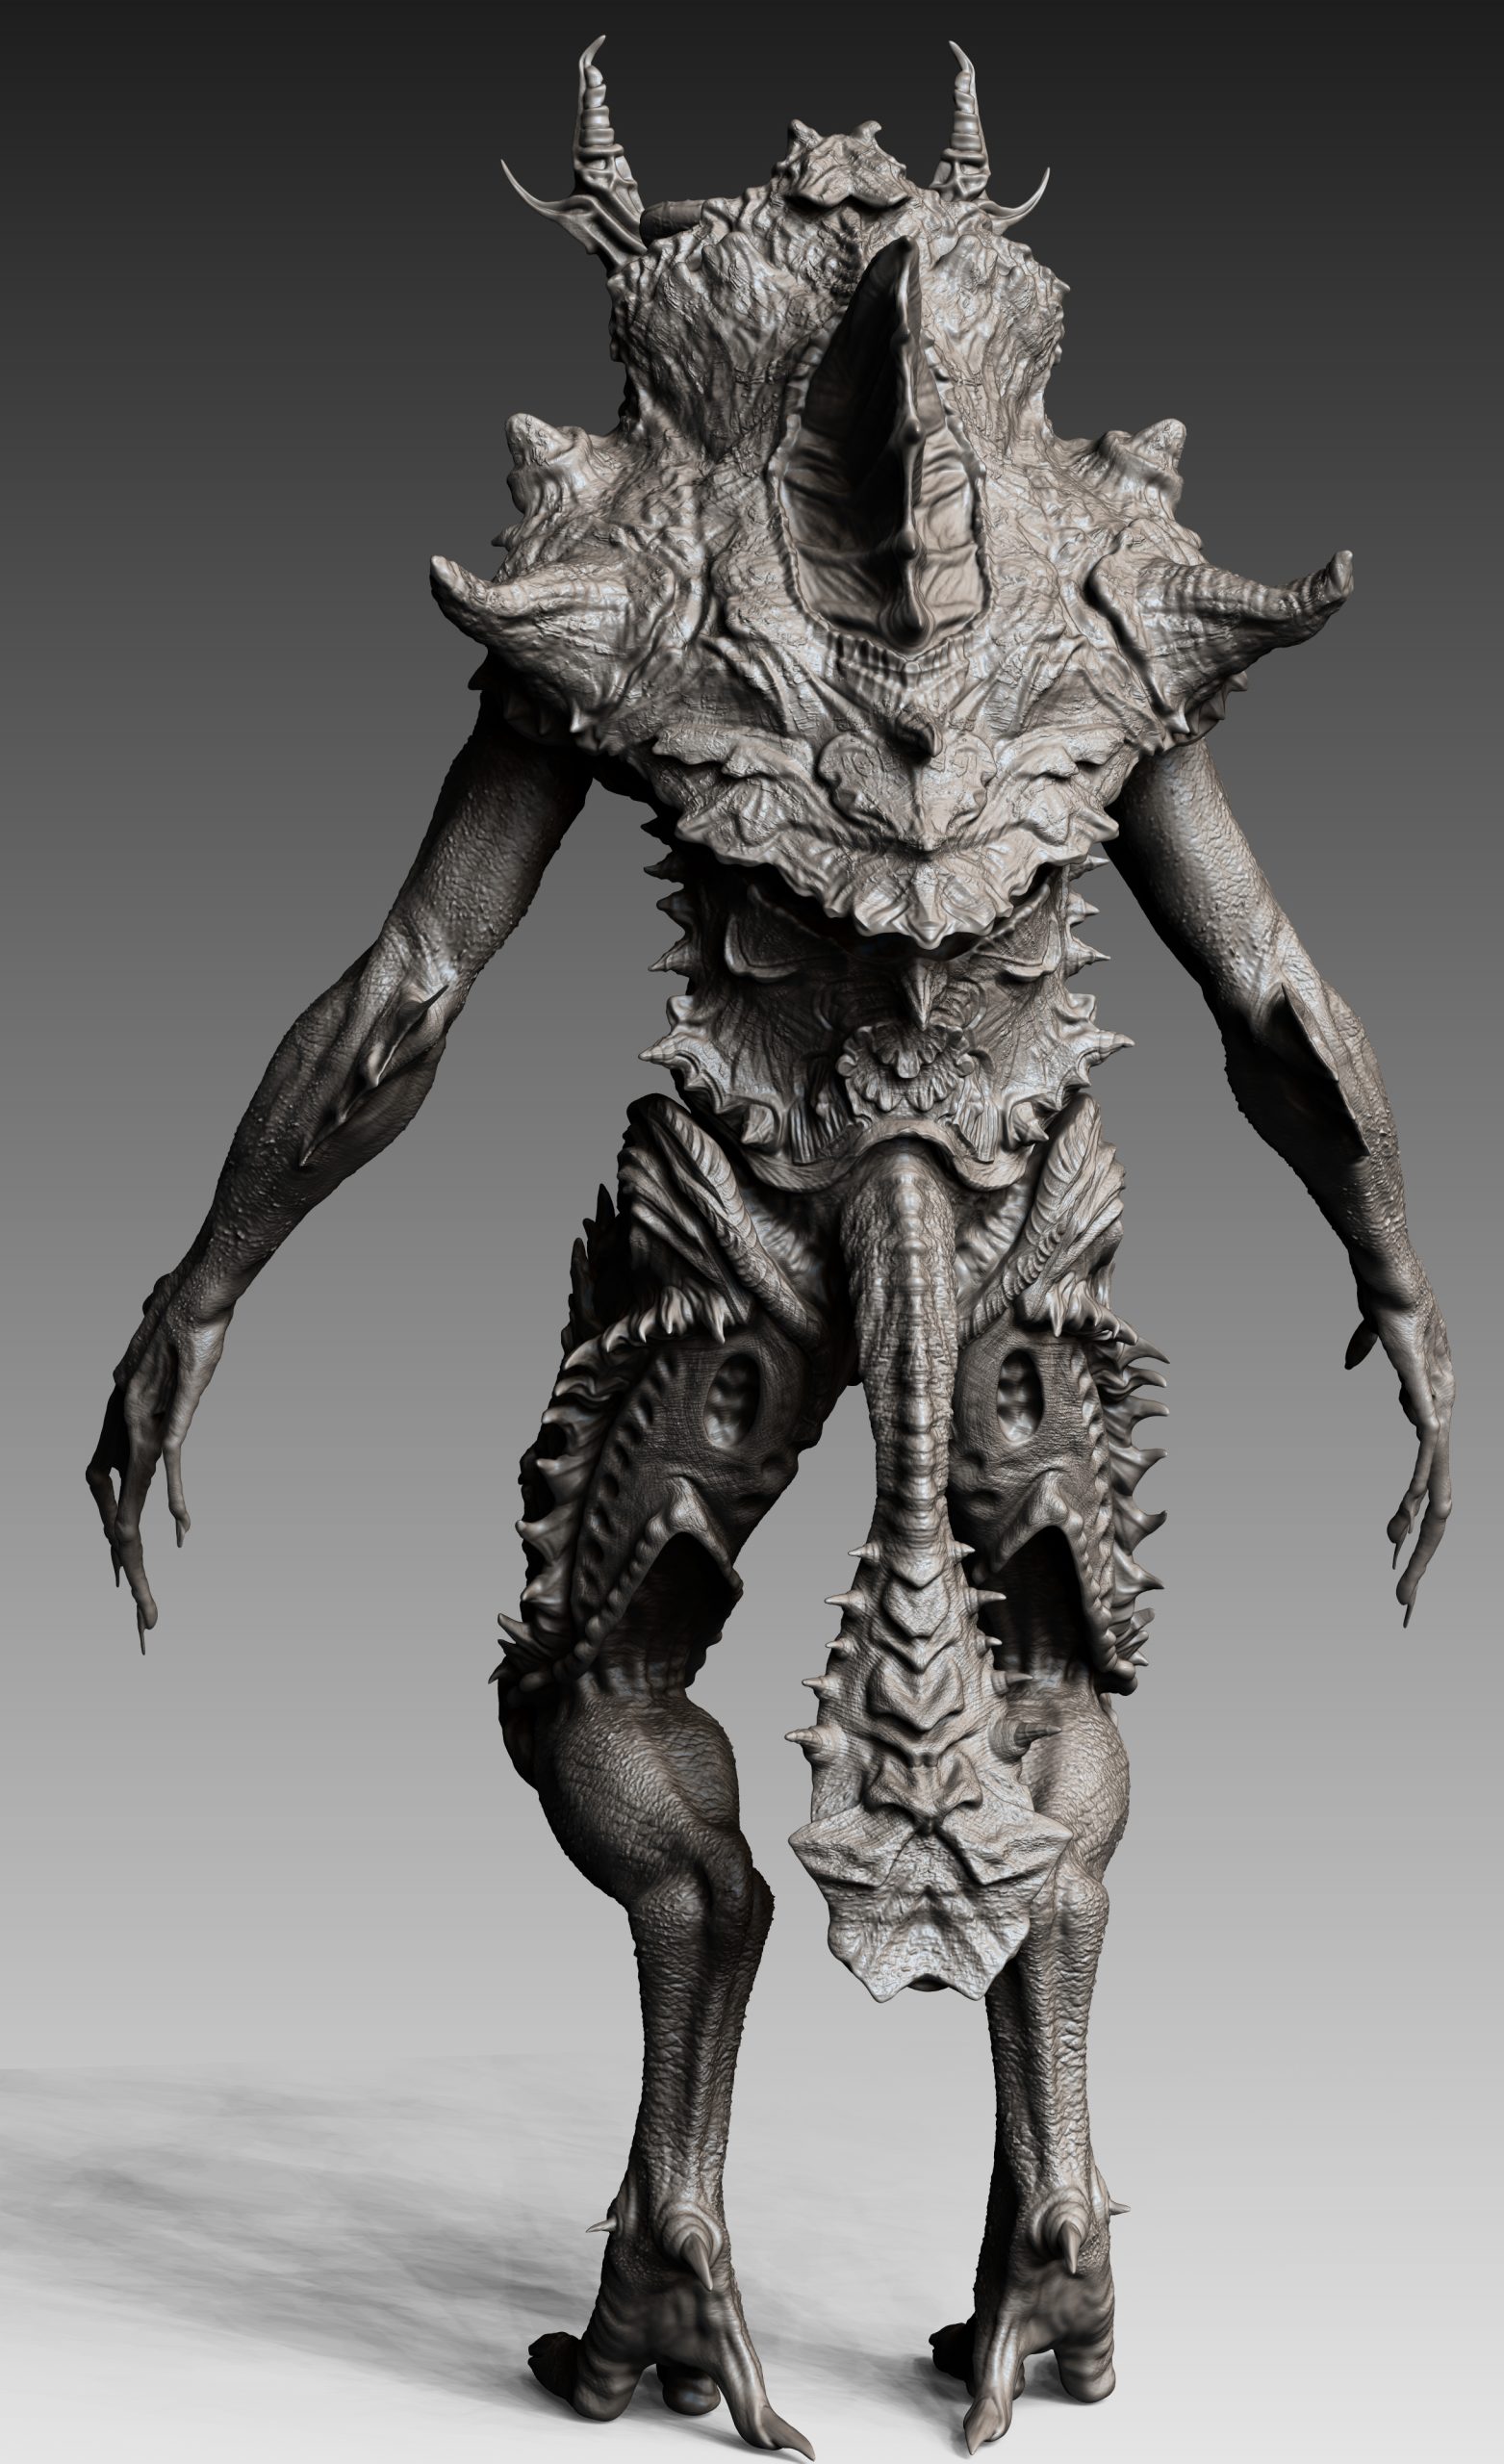
Next, I added the shell-like armor plating to the body area, thinking how the body would also articulate if this plating is a solid material, they had to be gaps for the creature to manipulate its body in various directions. I carved these out with a mix of dam standard, standard reverse and slash3.
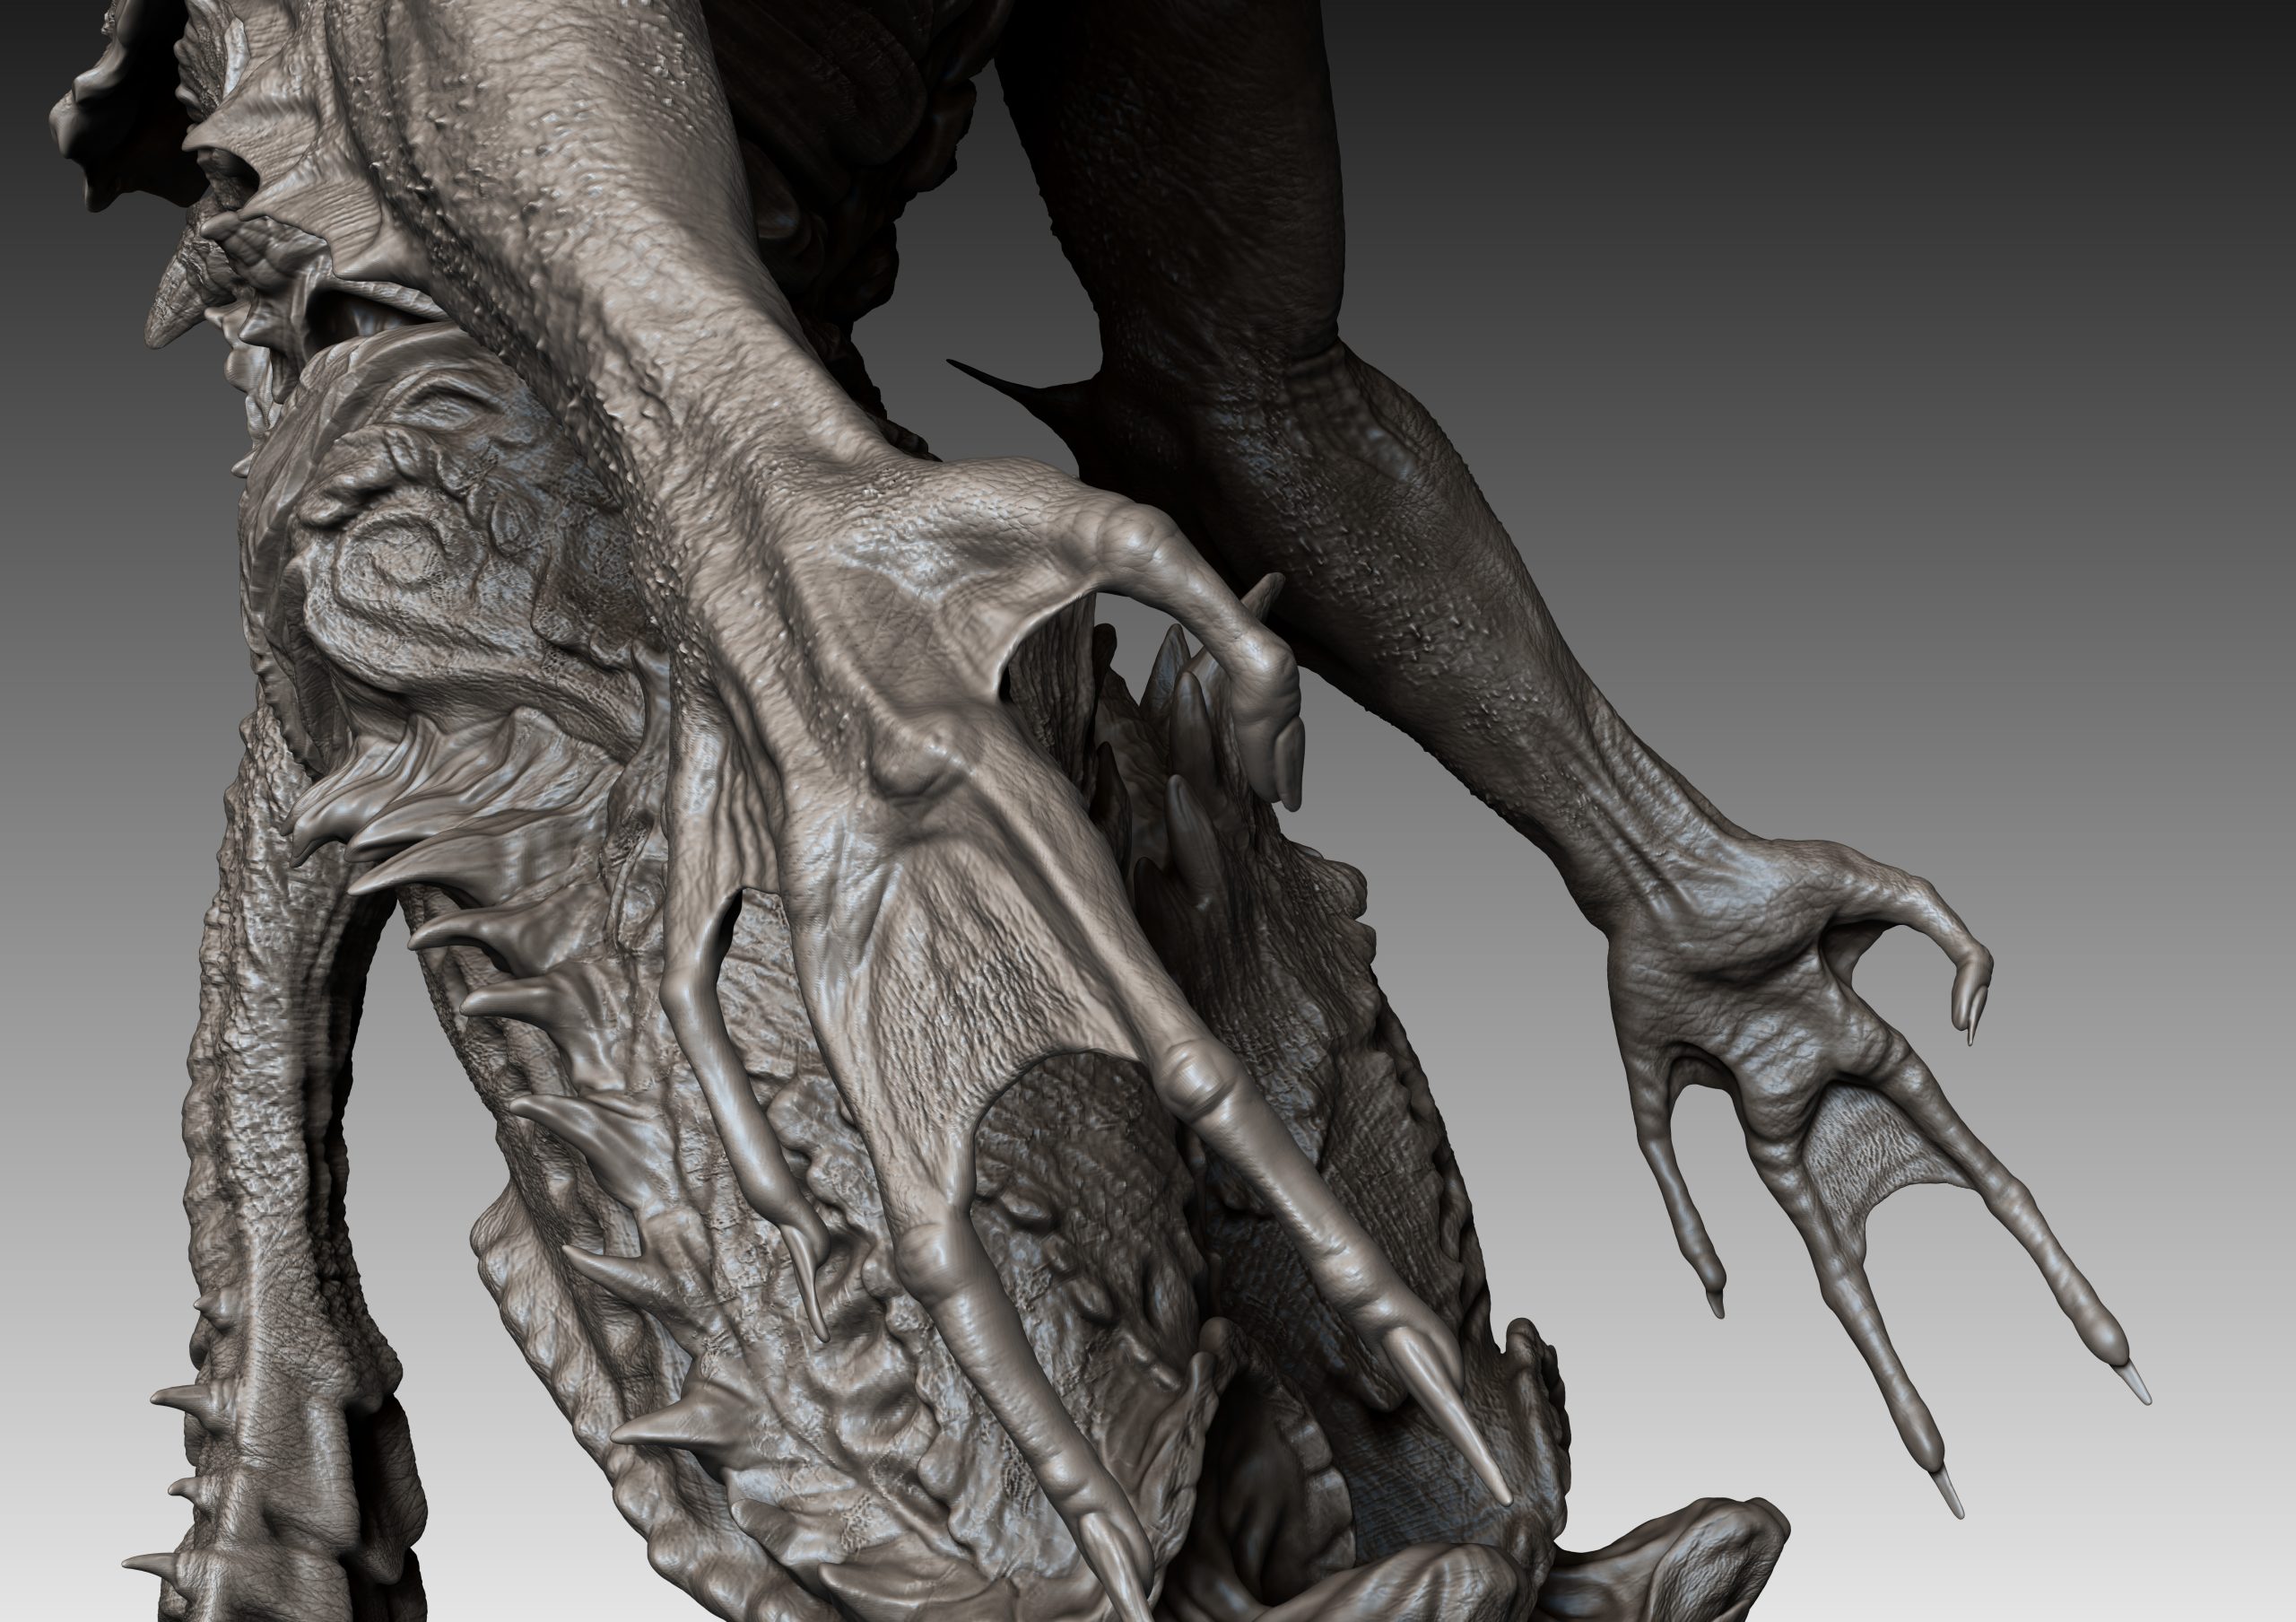
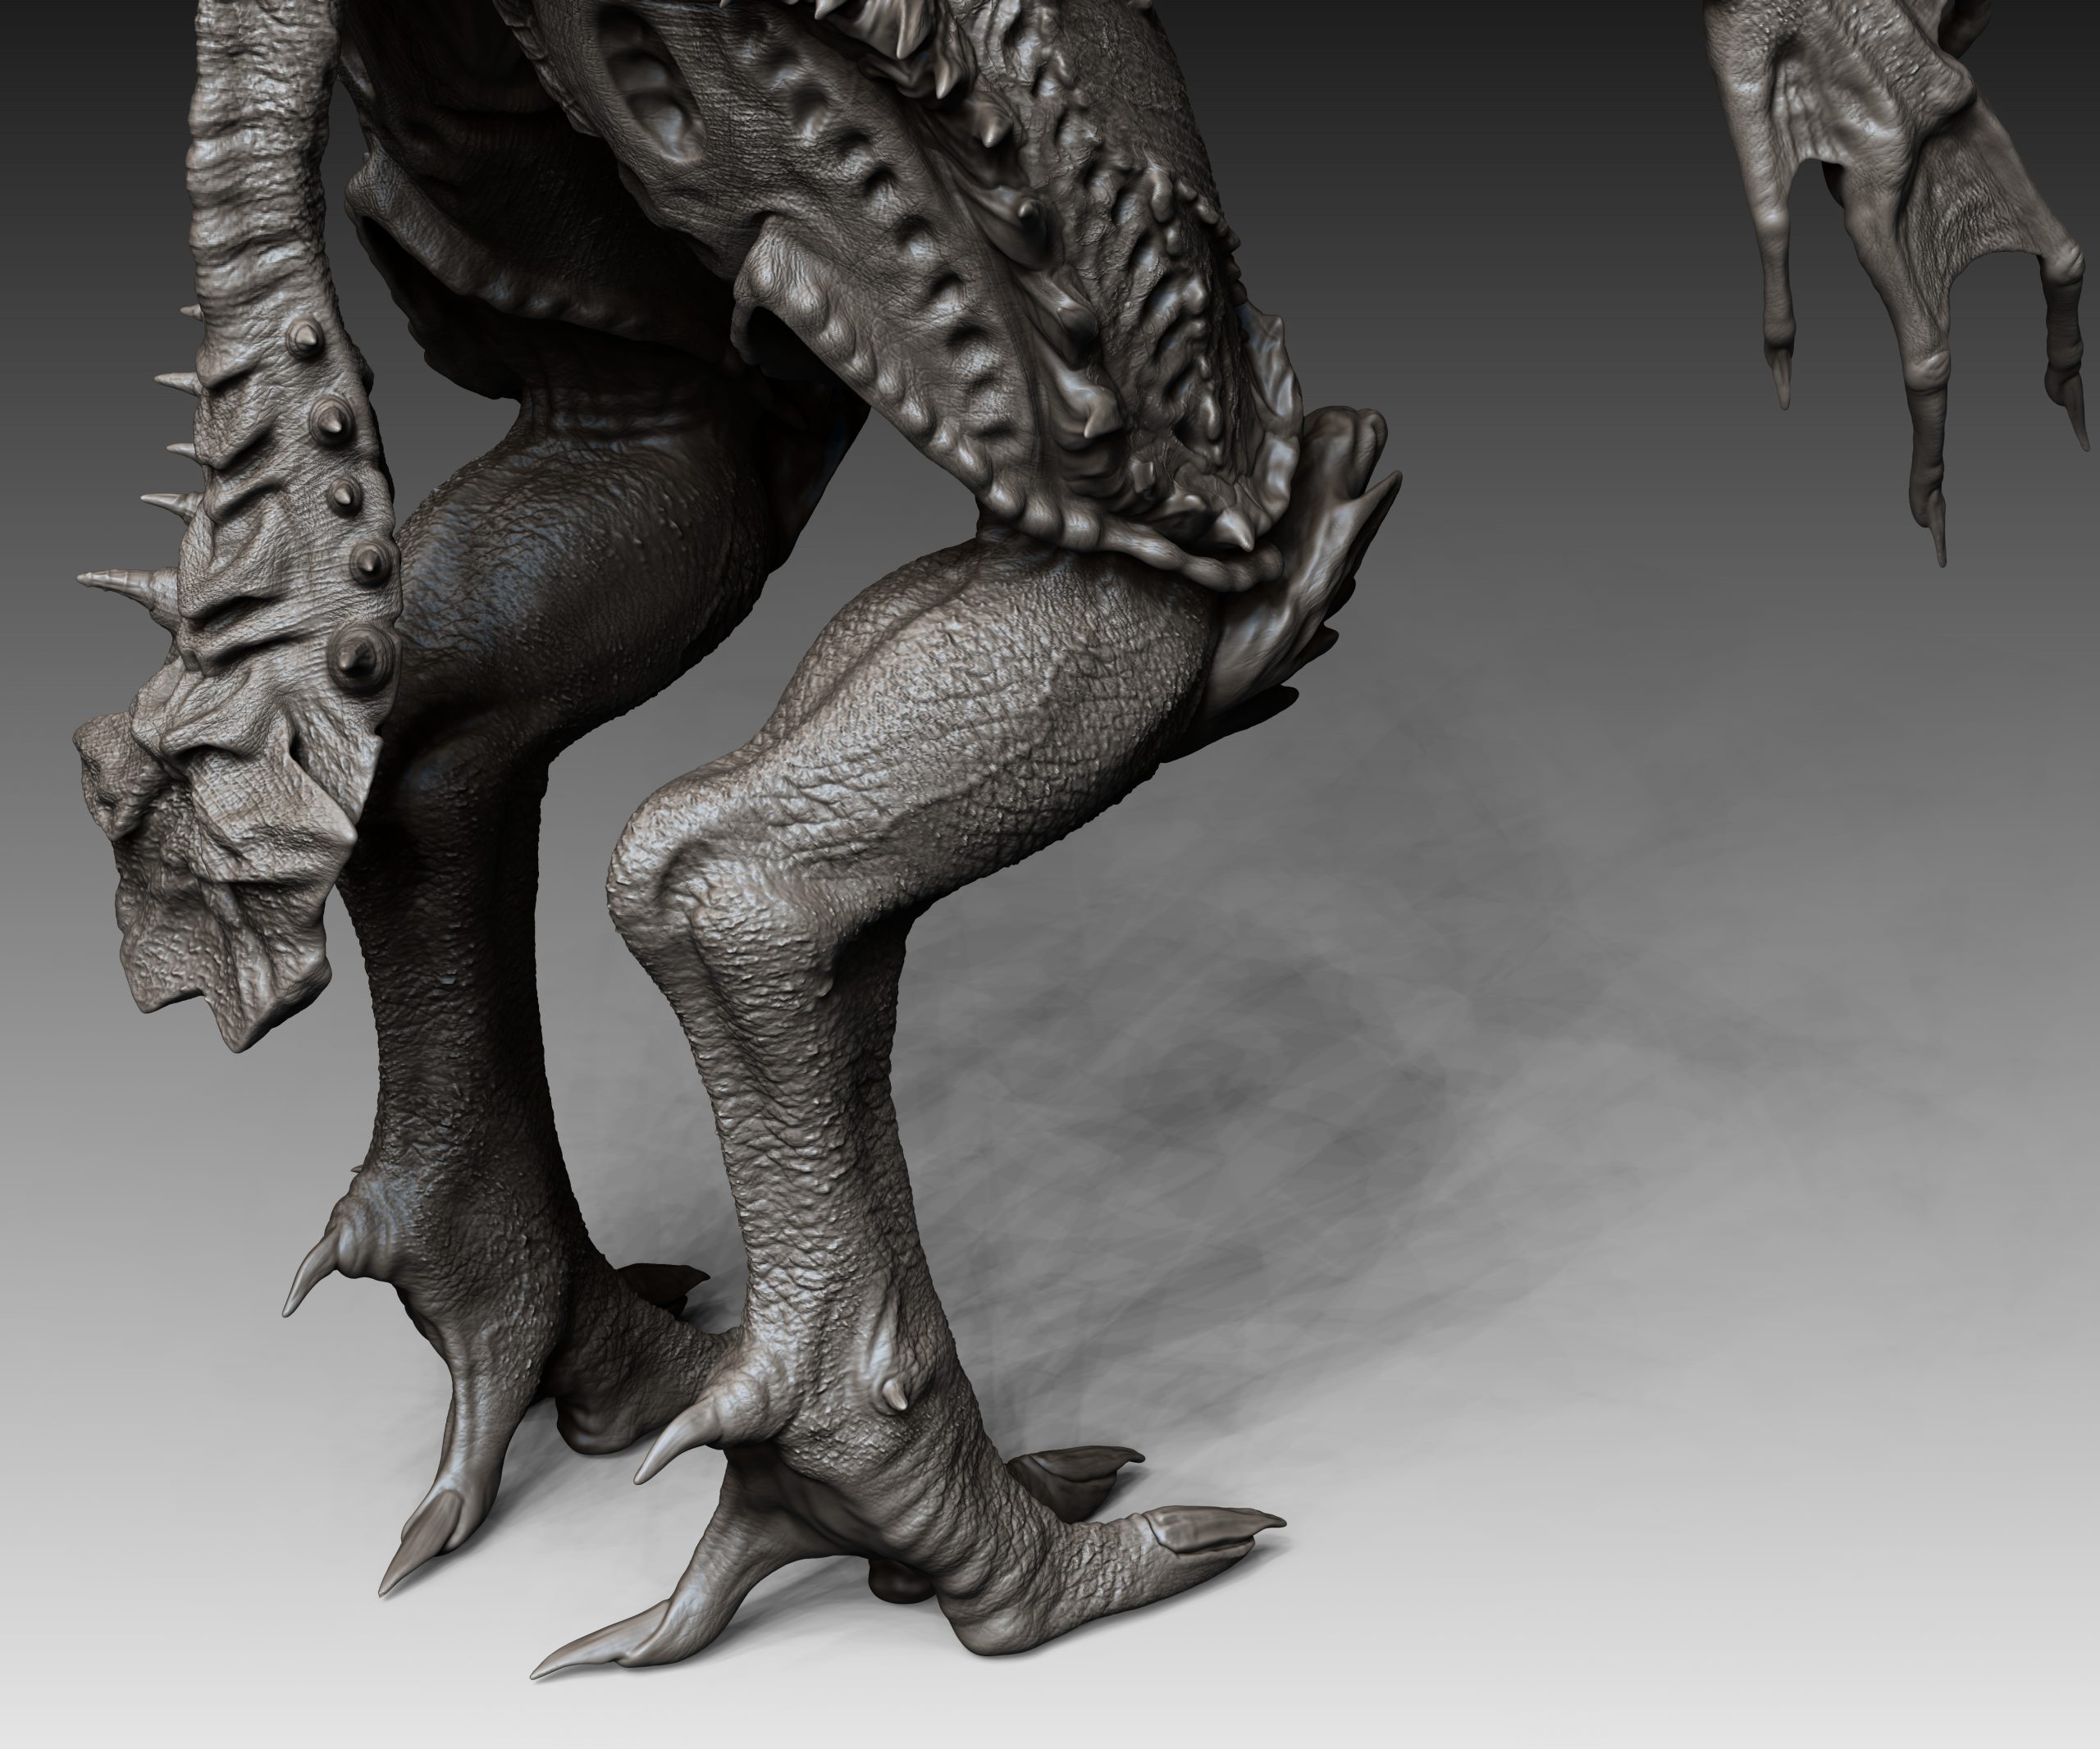
Sculpting the legs was done using zspheres as an initial base, then slowly building up the form and shape of the calve muscles and tendons that are typical in this sort of leg design, using the clay buildup brush. I used a dinosaurs leg as inital reference then added more girth and muscle to accomodate them holding up such a big creature. This was a lesson taught to me by my friend, to think about the design of a creature, if its muscular, big and strong, it would be heavy, therefore it would not have small leg muscles; if teeth and claws are long and thin, how are they functional? They would realistaclly snap! Using this idea of thinking about the realism of anatomy, catapulted the design forward immensely, making the overall design look far more real and feasable. I used my anatomy model to carefully sculpt in the muscles and tendons along the arms and legs, paying heavy attention to arm muscles and the deltoid area. From here i now had a muscular humanoid form that I could build on top of to create something more creature-like.
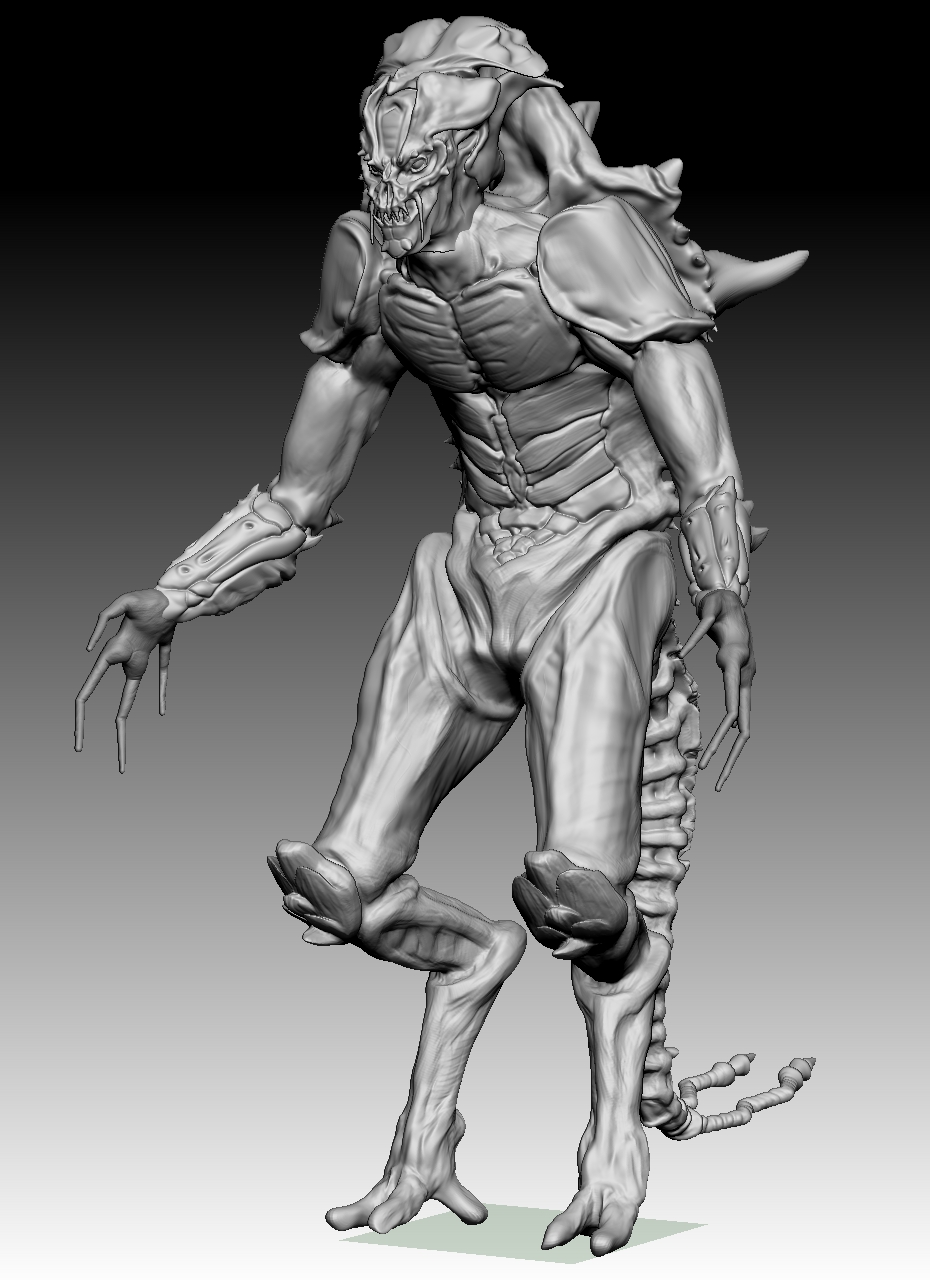
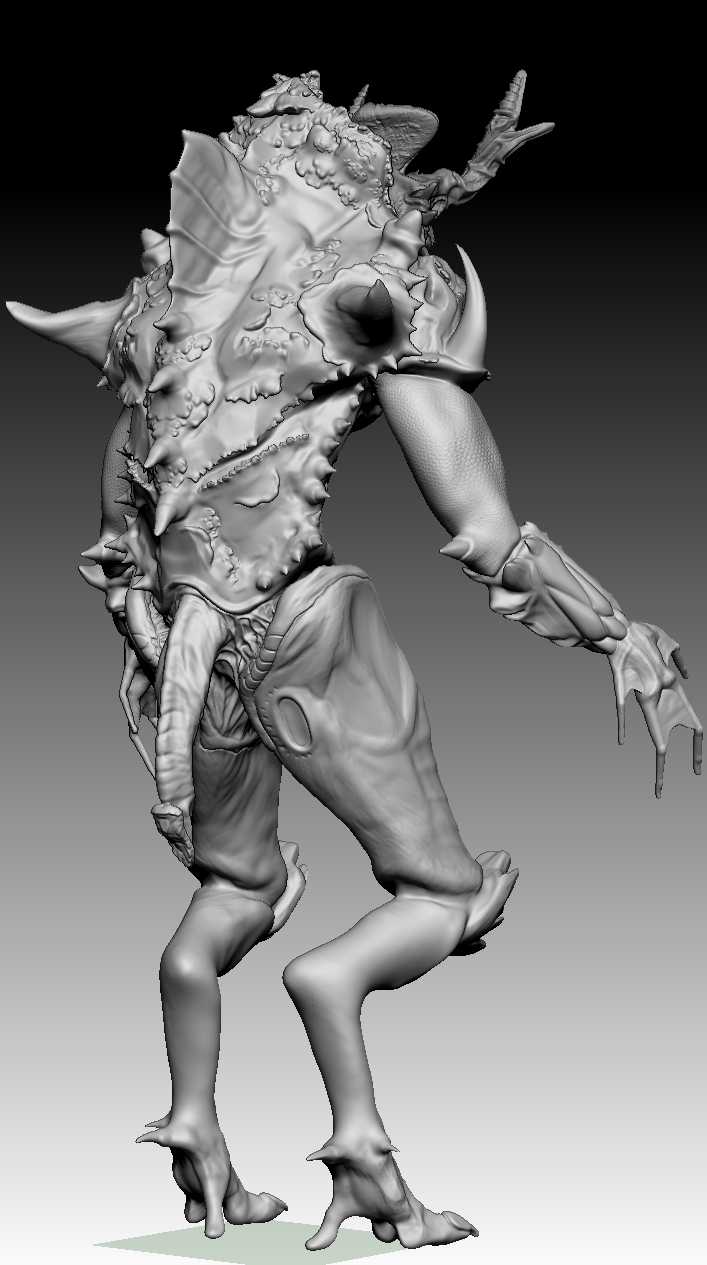
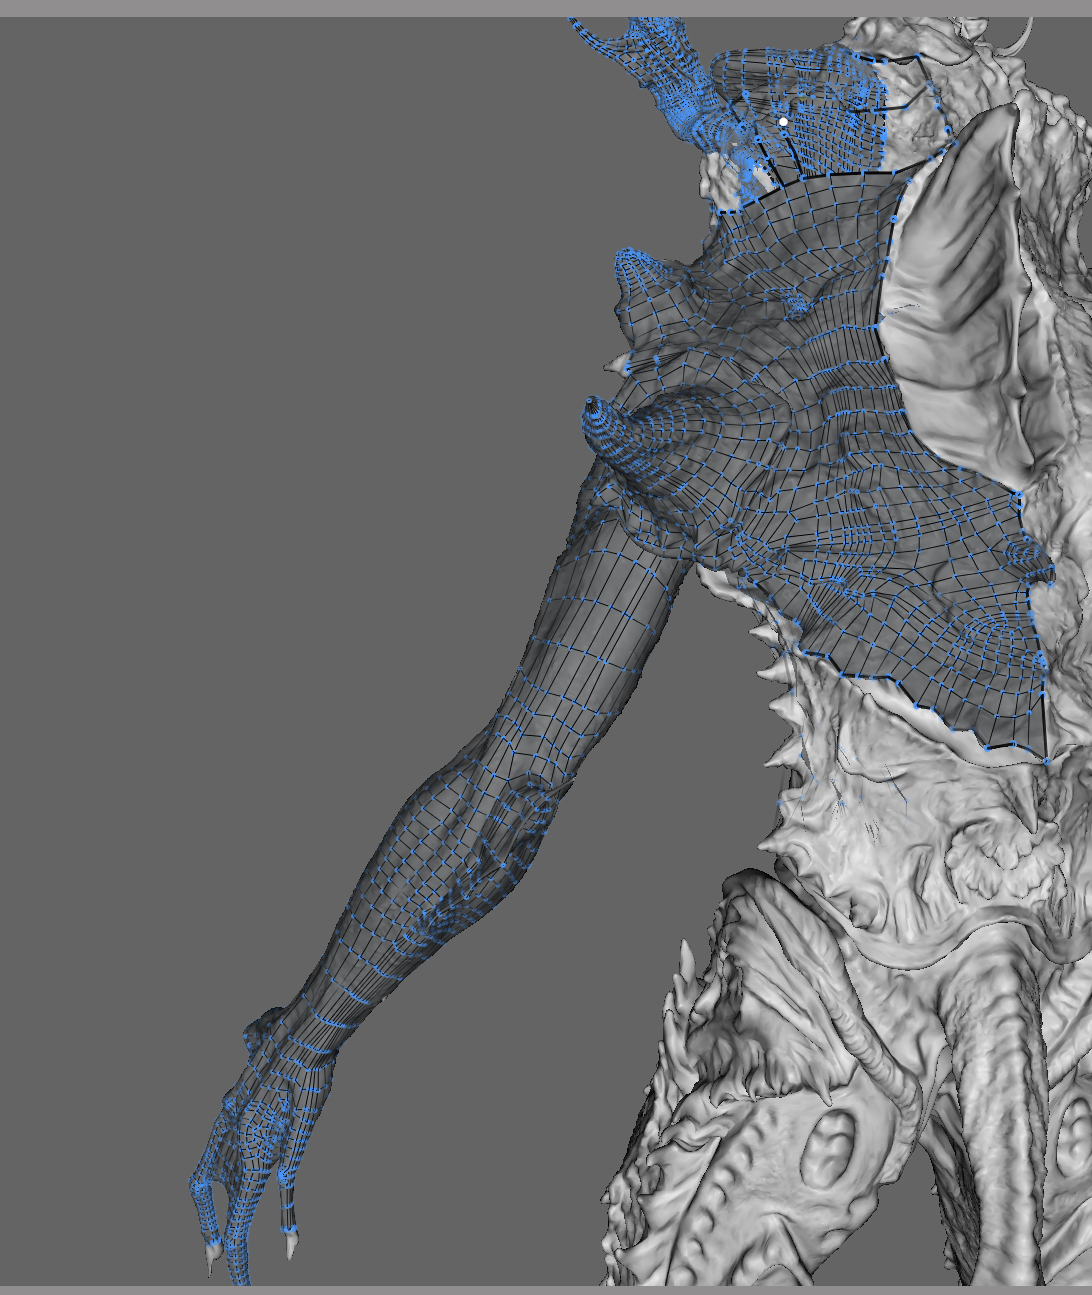
As can be seen in the photos above, the arms and shoulder plates underwent some re-designing, as well as the addition of some fins, webbing and the removal of the forearm plates. In the end, i opted to remove these armour plates from the shoulders and forearms completely, as I believed the design began again to stray from the original idea. It also gave me an opportunity to showcase detailed arm anatomy and practice it.
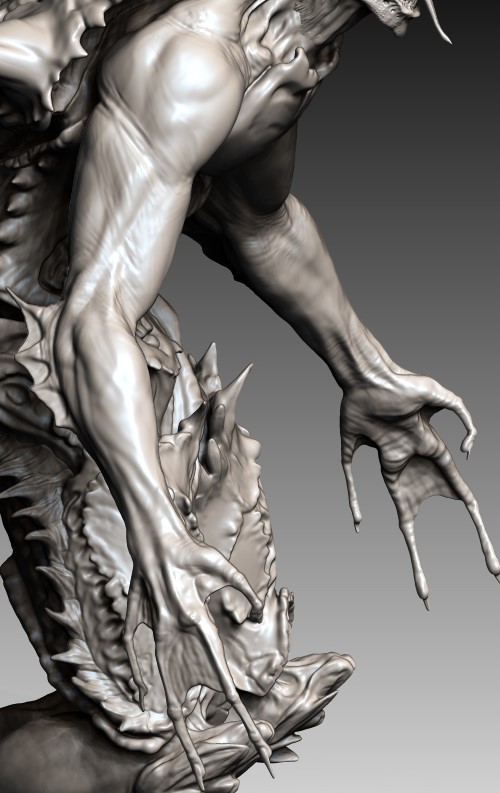
The thighs also went through various developmental stages, initally I started with something that just looked too skinny for its large frame. After looking for some inspiration in my books and iinterest, I had new ideas on how i could make the thighs look more armoured but still functional, while sticking close to the rough, spikey detail of a snapping turtles shell. A look at my pinterest boards helped me envision how to make the material look more like armour plates and once I had that inspiration, I let my imagination flow on the overall design of the plating. I also thought about how the rear of the calf would tuck up into the back of the thighs when crouching, so I channeled out an area in the plating to allow the leg more room to bend.
Refining the detail
Once the model was somewhat complete, I began the first detail pass. This is the stage where once all the shapes and details are in place, you begin adding the finer details such as refining muscles and tendons, building up the spikes, adding more detail to mouth and teeth. This first pass starts to add more realism to the model (if thats what you want.)
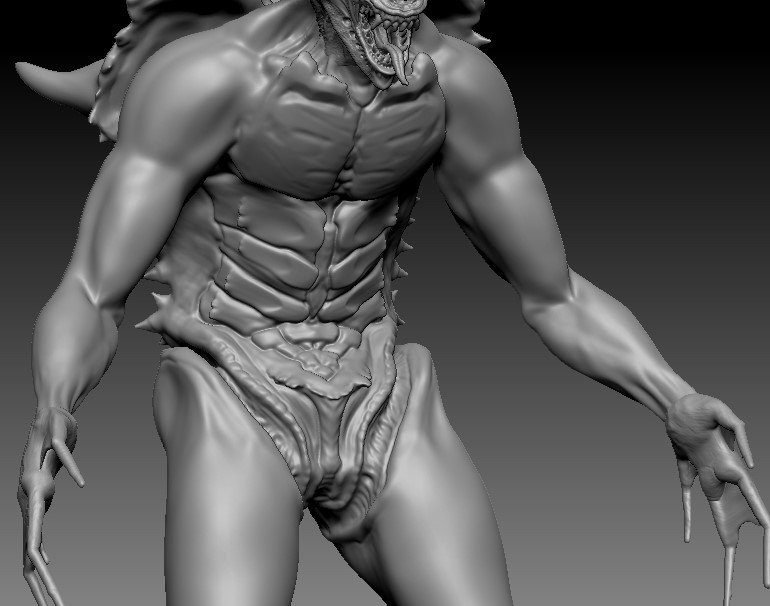
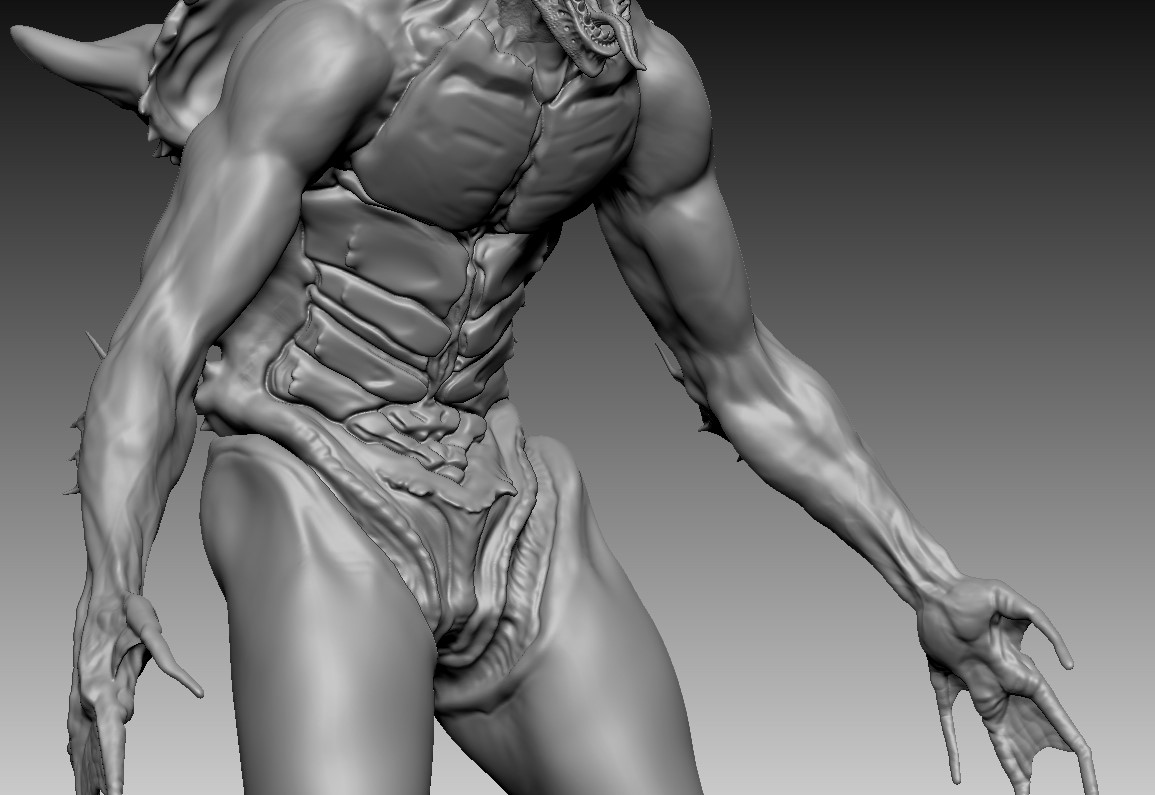
After the first detail pass, I started the final detail pass. this is where alphas play a large role. Micro details, such as skin pores, skin texture and textures of materials in general, are done using alphas as they are quick and easy to use. I use them by masking off areas I do not want to change then using either the drag rect tool or spray tool depending on how I want to place the alpha. The drag rect tool allows more precision of the texture placement, but can take alot of time depending on how much area you have to cover. The spray tool is good for adding quick randomised patterns, depending on the randomisers specified. It was also worth noting that the intensity of the brush also affect how the alpha will look when placed.
Finalising the model for retopology
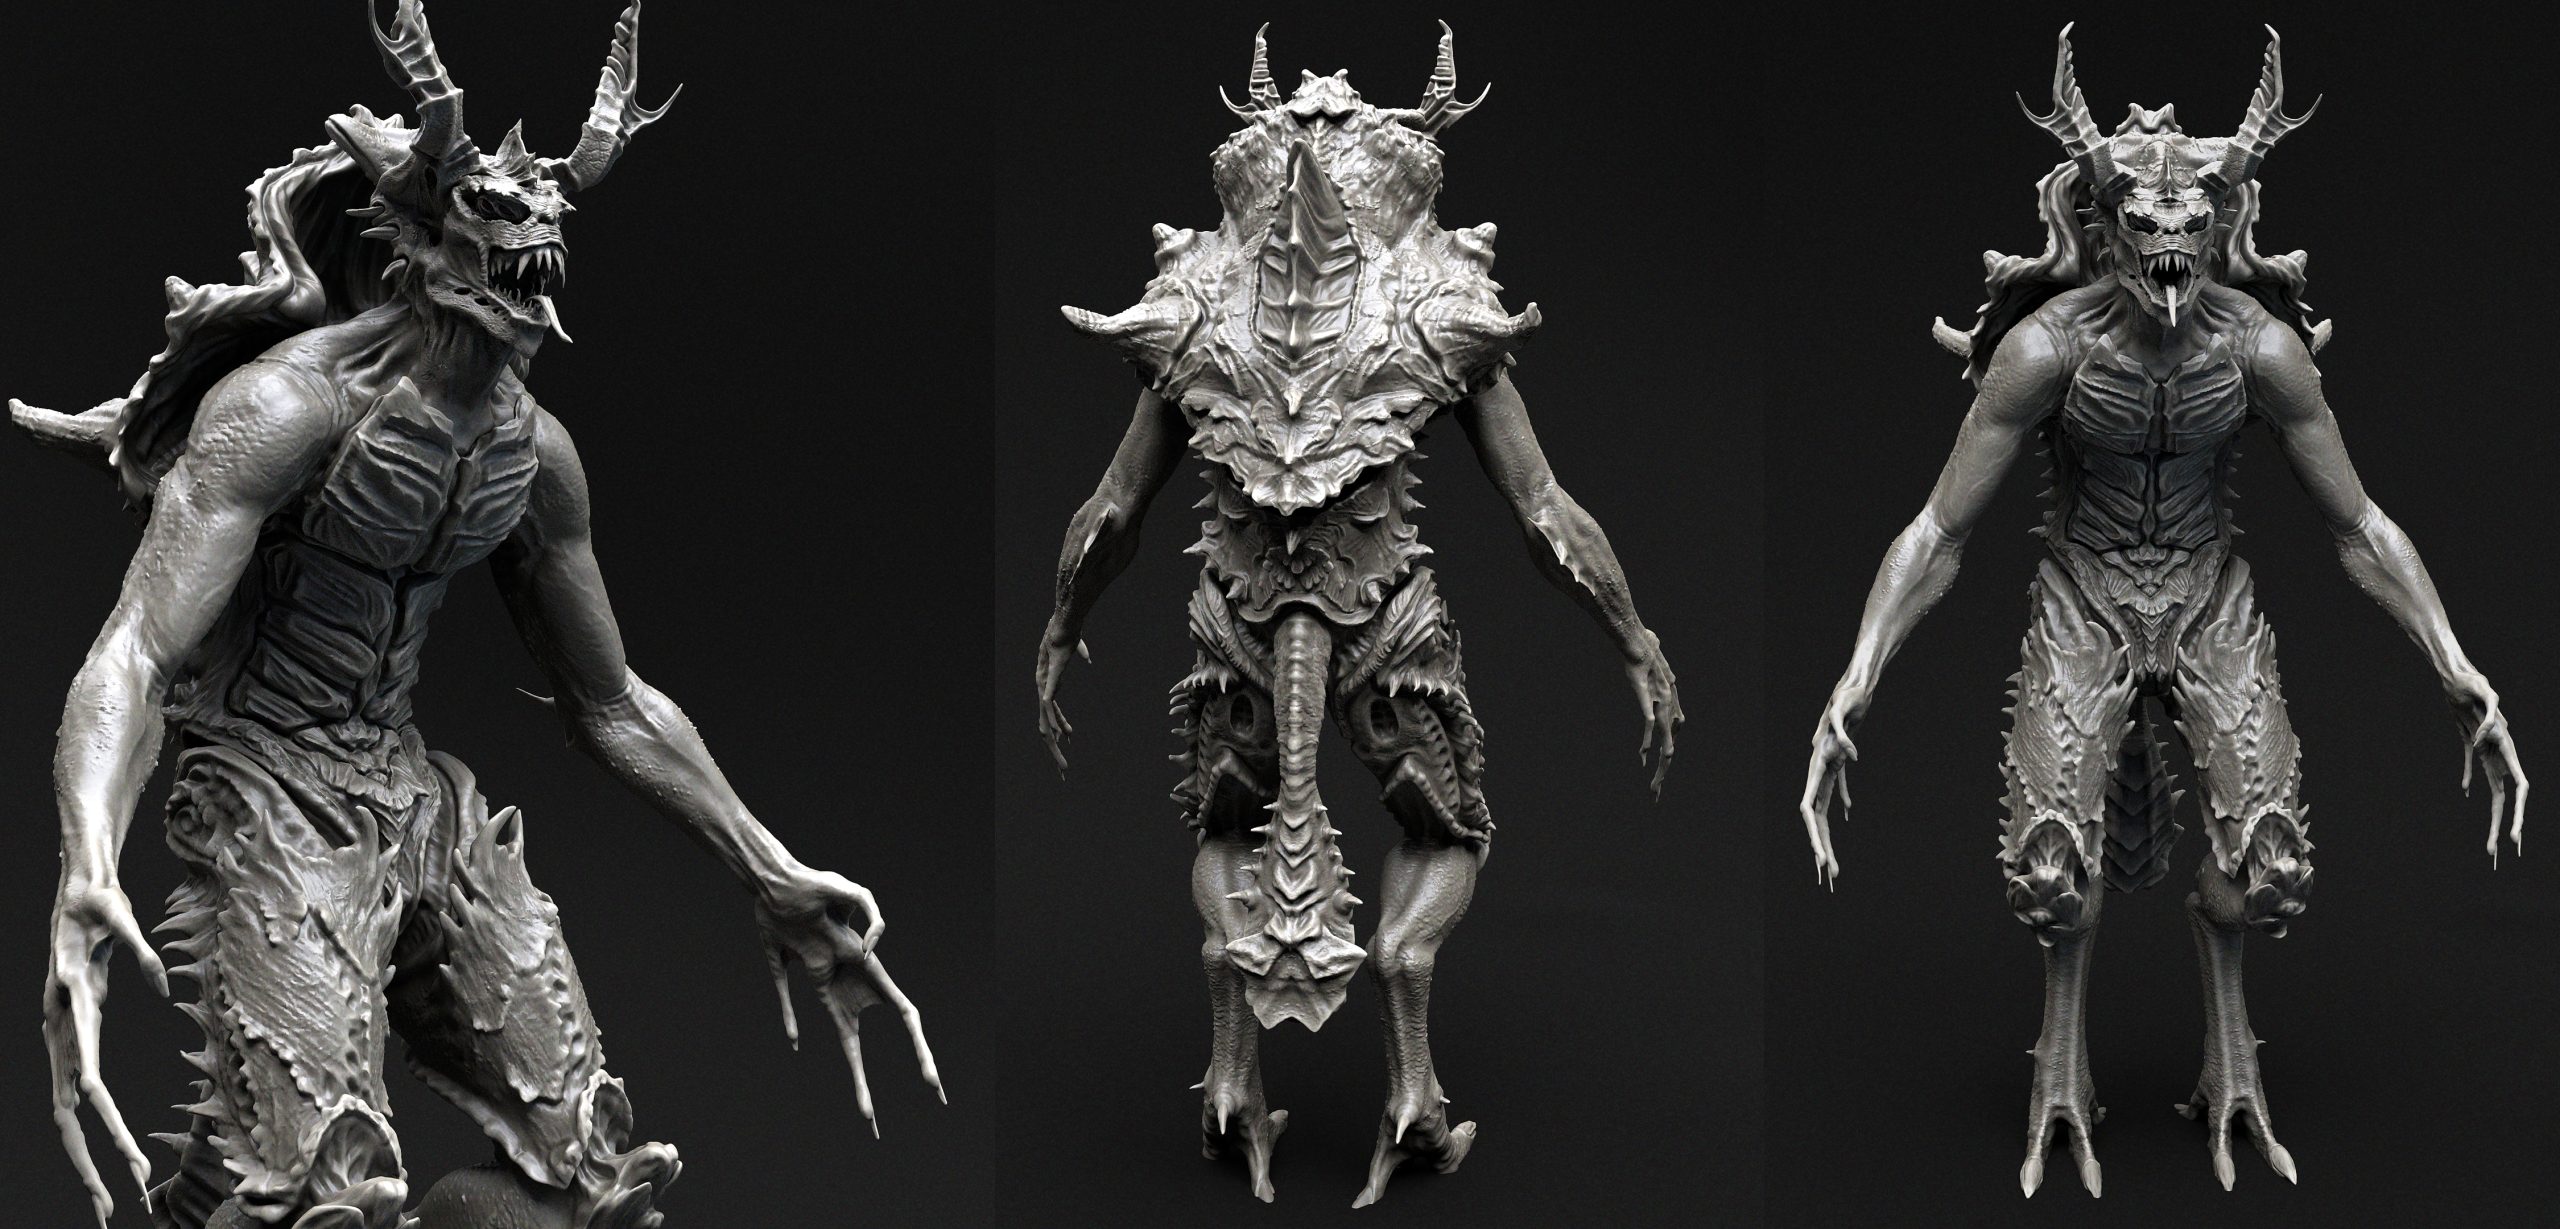
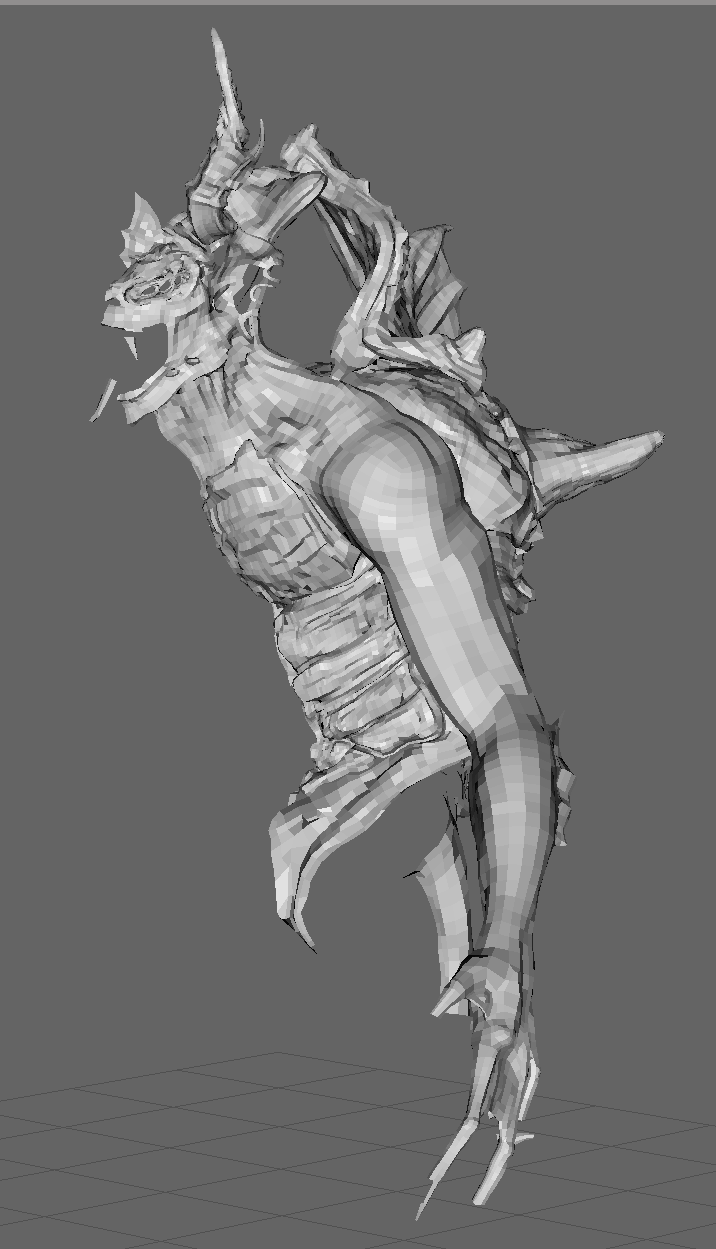
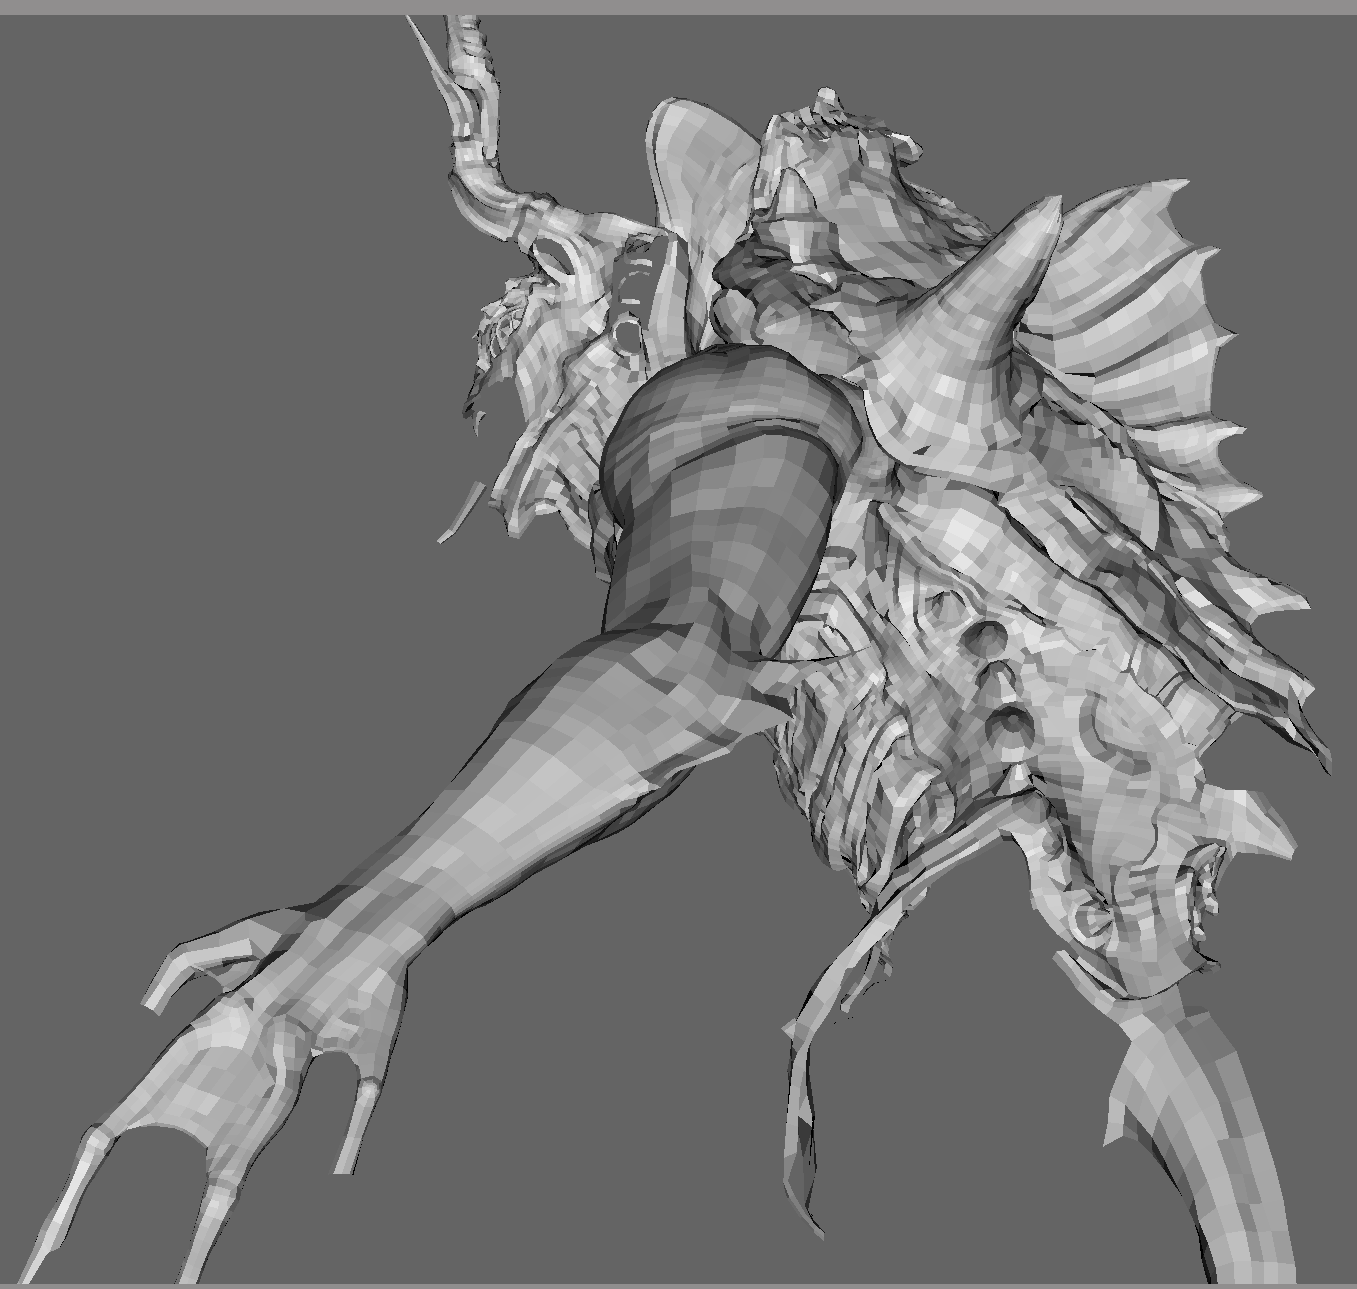
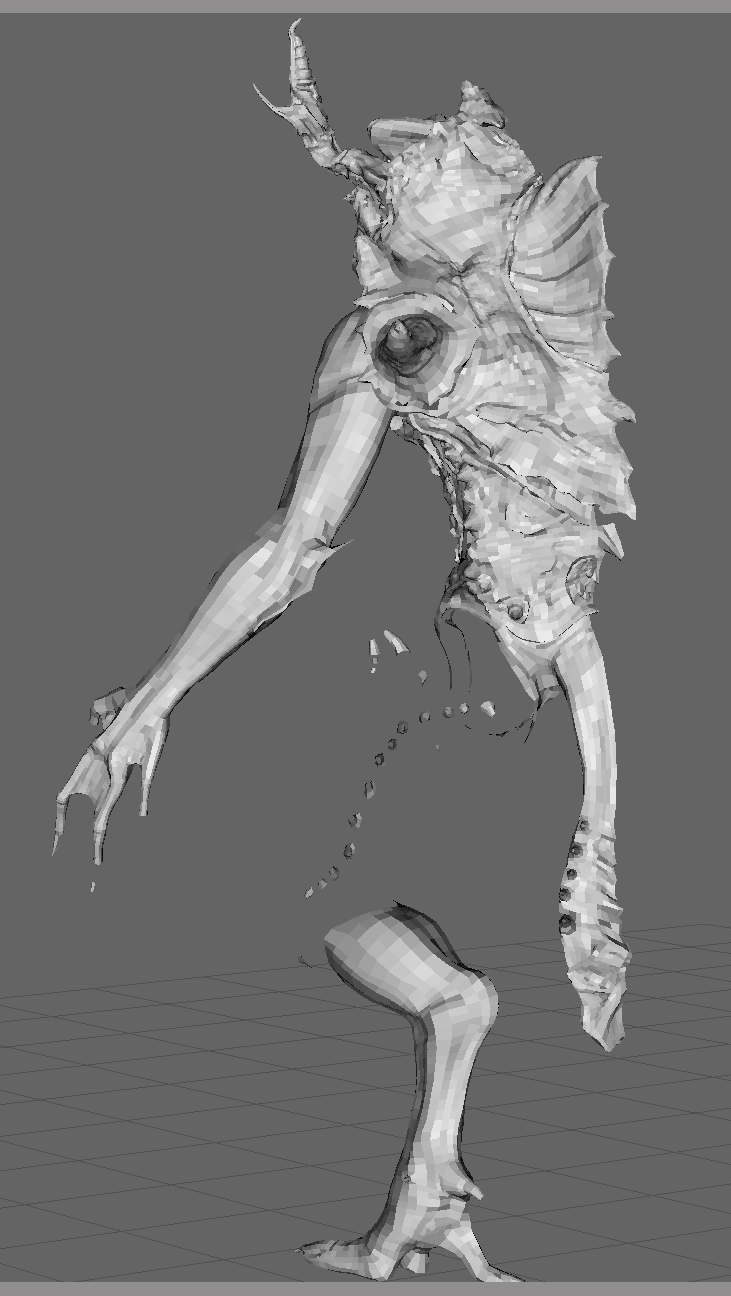
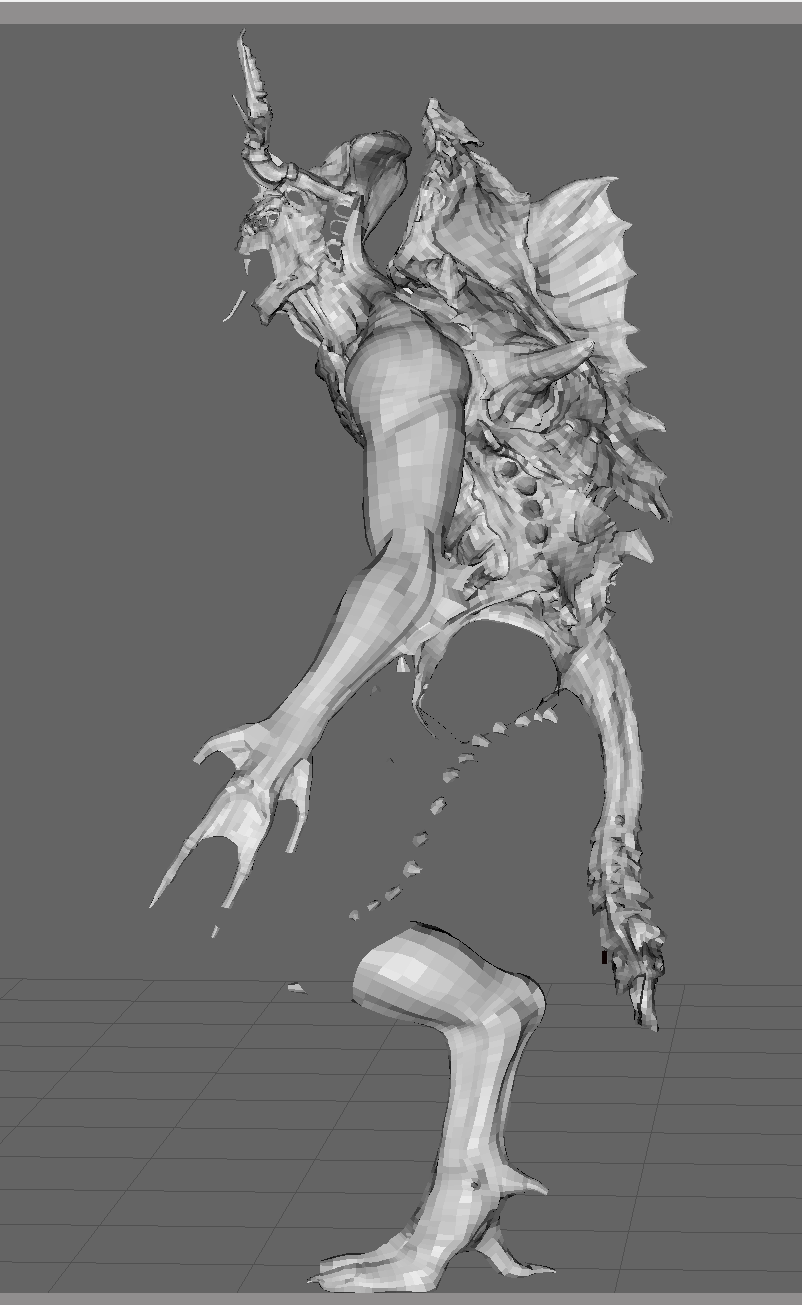
Once the model was complete, I began by taking a few render shots from within ZBrush using the pbr button, choosing a material that captures shadow (as mat cap does not), changing the direction of the lighting in subsequent renders to find nice photogenic shots. Once I had the renders, I started to make sure everything on the model was symmetrical, to aid in the ease of retopology. Once I was happy with the model and decided to call it complete, I saved the model in a seperate file, before beginning the task of decimating the model for retopology.
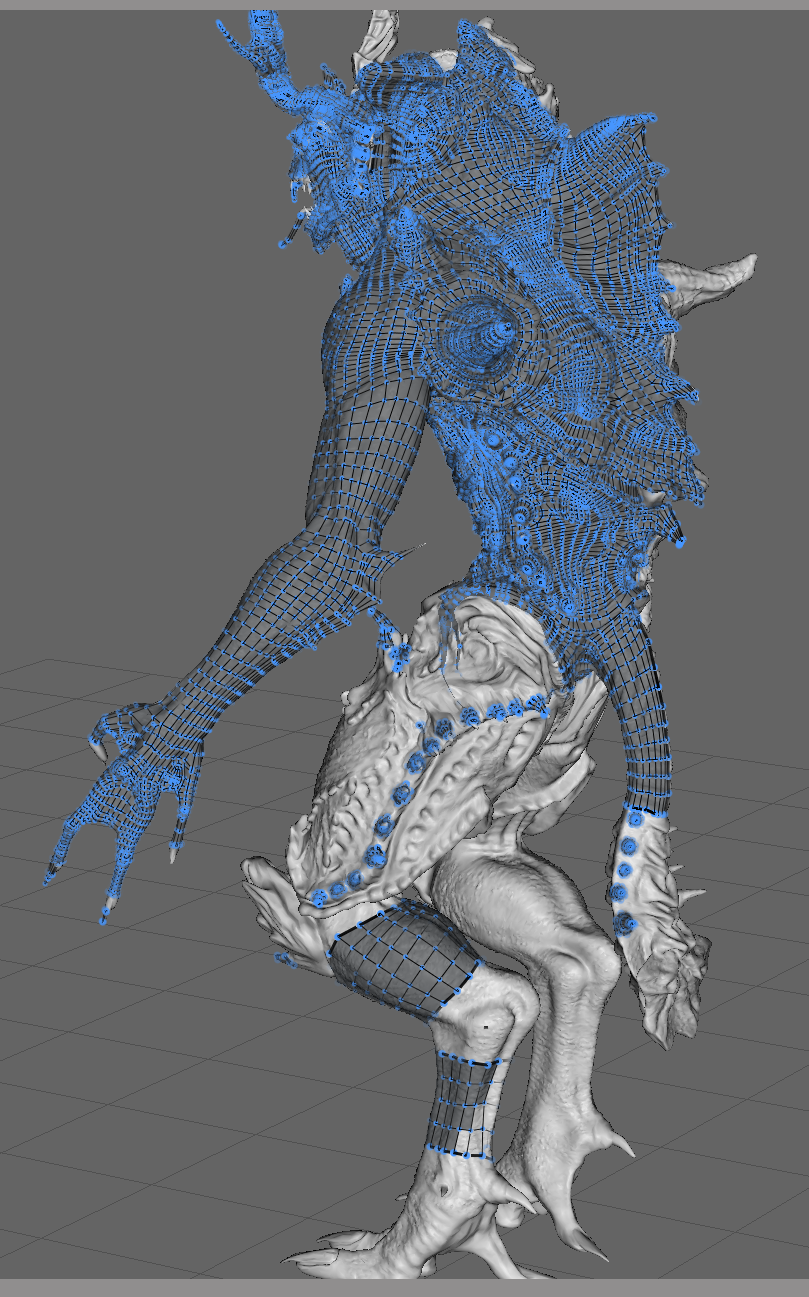
The final model consisted of 17 million polygons, too large a number for a program like maya to handle so the model had to be decimated down and lowered to a more reasonable poly count.
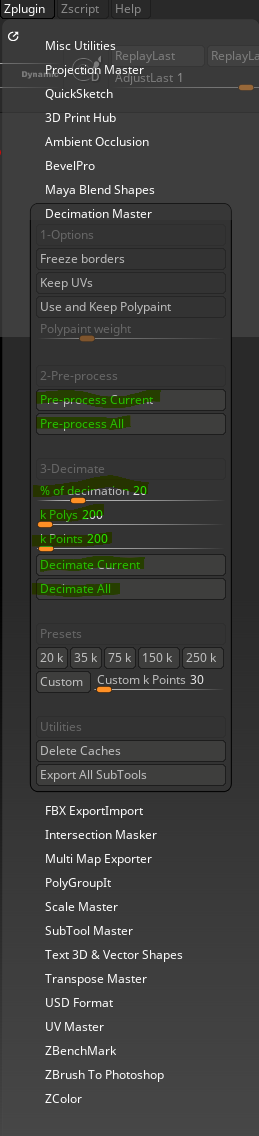
The buttons in green in the image above show the tools necessary for decimating a model. First, the model is merged together (if needed) and then it has to be pre processed (a step necessary before every decimation). Depending on what you want to process, either the entire model or the current selection in the subtool menu will depend on which option is chosen. Once the model has been pre-processed, the percentage of decimation can be chosen, allowing a target count of polys to be achieved after the decimation. I first chose to go for 1 million, to vet how much detail it would retain, once it was decimated, I decided it could be even lower, achieving a count of 400 thousand polys before it started to loose too much detail. This count was in range with what many suggest a retopology count to be (depending on the level of detail to be captured).
Retopology
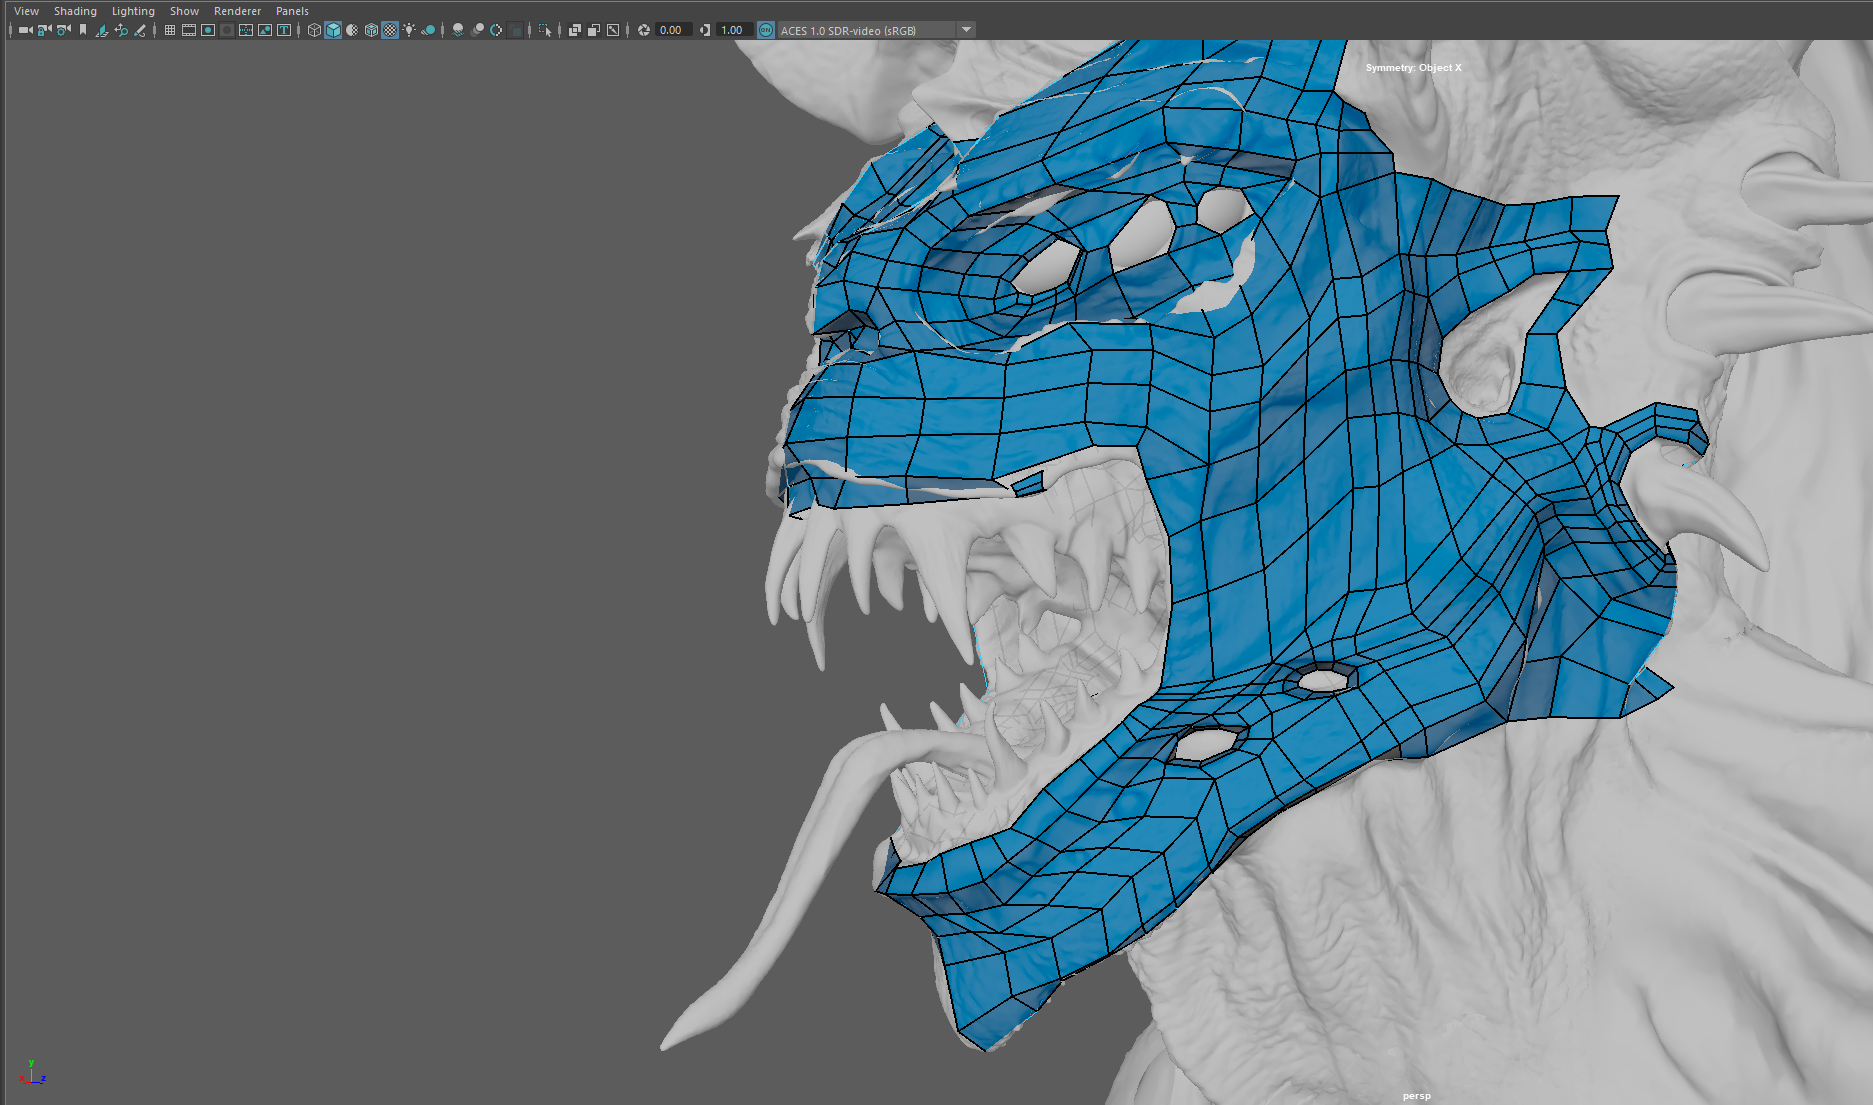
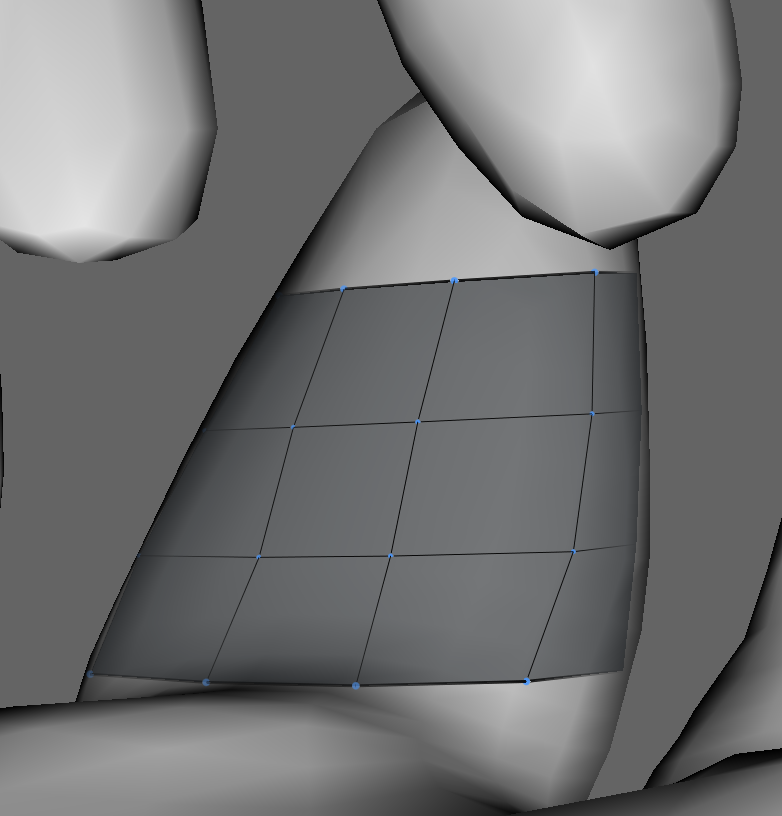
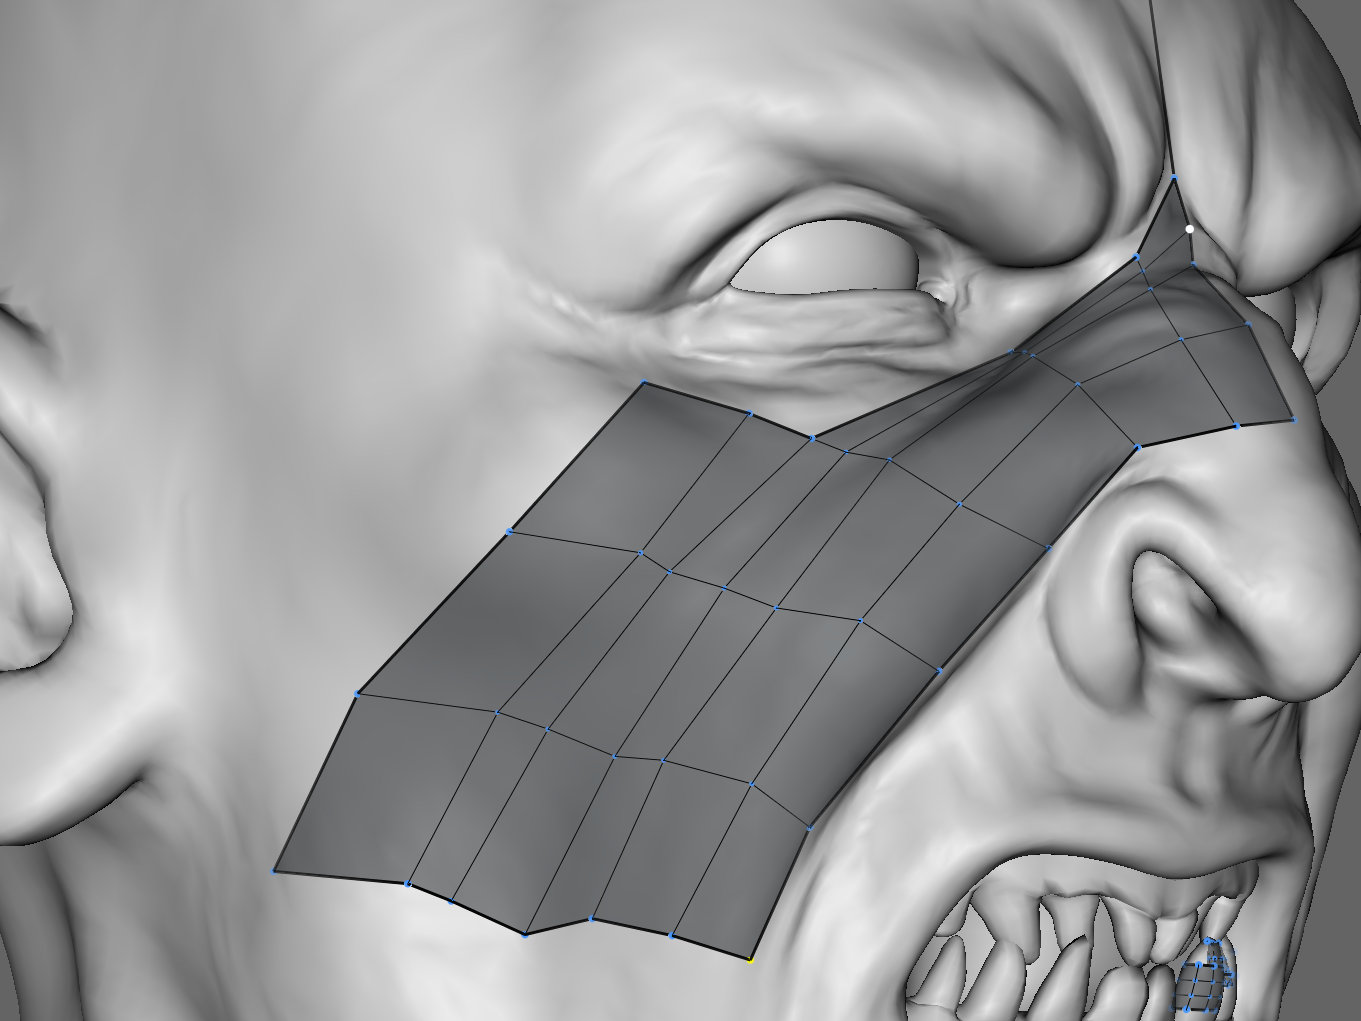
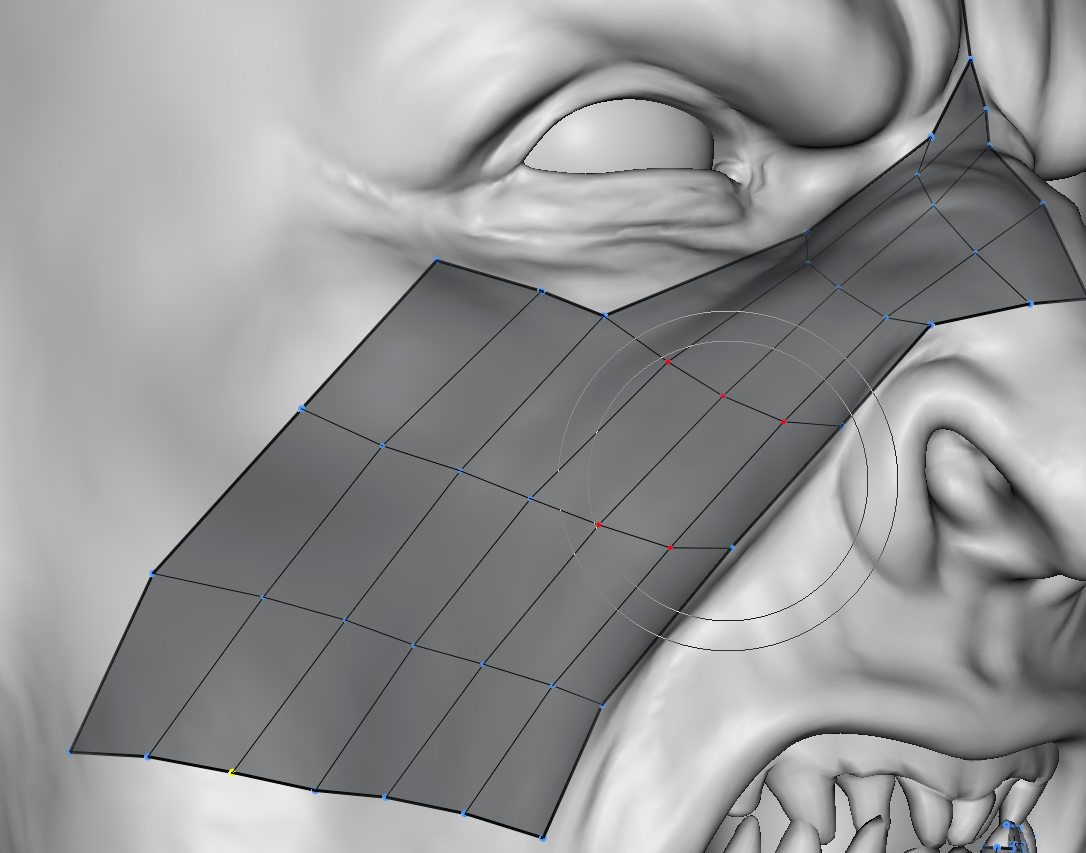
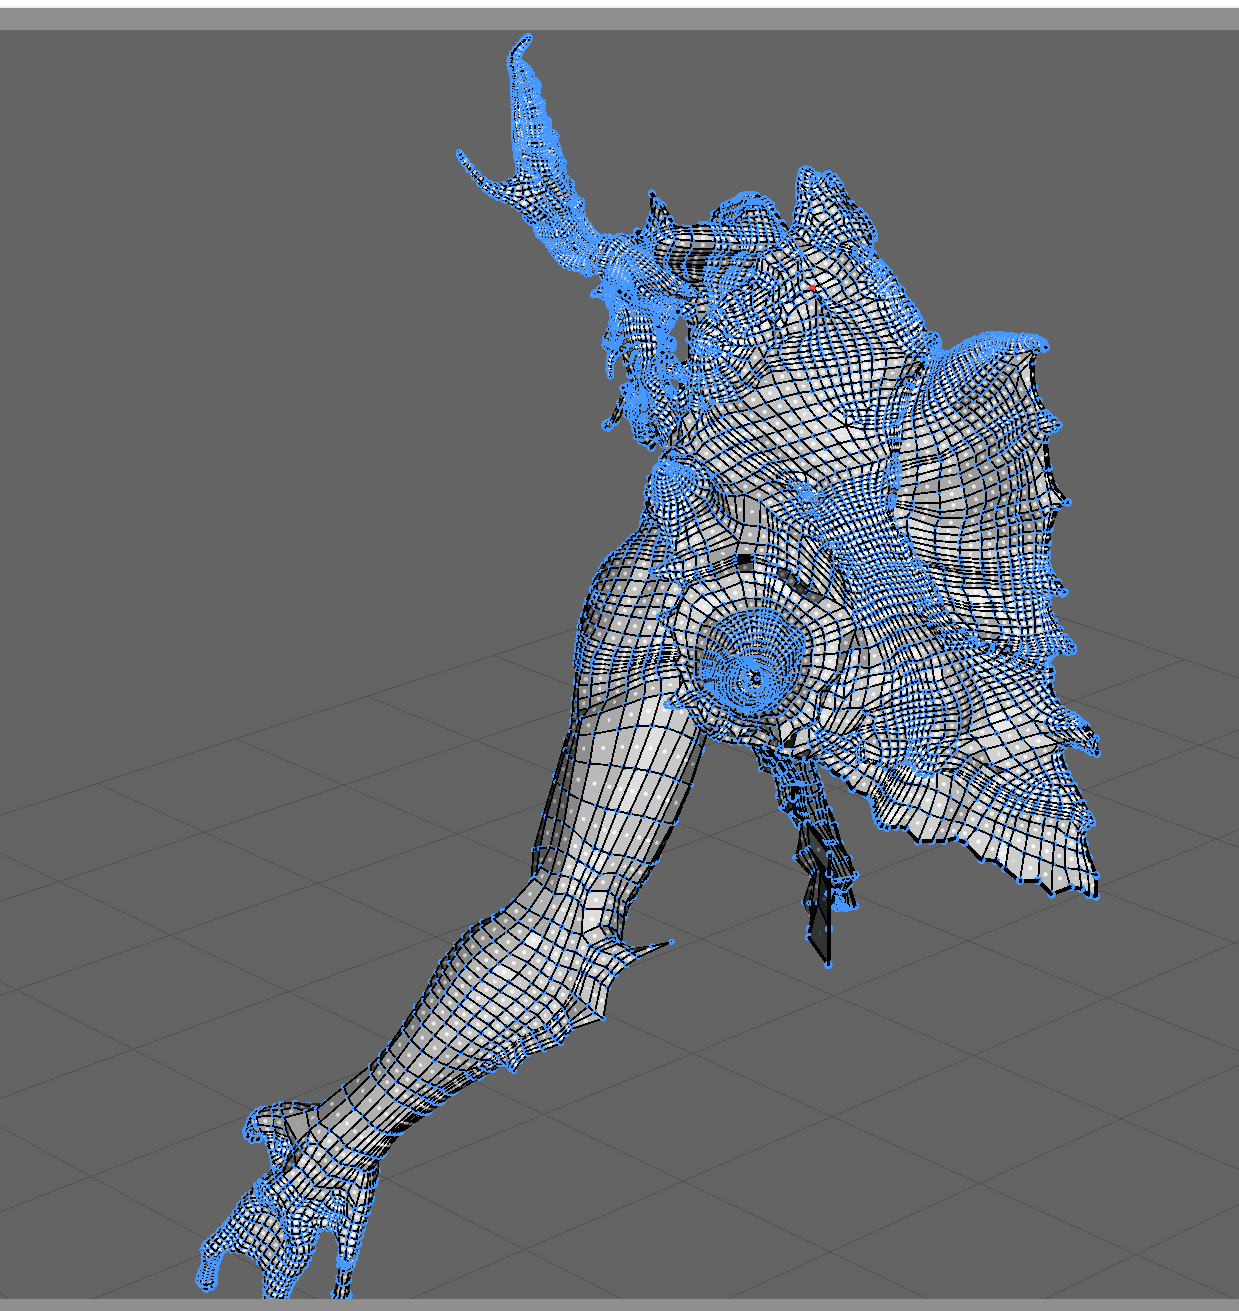
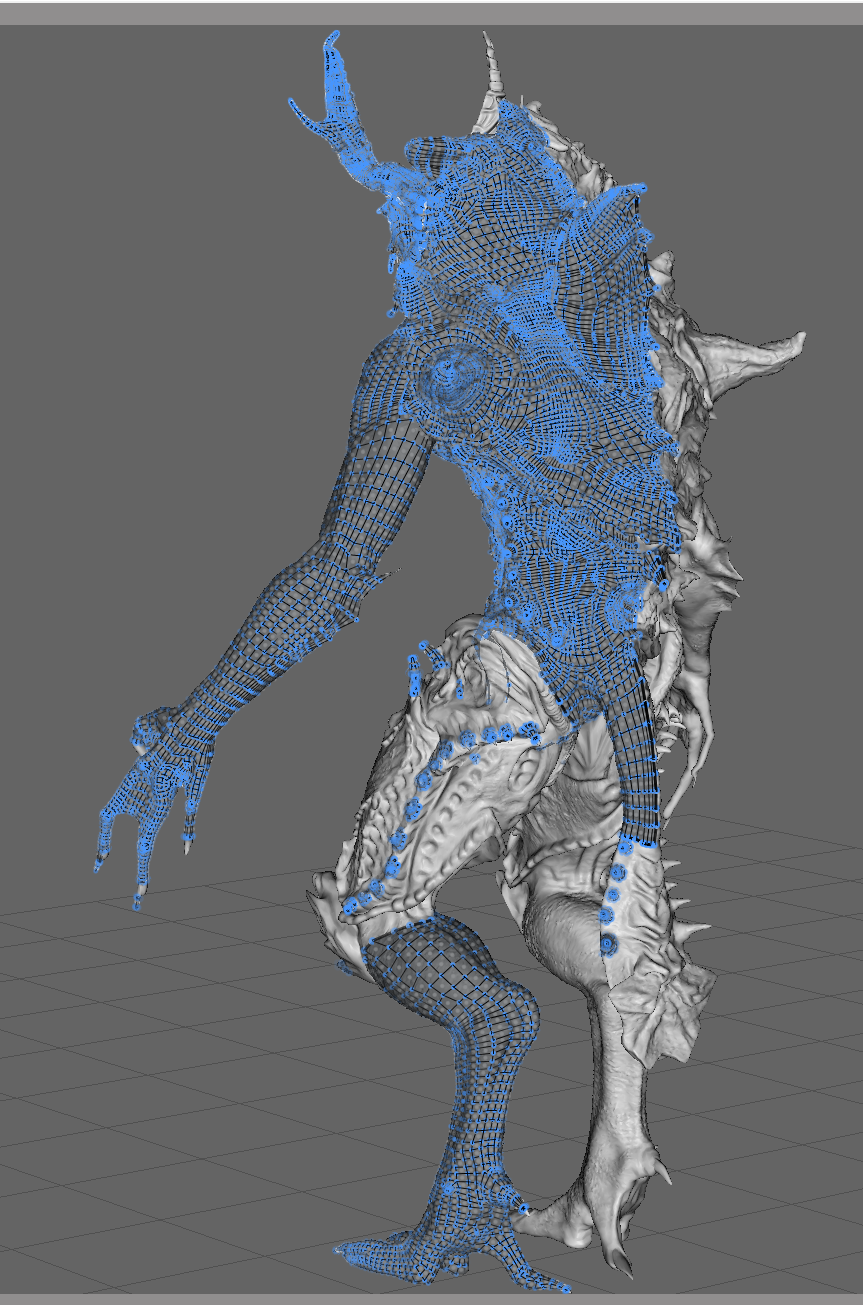
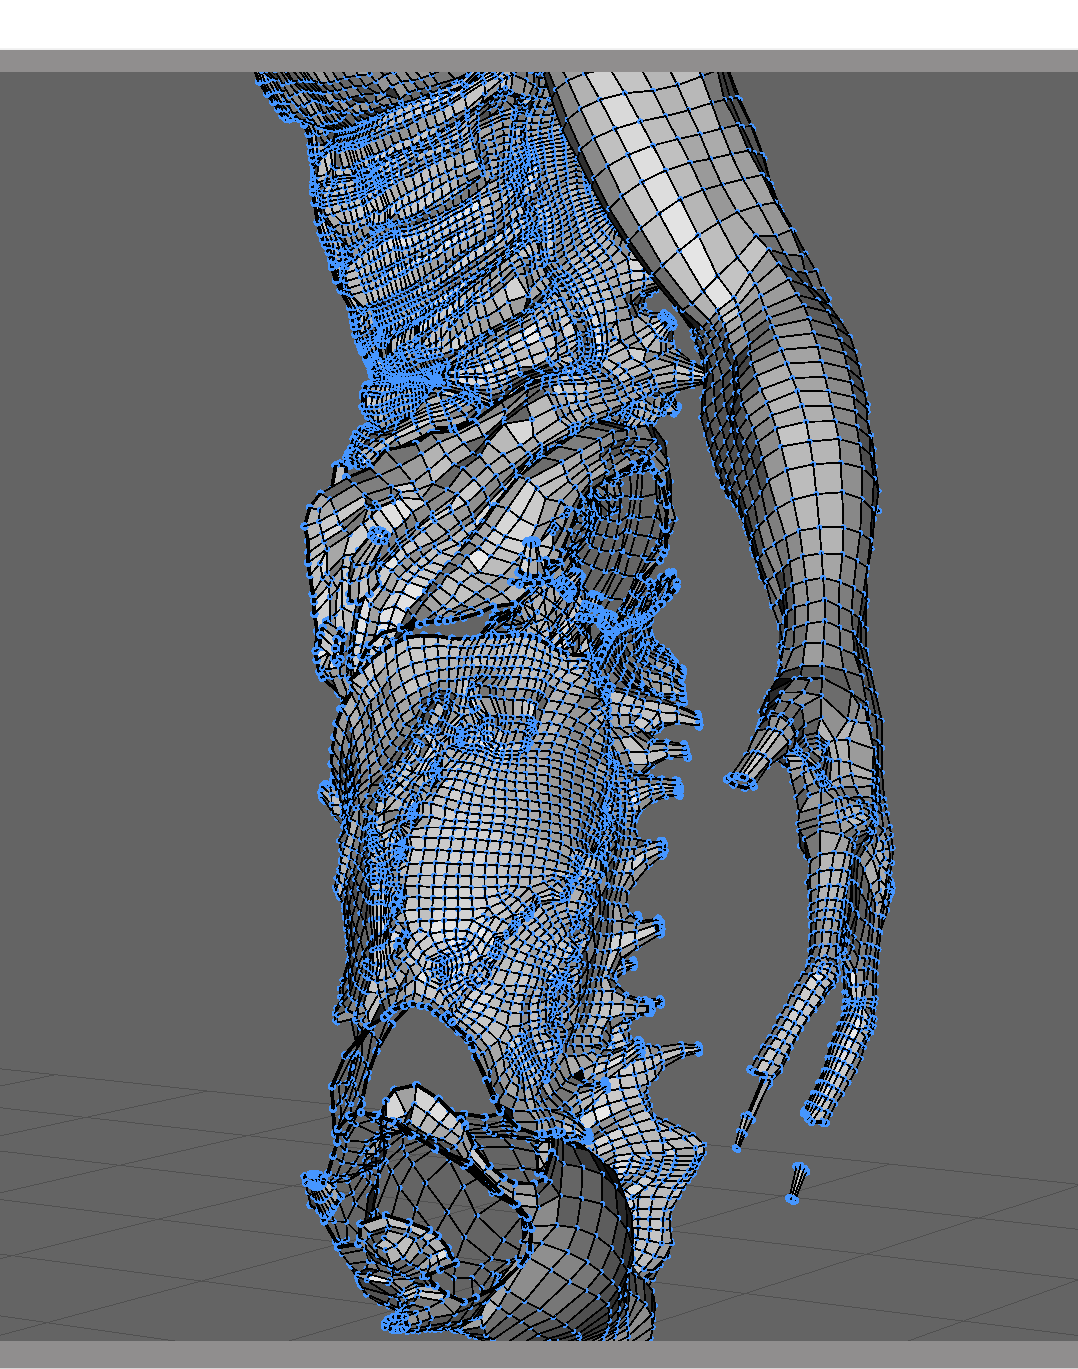
Now i had a decimated model at a manageable poly count, I began the retopology stage. I first started the retopology in Maya, however, once I reached a certain point (see image), the program became slow and unresponsive and was therefore not viable.
Topogun

Since Maya had become unresponsive and no longer viable as a retopology program, I then moved to the retopology program I am the most familiar with, Topogun 2. Topogun is a dedicated retopology program, with an easy to understand inteface and quick topology tools, it’s an old program but reliable and easy to learn.
To start off, I imported the reference mesh (the decimated model) and loaded it in. Unlike Maya, the reference mesh is live straight away and you can immediately begin retopologising the object. The toolbar is simple and best of all within topogun, there are tooltips for everything – describing in depth what they can do.
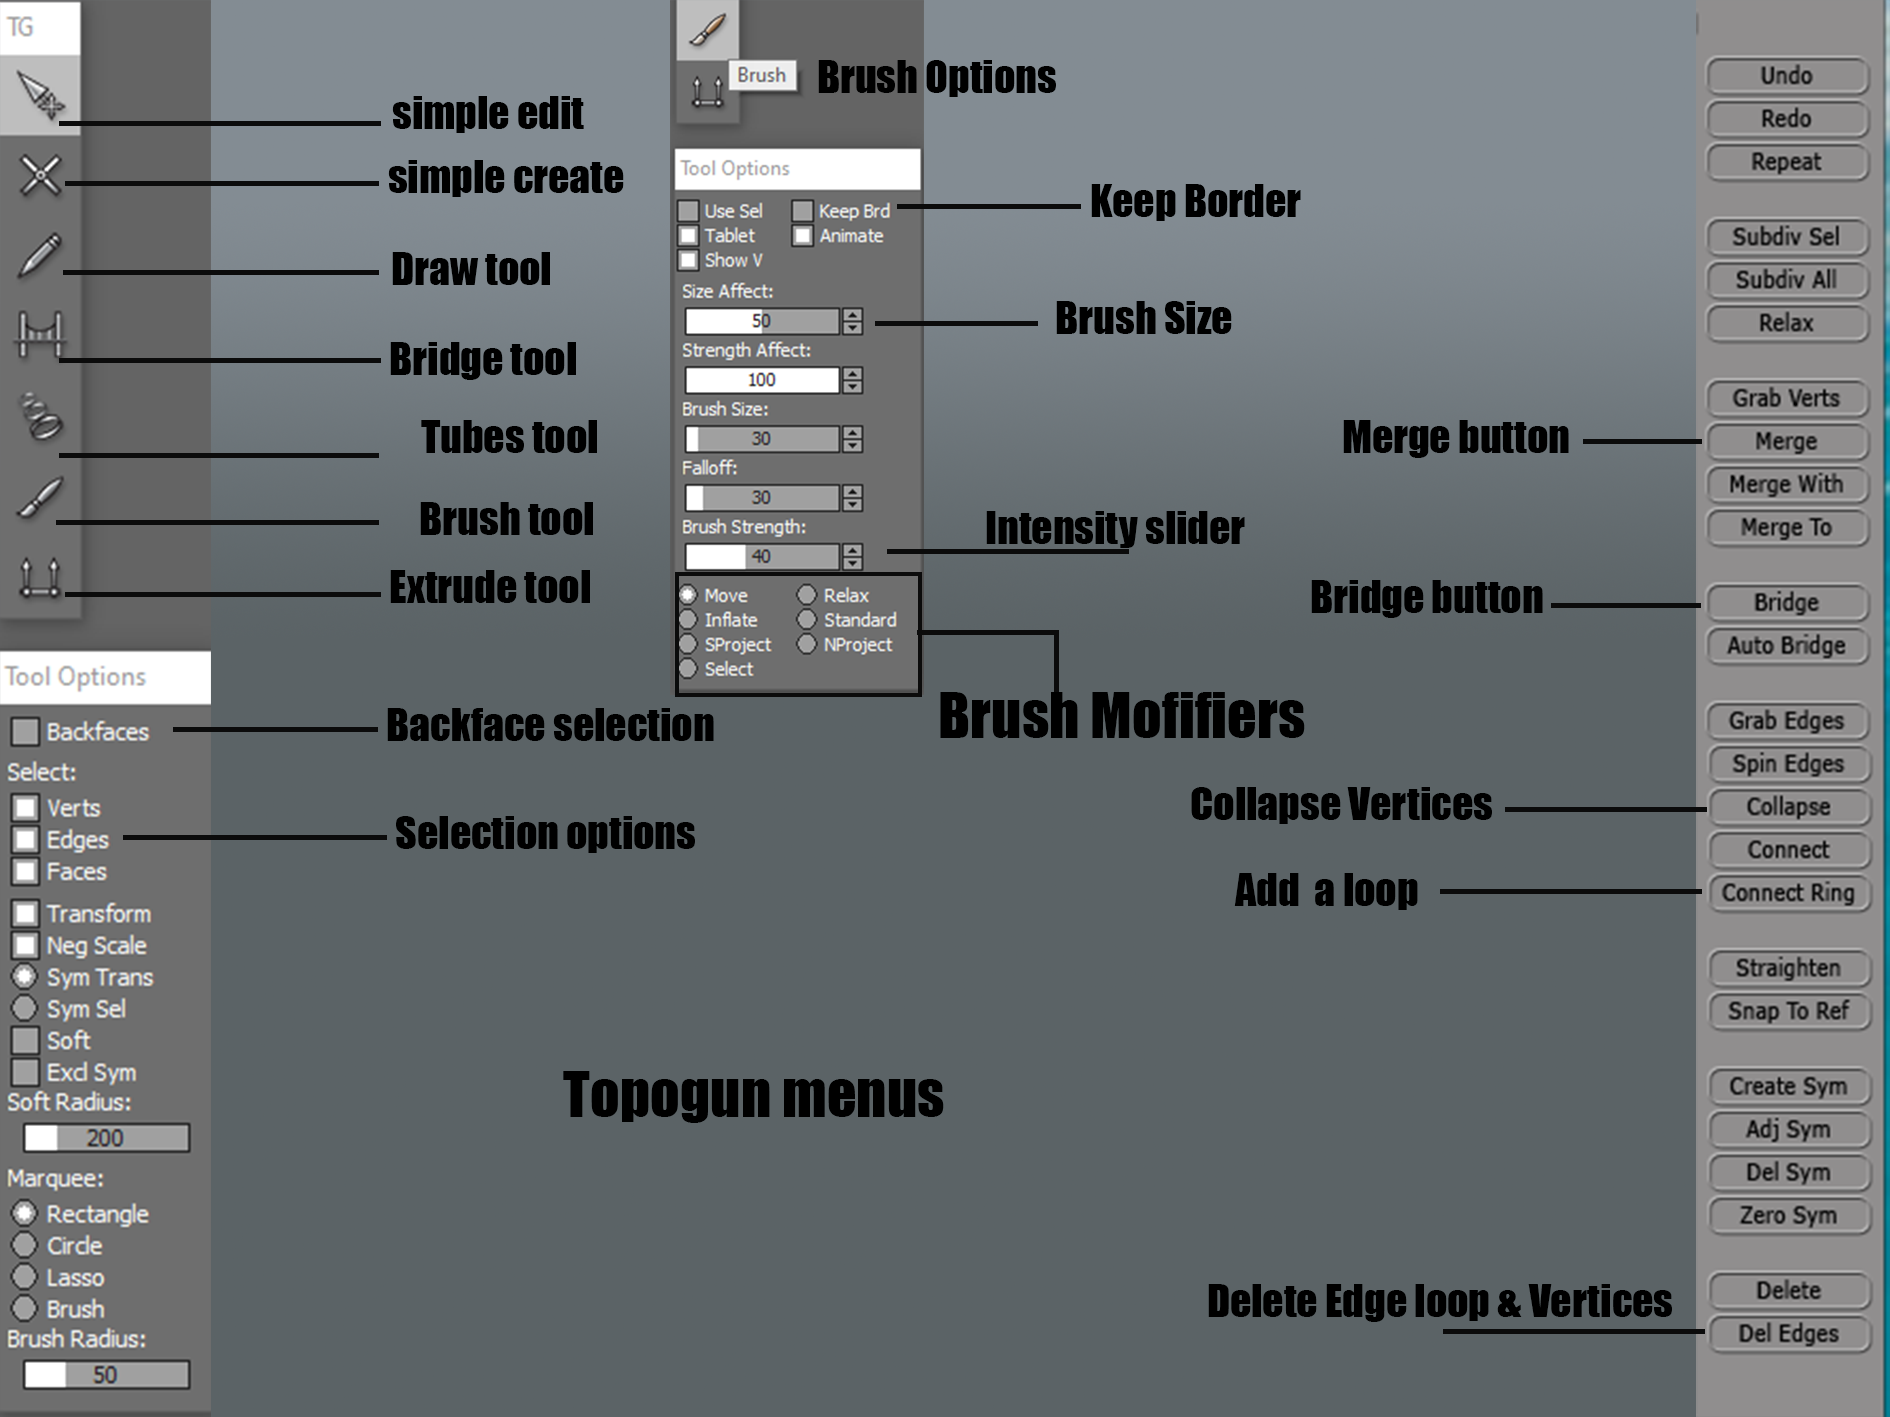
Simple edit allows the selection of individual vertices, also allows the user to move them about. This can be used with backface selection to select verts that are behind the reference mesh. Simple create allows the individual placement of vertices on the reference mesh, this is the most normal way to work but takes time placing them all. The placed verts can the be bridged using the bridge tool to create lines between the verts, creating polygons or triangles. The tube tool is a great tool which allow the user to draw divisions at an angle on tubular style parts, you select the number of divisions you want, then right click to create a tube. The tool can be tricky, sometimes not placing the loops correctly or incorrectly joining them.

The brush tool is dynamic, but I mostly use it for quick selecting lots of verts by clicking the sleect option within the brush midifers tab. This allows the painting slection of vertices or edges. It can also be used to move verts about by selecting the move option and varying the size of the brush. Most of all, I use it for the relax option. like in Maya, this option relaxes quads and verts to conform them together so they are more equal. The keep border option stops the outer border of the mesh from being derformed or moved when using the brush or selection tool.
Breaking up the retopology
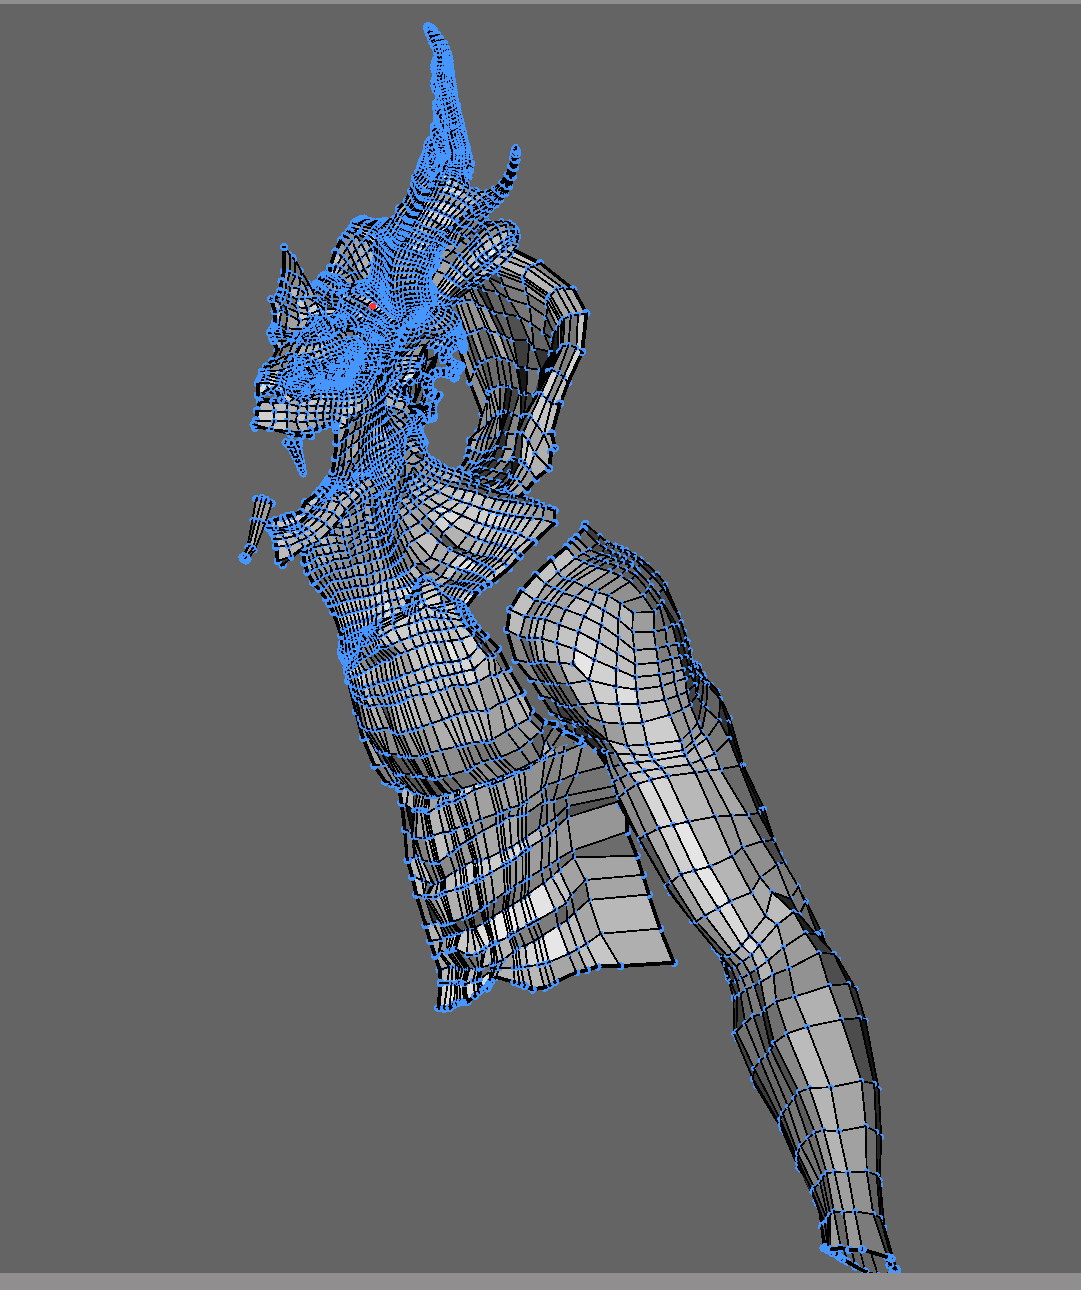
I broke up the retopology of my character into stages, to make the overall task easier, as since this was my first major retopology project. I was overwhelmed with the amount I had to do. I also opted at the suggestion of my friend to just retopologise one side of the model, for performance and then once done just mirror the completed mesh over. This was why it was important making sure my model was symetrical.
I started with the head, retopologising the face and horns, the crest and leaving the mouth until last and slowly working onto the traps and inside of the shell. Once these where done, I moved onto retopologising the front of the torso (briefly) and then began the deltoid and arm. I knew from watching tutorials and listening to my friend to follow the flow of the character, using retopology reference from the internet to aid my work, adding more loops in areas which would heavily deform and thereby limiting the number of triangles I use.

Once the arm was done, I moved onto the hand and rear of the shell. The shell was an enormous task, I broke this into 3 sections: the upper shell, the lower shell and the gap in between them, doing them seperately then joining them together later. The first thing I always completed when starting a new area was ring and loop any spikes, as this just makes joining them up to the flat transitions easier.
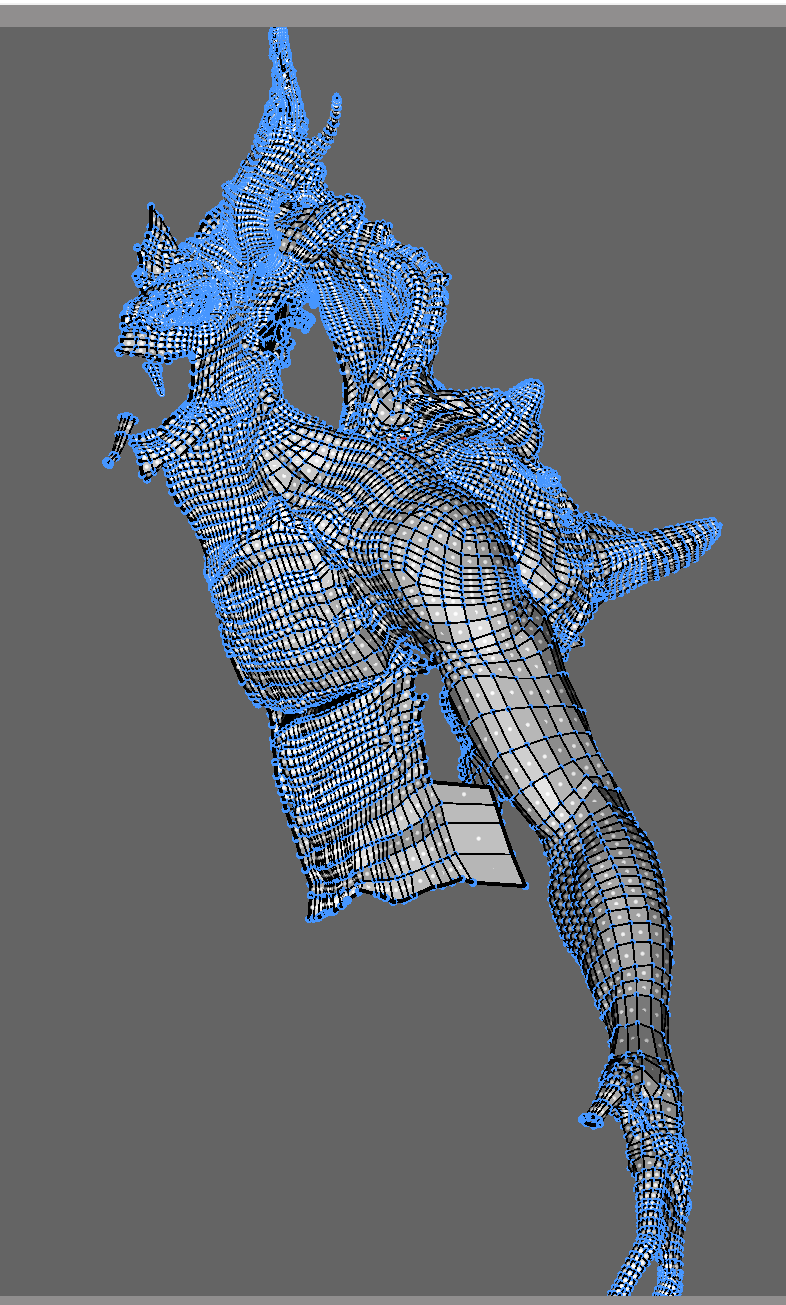
Once the upper half was done, I started the lower half, completing that and moving onto the base of the tail and lower torso. From here I took some time to define the torso quads a little more, relaxing them and adding more loops and filling in the gaps between the shell and the torso.
Once the upper half was completed, I proceeded to mapping out the lower calves and feet and completing the torso section. I also began ringing the spikes of the tail and upper thigh plates. After these where complete I began the tail, starting from the front and working around.
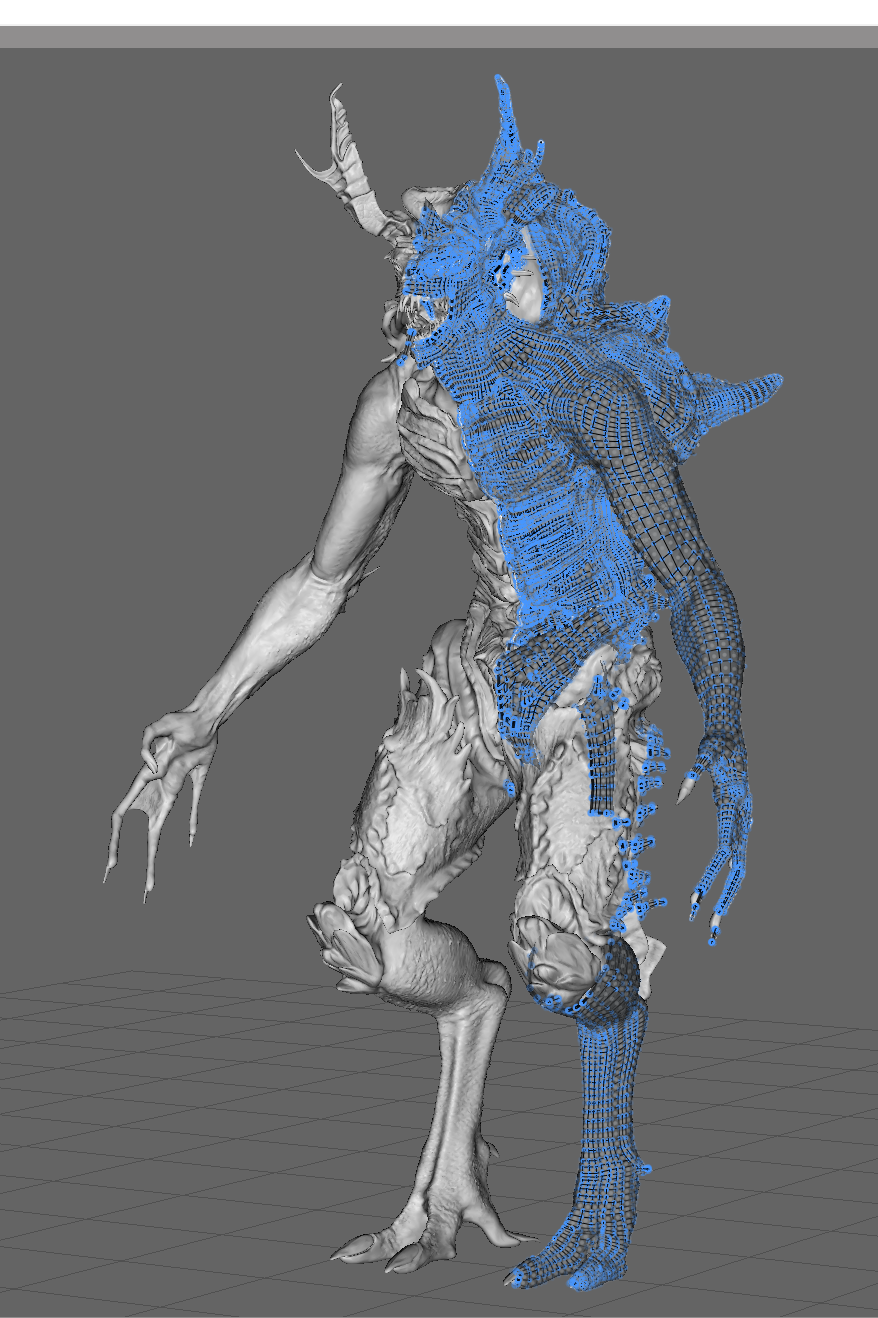
With the lower half now complete and the tail, the last major part to retopologise was the thigh and knee bones. I left this till last so I could pick up some skill along the way, as I felt this was going to be hard, due to the many spikes and plane changes of the design. I started it by mapping out the thigh and completing the space between the thigh and calve, as the area between the thigh and knee bone would be deforming heavily in the future. I wanted to make sure the loops in between where neat and plentiful so animation was easier as well as the uv stage.
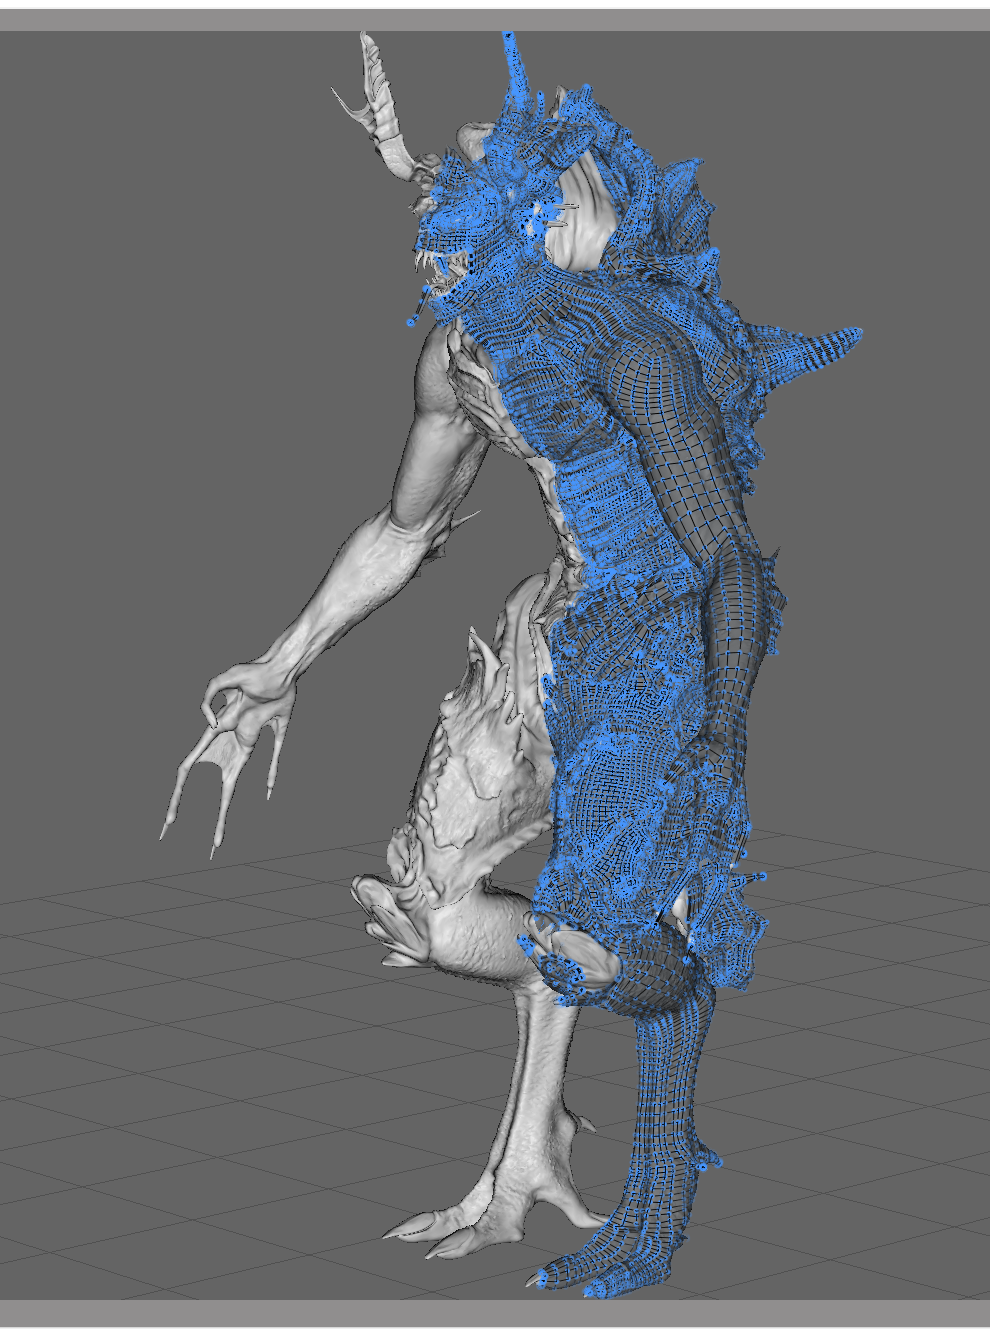
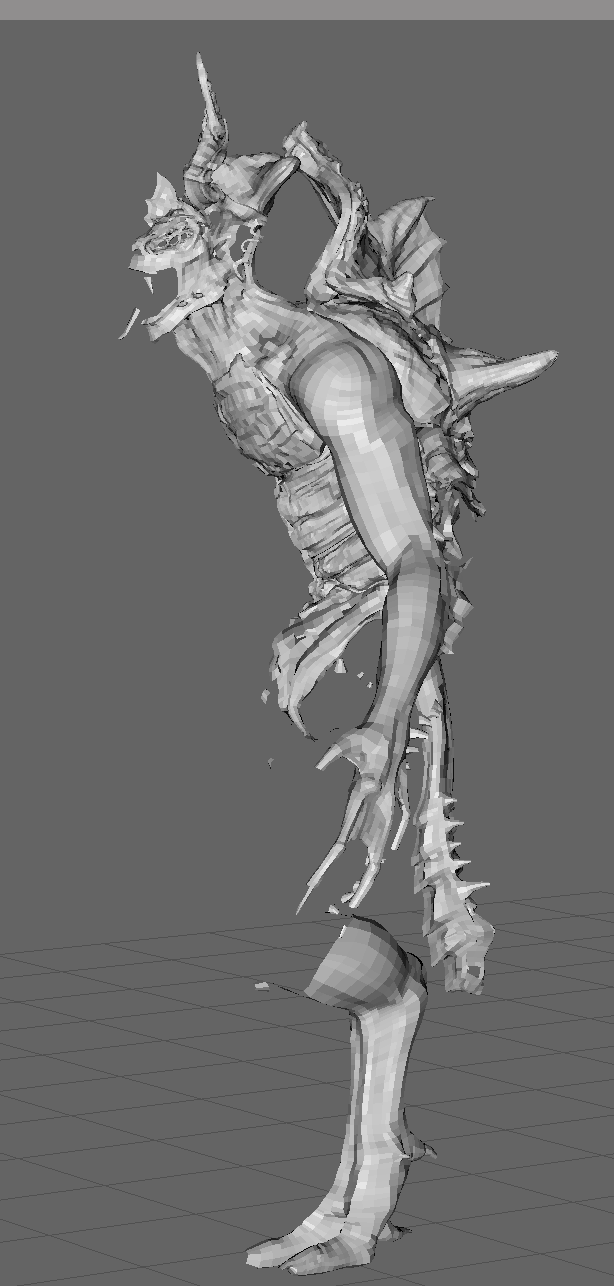
Now the entire model was complete, I only needed to finish the face and mouth and close any spaces i had left around the model, doing a ‘sanitation’ check to make sure all faces where triangles or polygons and that any messy areas where relaxed and smoothed. I chose to to do this last as i could go around the model relaxing the topology, without losing borders and certain vert positions. Now the model was complete, it consisted of 41000 polgons, 82000 once mirrored. I flipped the symmetry over, welded the vertices together down the middle and exported it for the uv stage.
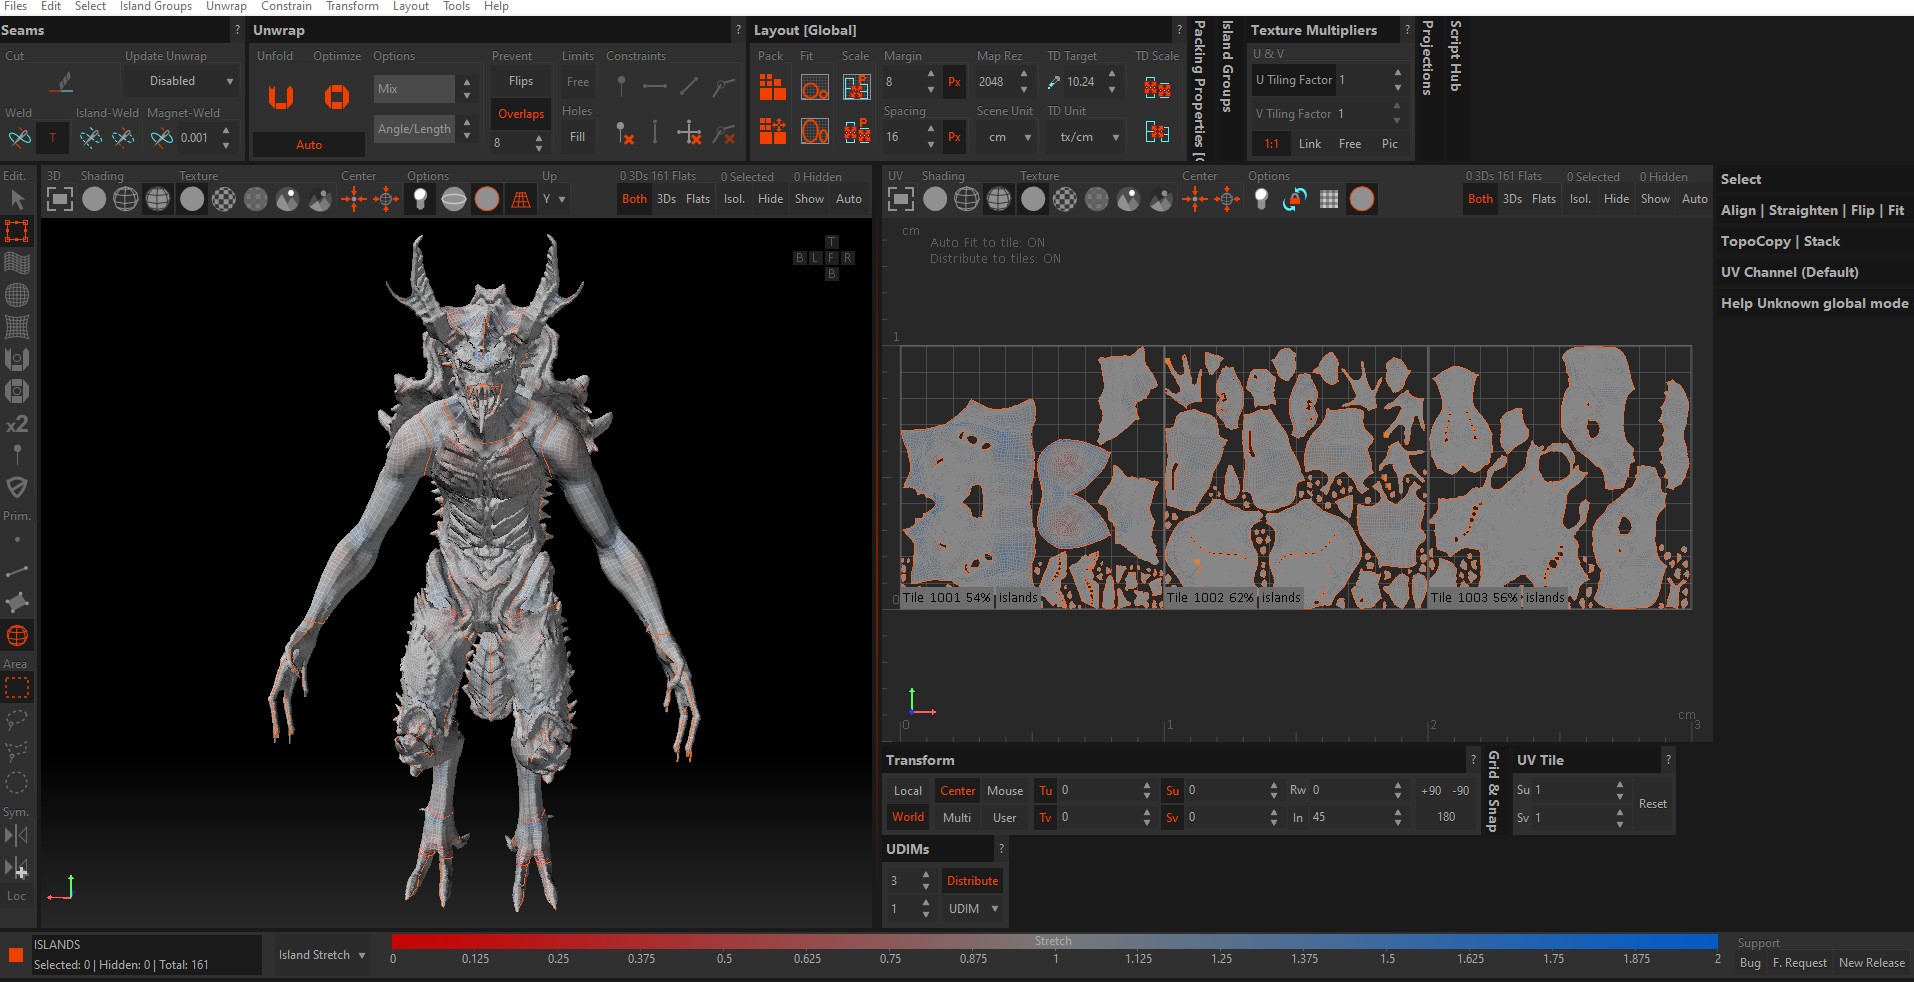
Rizom Labs UV
Rizom labs UV is a dedicated Uv program, I chose to do my Uv’s within this as I have experience with the program. Its interface is easy to use and allows for very quick and easy Uv’ing. It has tools to help you select loops easily and trace a path along the mouse cursor. It also unwraps uv’s very efficiently, with modifiers to change how it unwraps. Another excellent feature is the heat map which ranges from red to blue, with grey being the medium. This shows the user on the fly any enlarged or shrunk areas, helping to identify which area may need better unwrapping.
Again I began by breaking up the areas. Uv’ing each part individually and breaking them away one by one. I started with the spikes, teeth and horns, ringing these and splitting them down the back. Once these where done, I began with the head, leaving the mouth. I then broke off the arms and hands, splitting the hands down the center edge and splitting away the elbow fins. Next, I broke away the shell from the back, spltting this down the centre and following suit with the torso. The legs where then broke away at the hip joints and split at the calf, the calf was then split from the foot at the ankle. These where then unwrapped individually and split down the inside. The tongue was then broke away from the mouth and the mouth unwrapped leaving the model now complete. I packed the Uv’s into 3 UDIM’s to preserve some resoloution, saved them and exported them into substance painter to begin the texturing process and finalise the project.
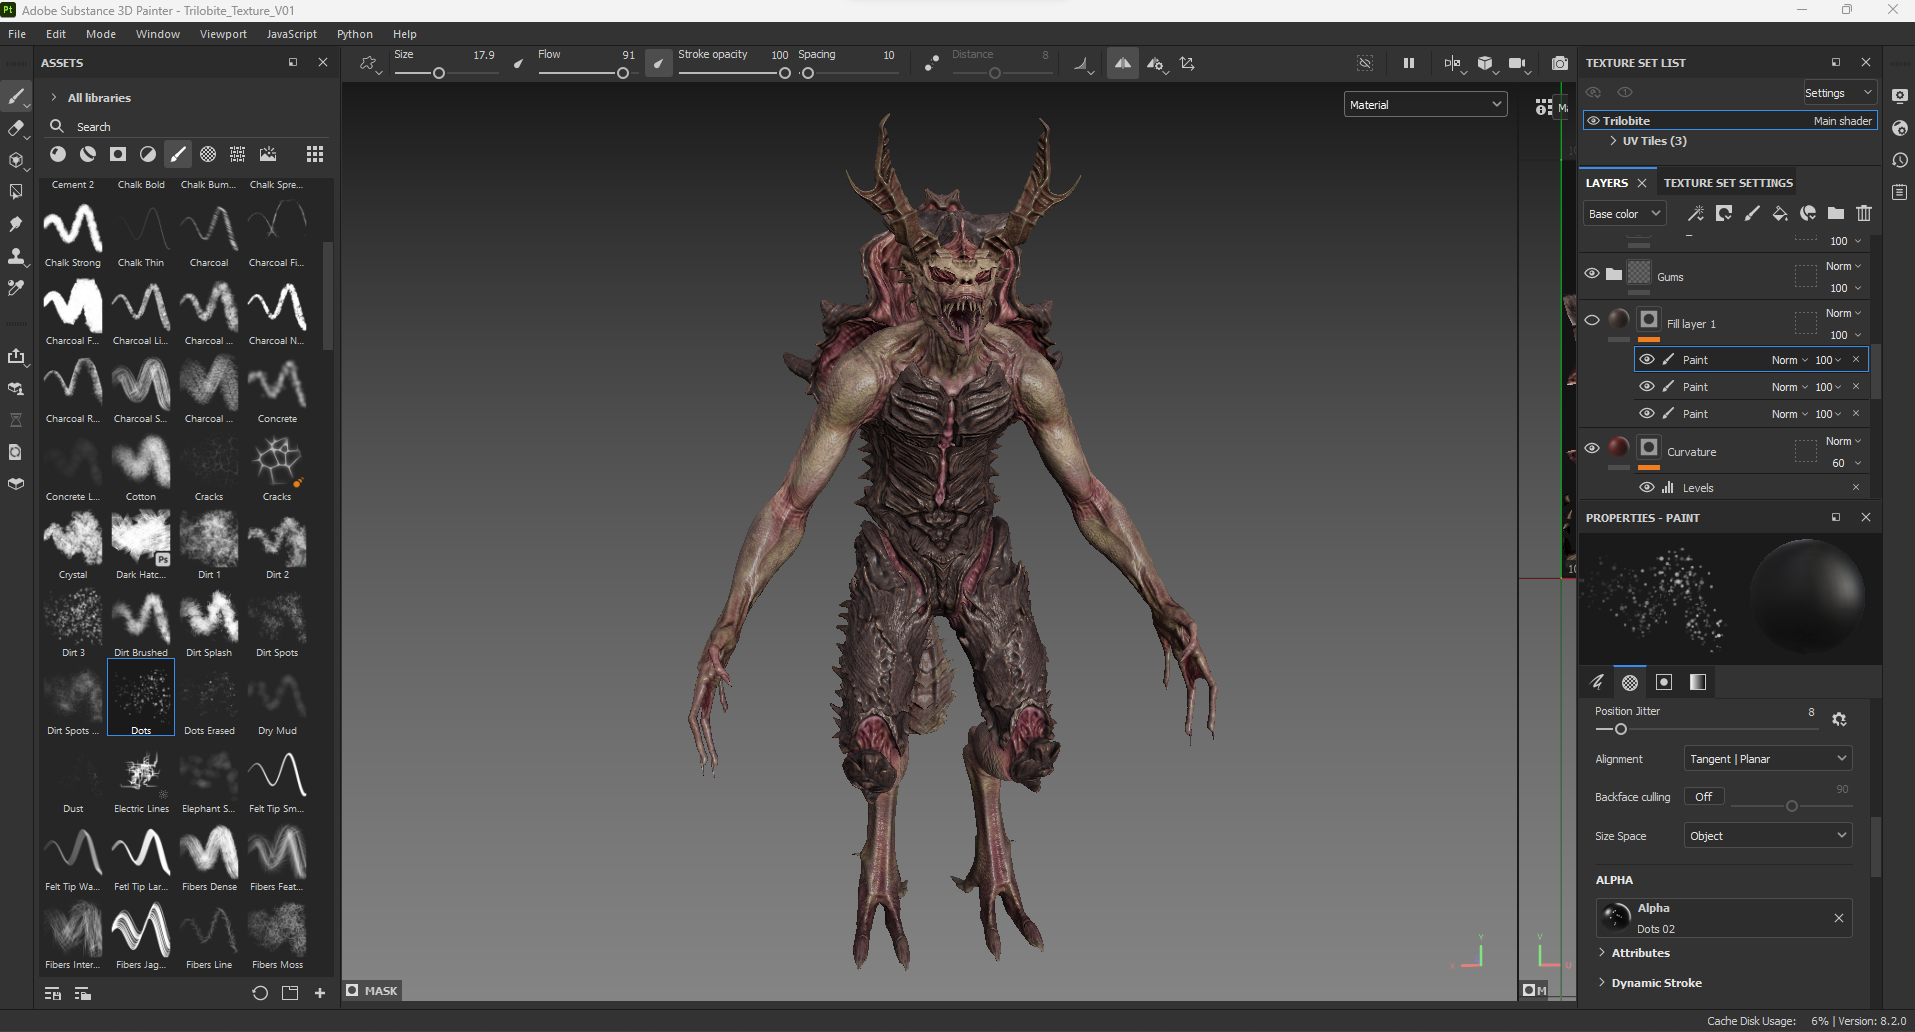
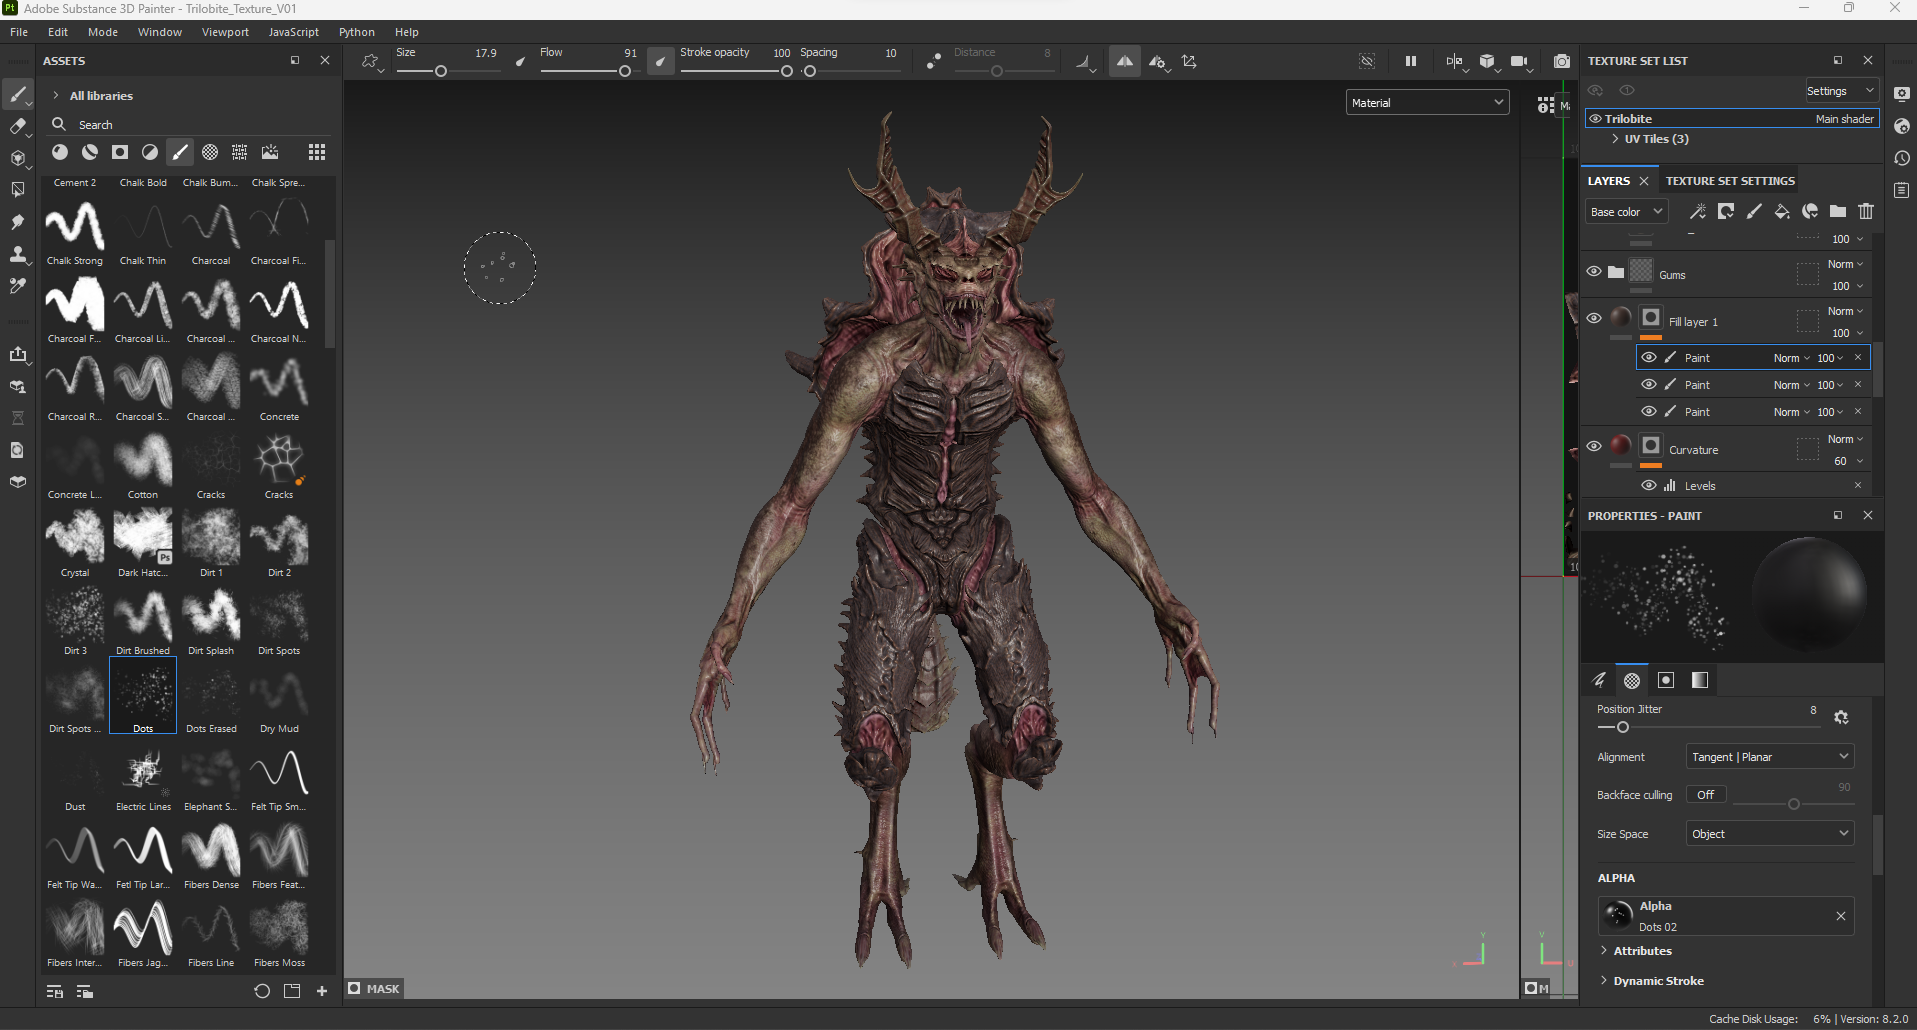
Texturing
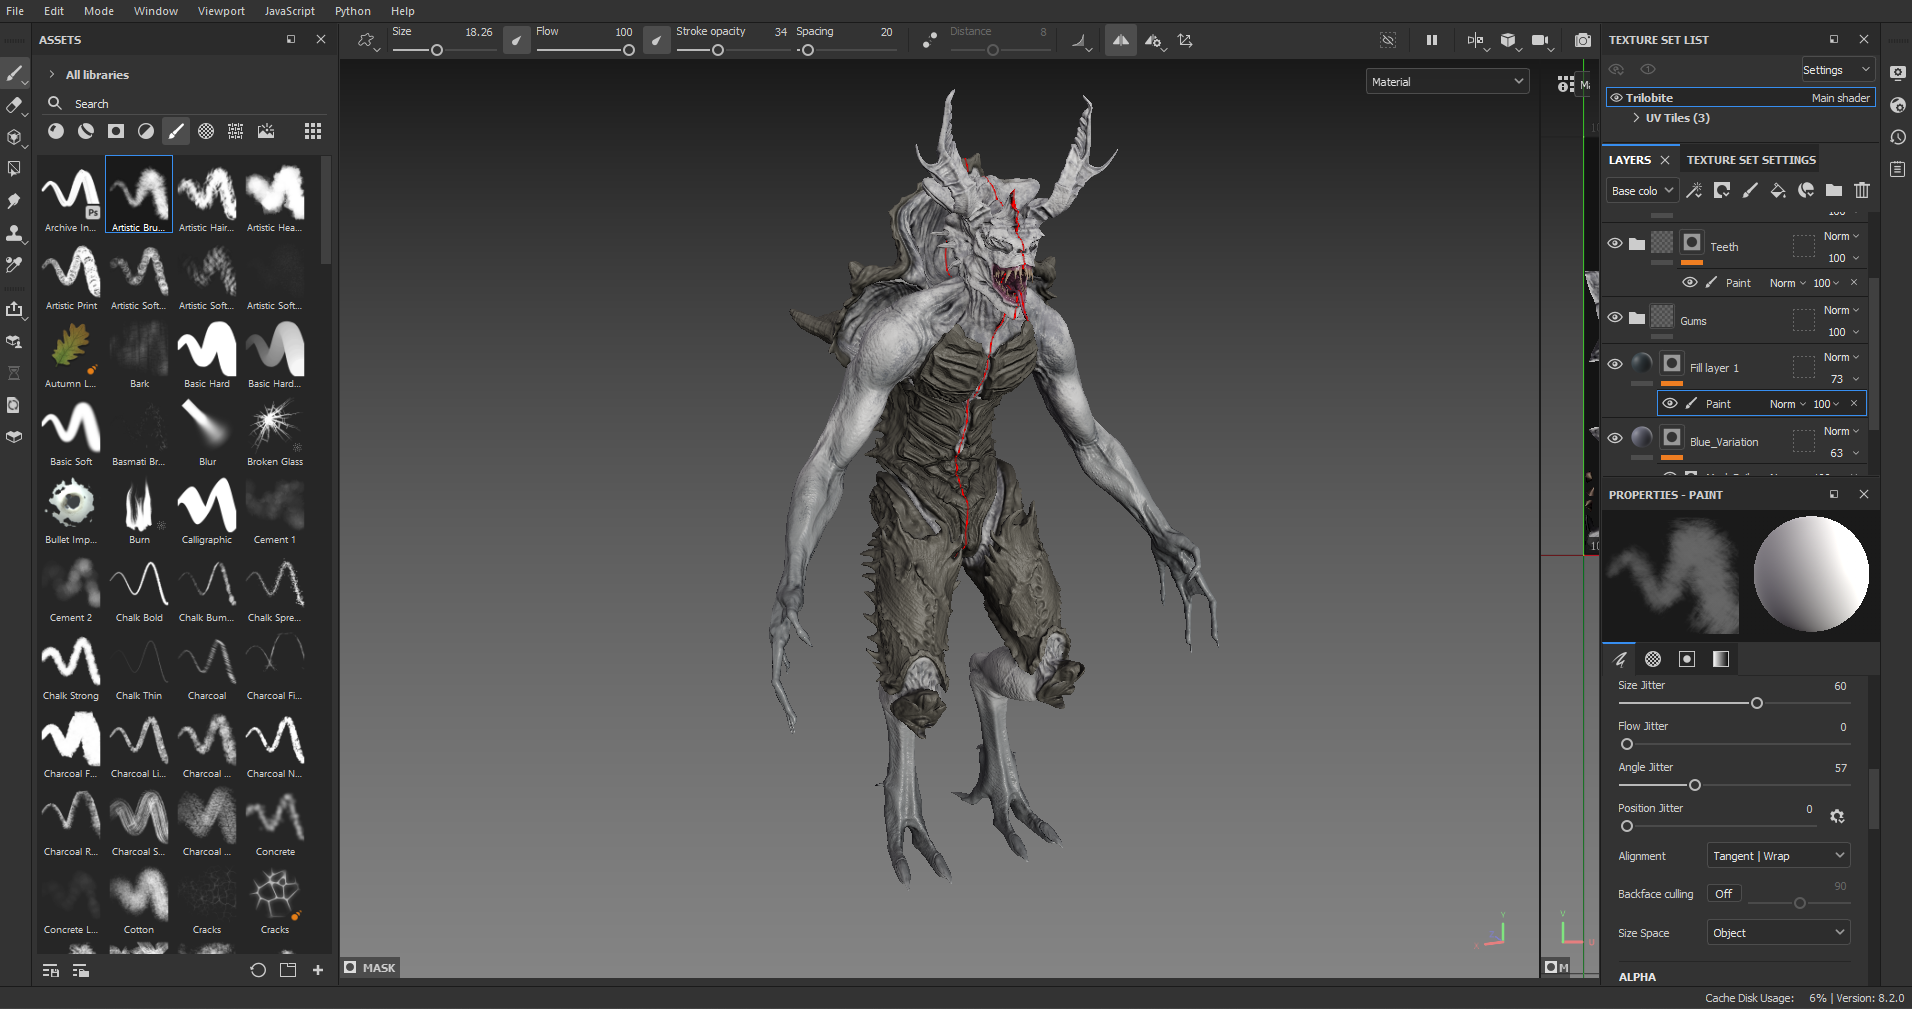
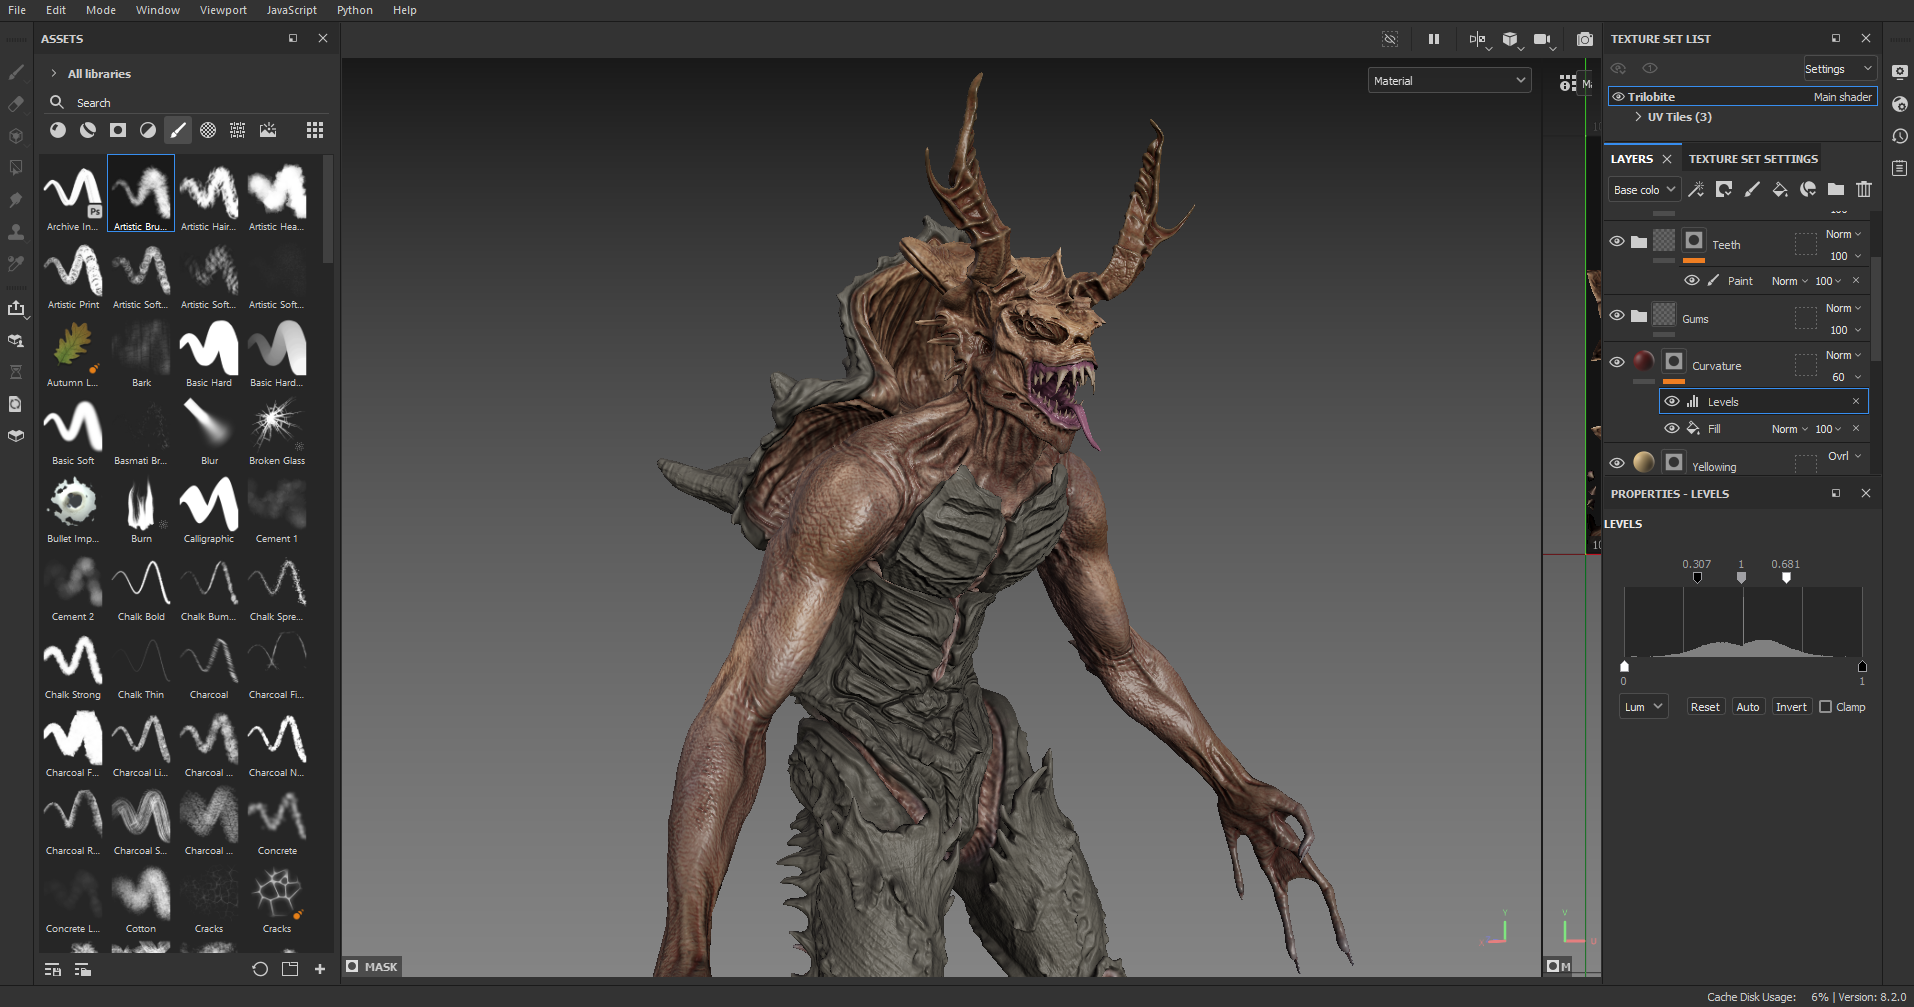
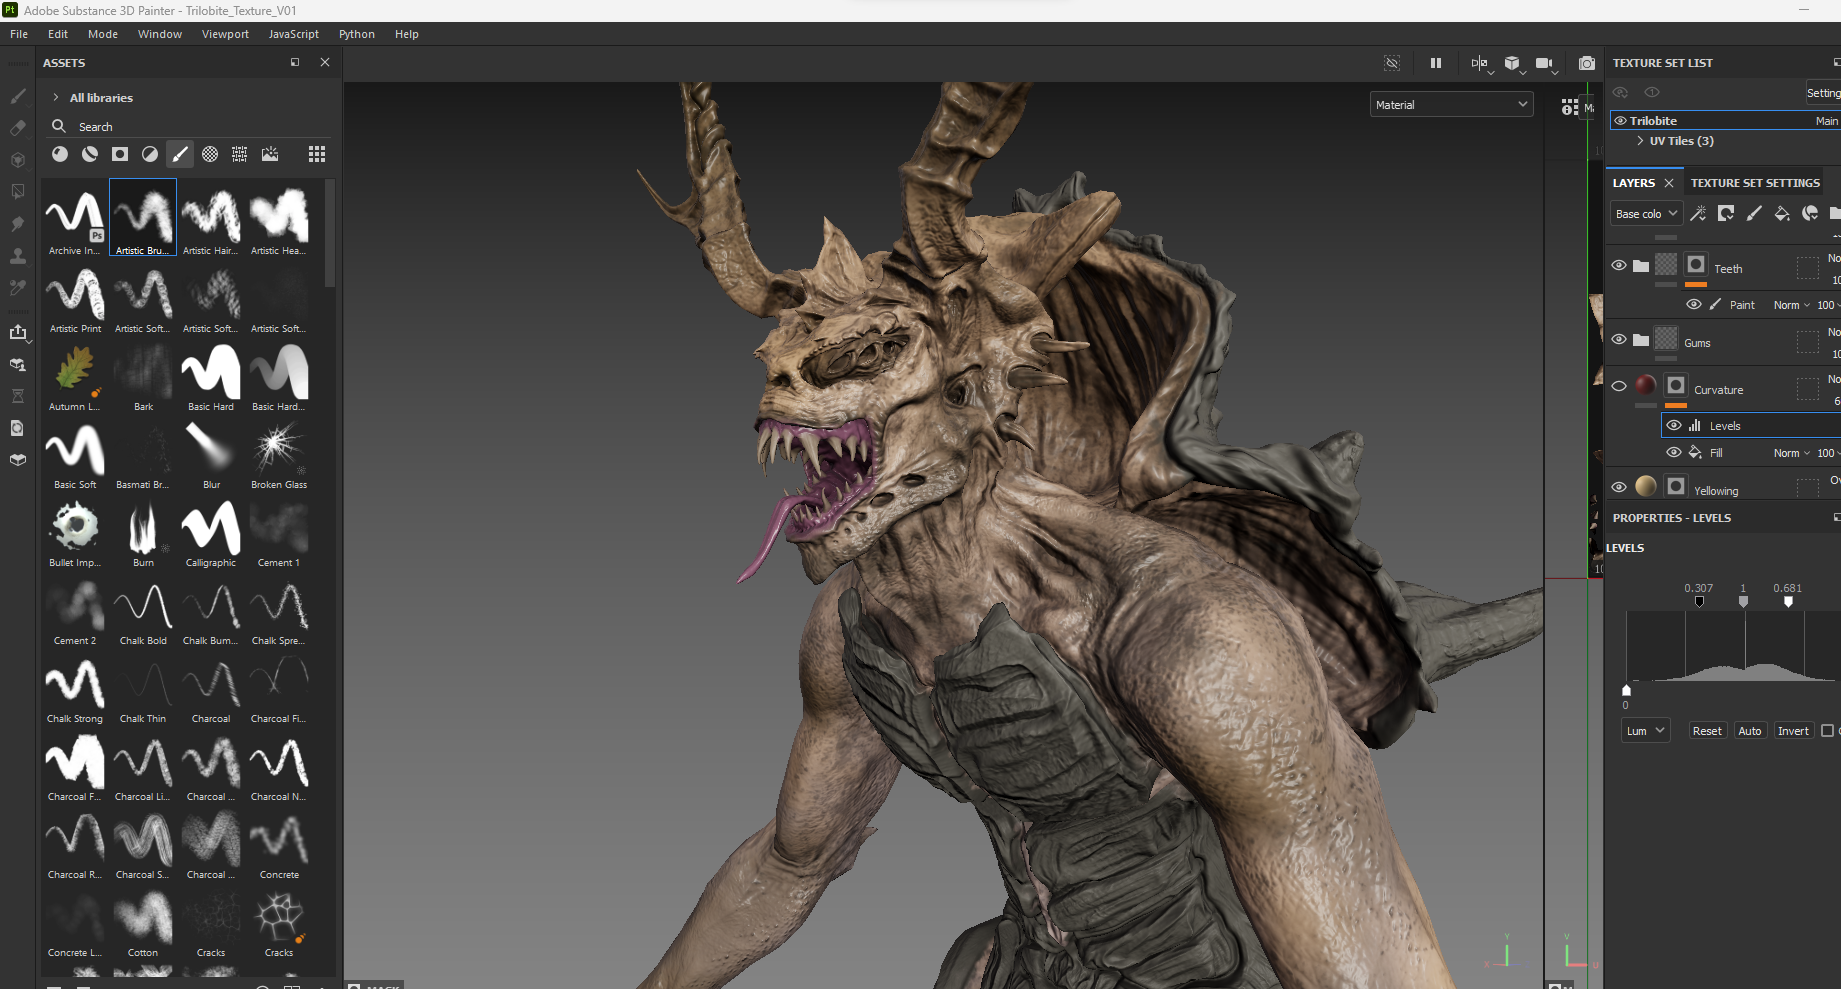
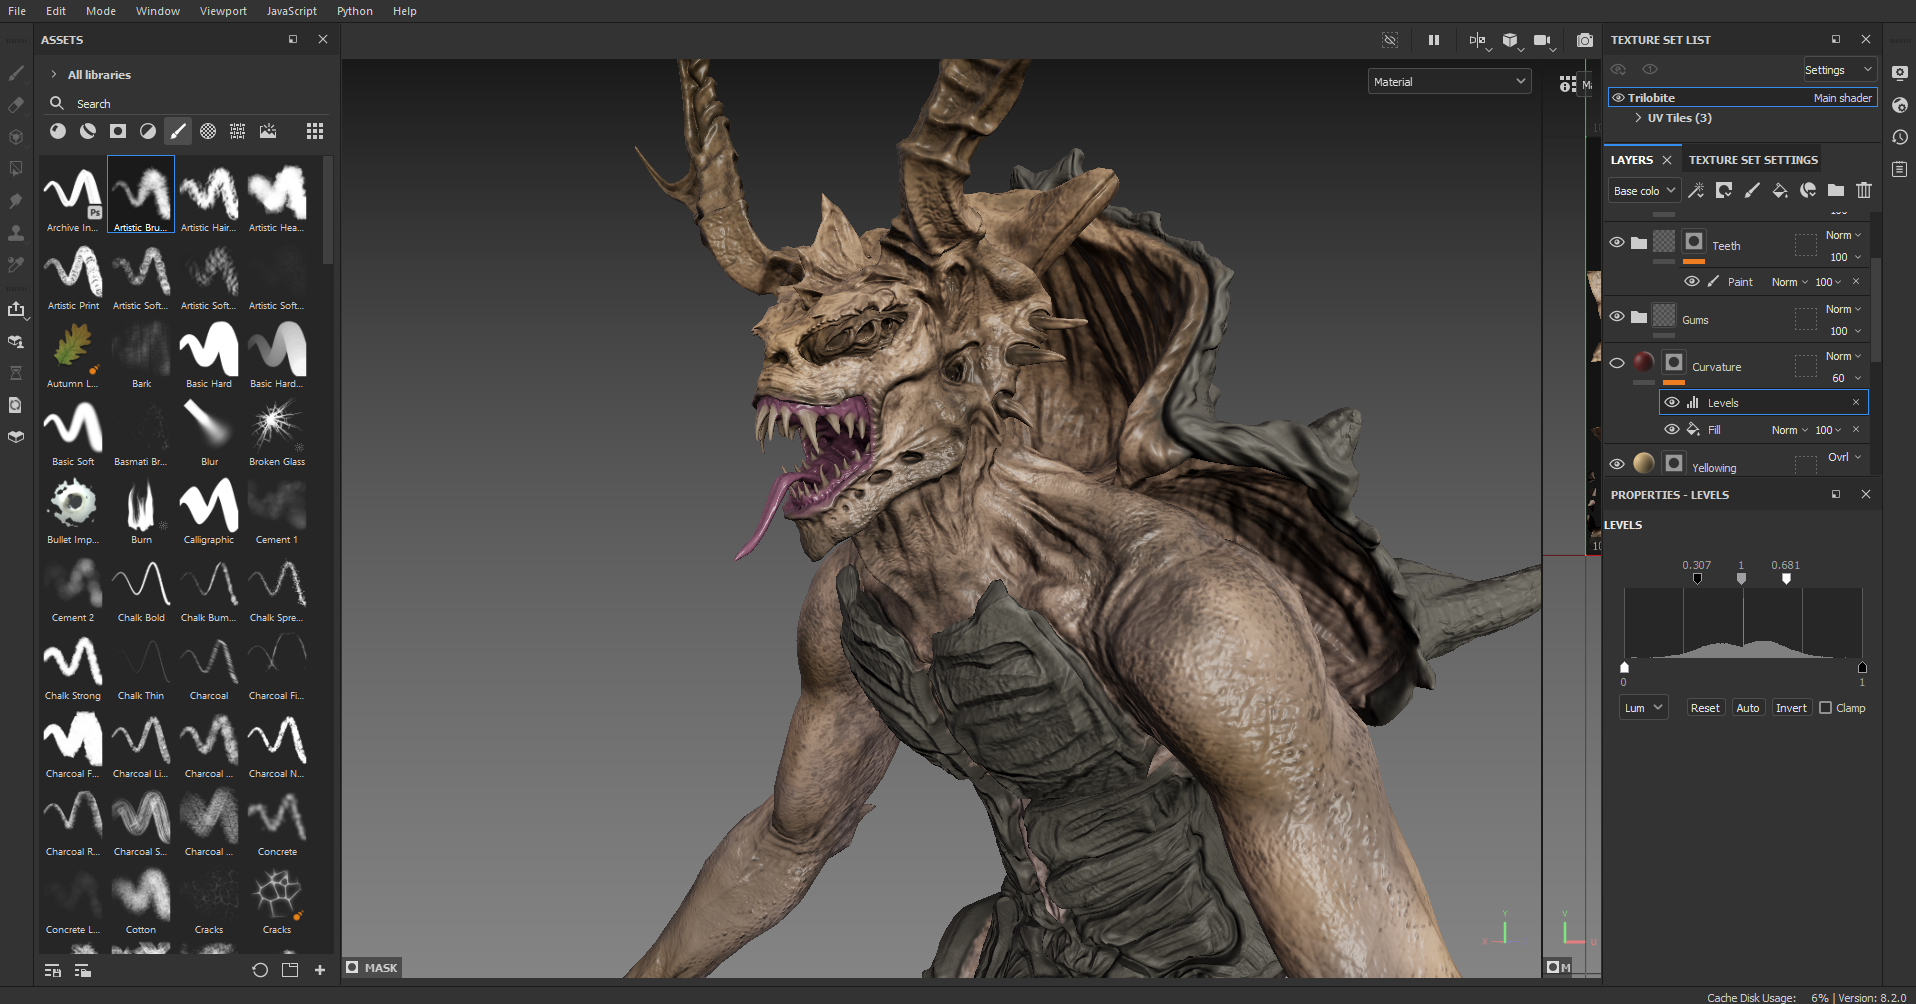
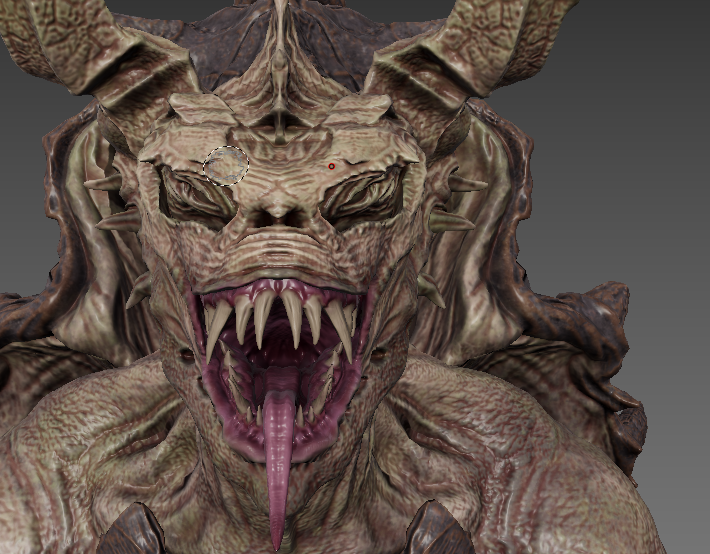
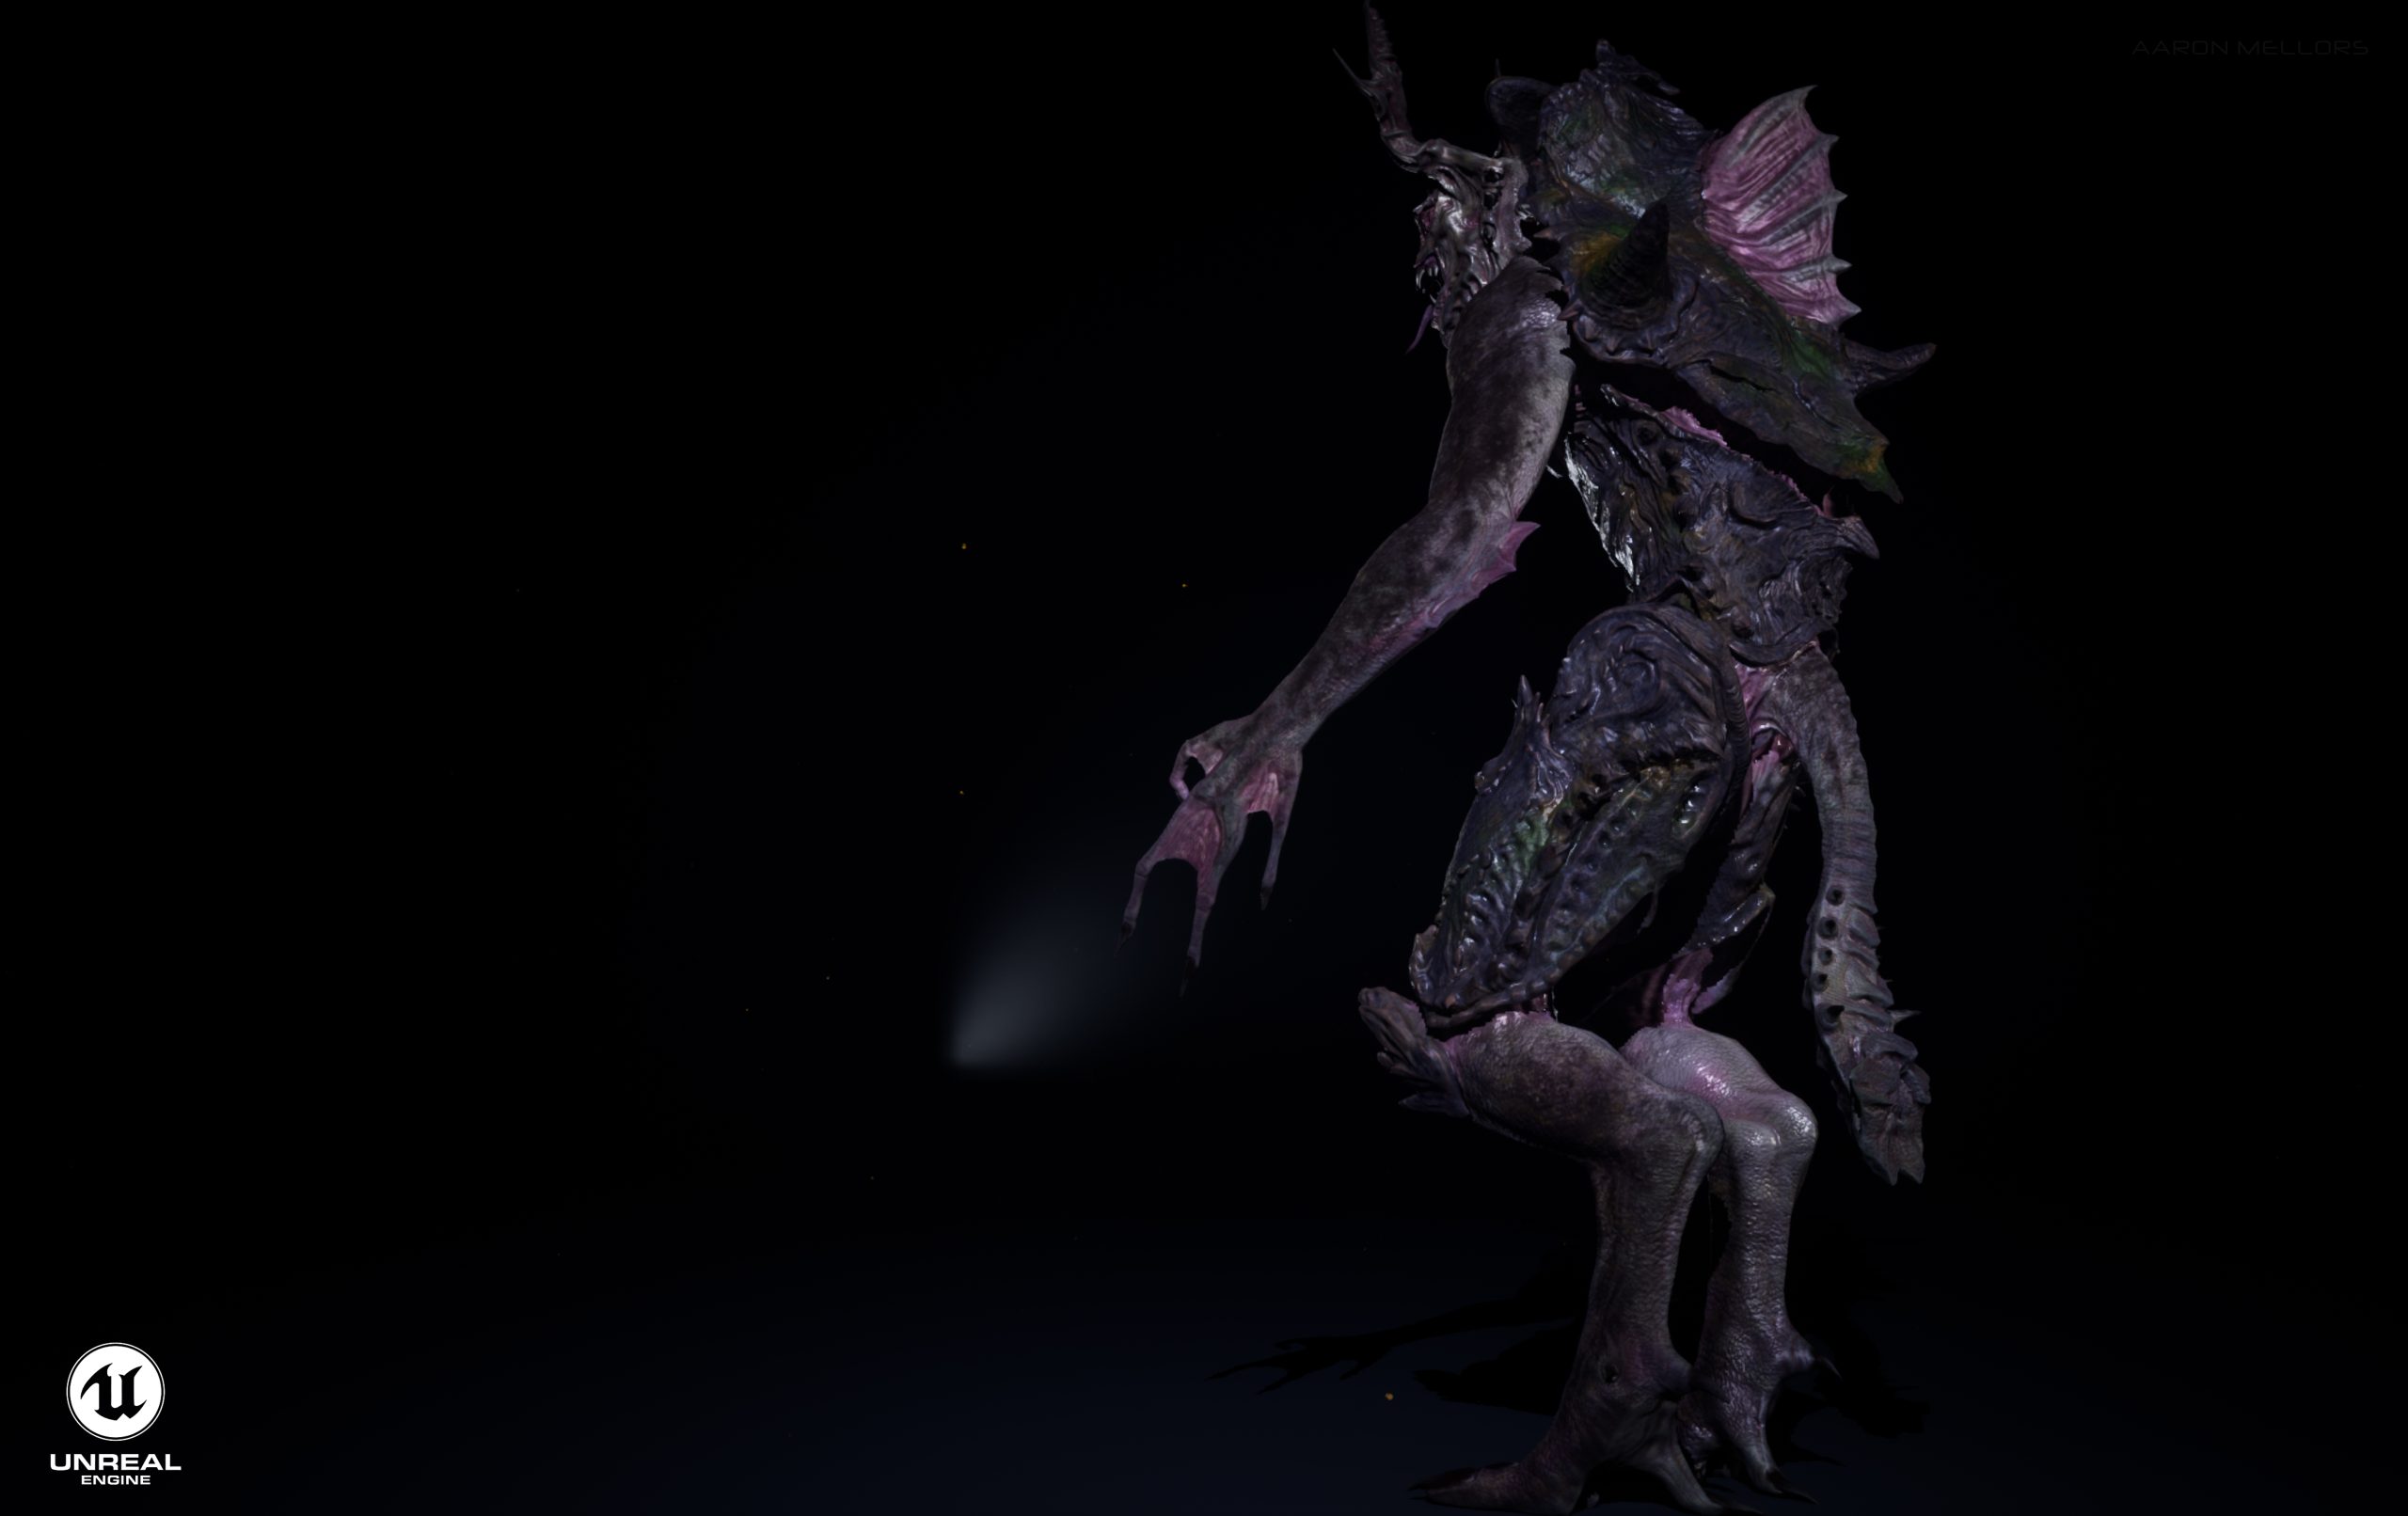
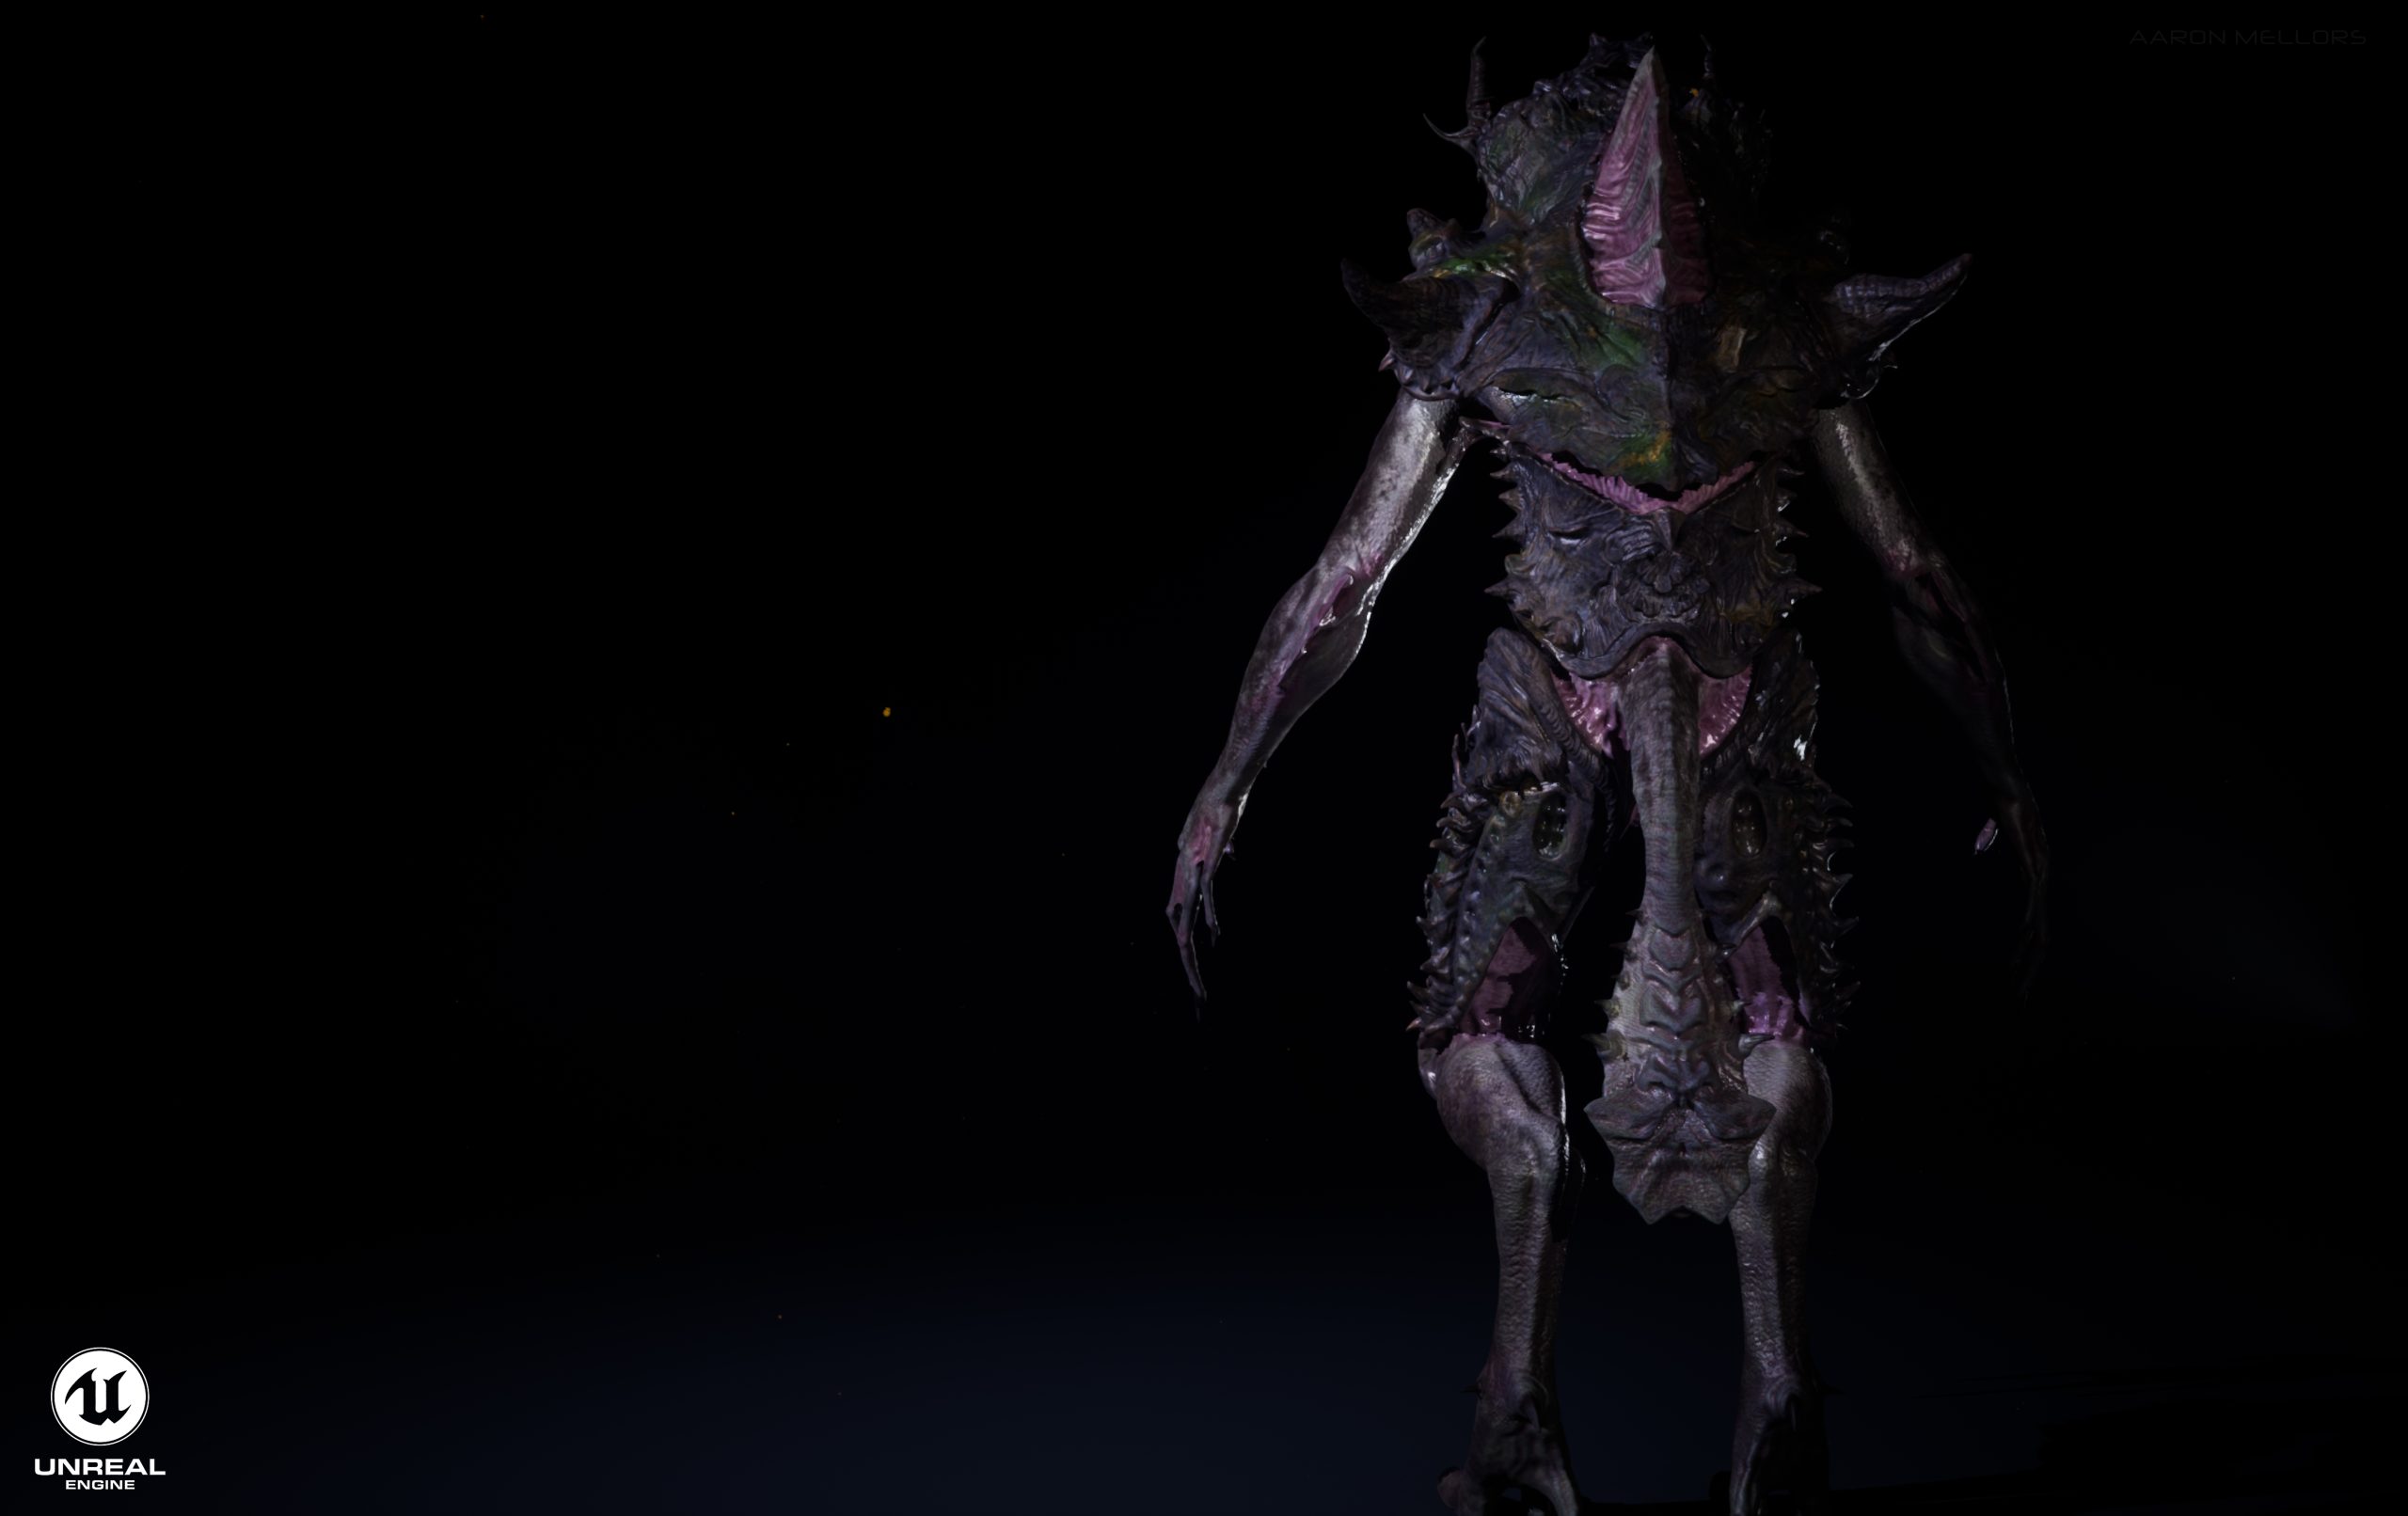
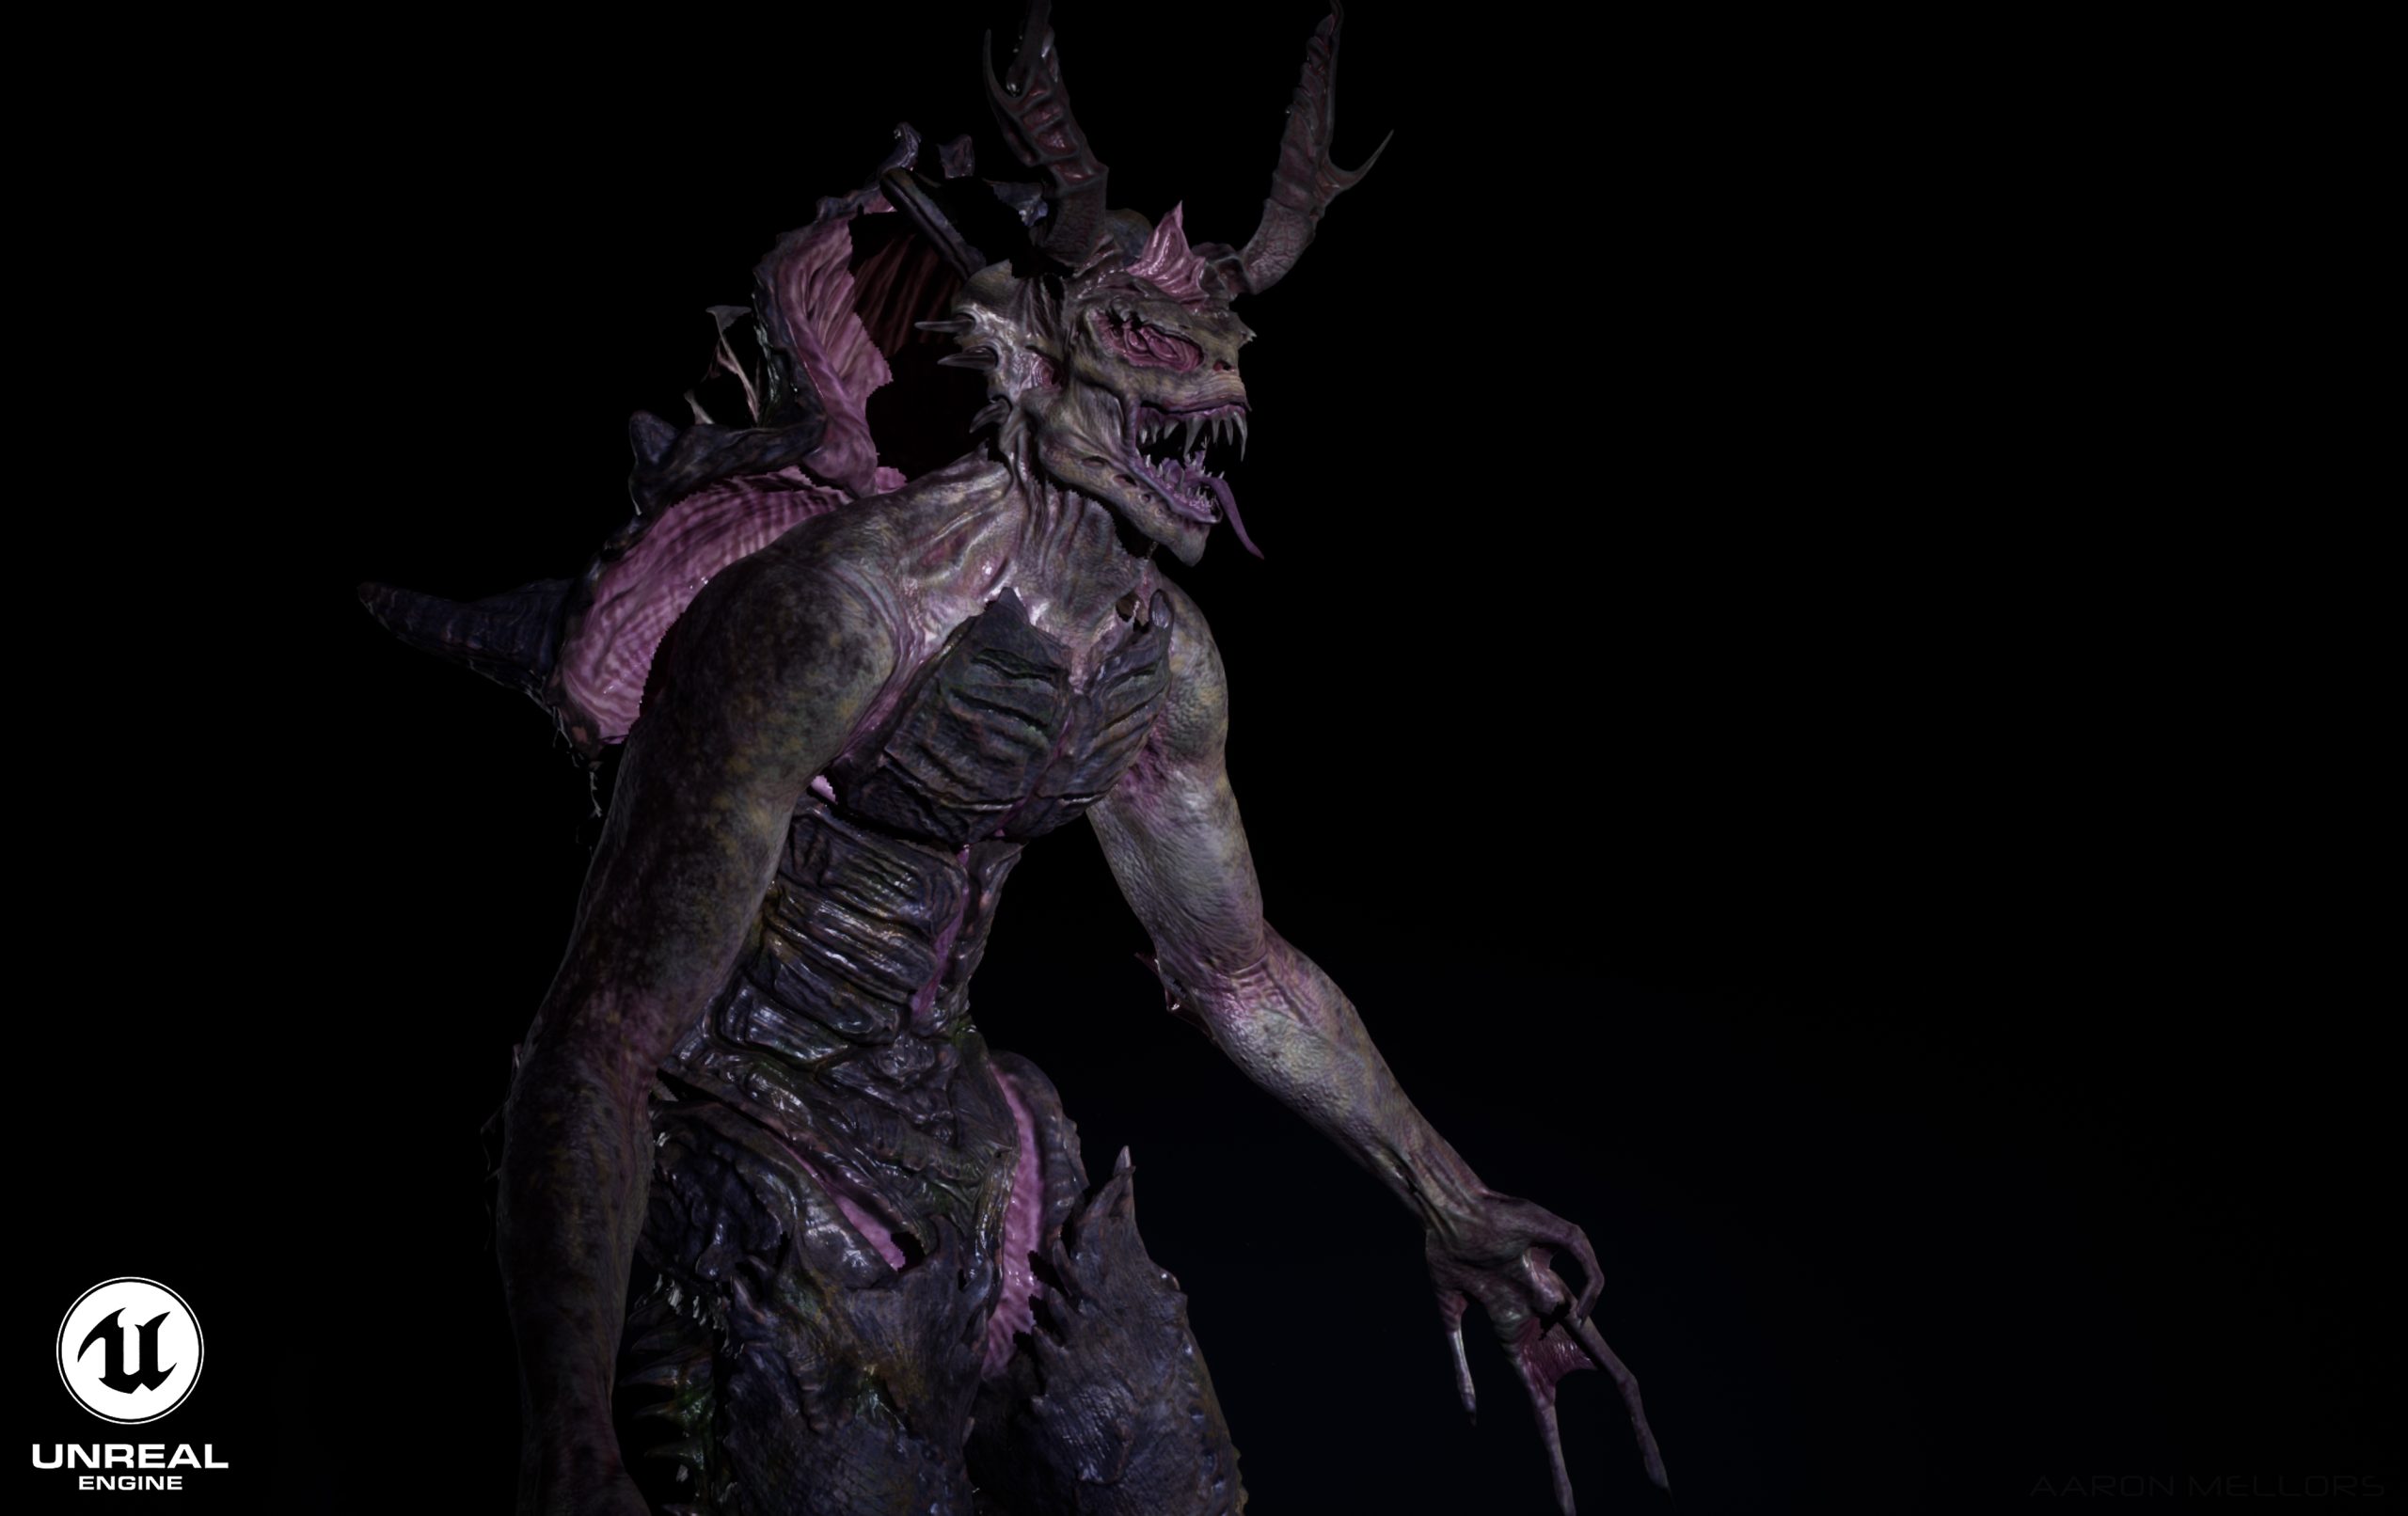
I took the export from Rizom and imported them into substance painter, from here i would texture my creature. I used reference from many different snappign turntles to come to a conclusion on the final colour choices for my creature. I transitioned through a few colour choices in the process, checking which suited the creature more, as this was inspired by a turtle, it didnt need to be exact. I eventually settled on a more green/yellow colour scheme with a dark mottled pattern, mimicing the subtle patterns found on amphibian skin. The membrane is a classic skin texture, reddened up, to look more sore and stretched. Overall i was satisfied with the final colour scheme and believe it suits the creature well, sitting well with the swamp/ drowner theme i had begun with.
I began by adding base colours and like painting a model, built up the layers slowly using textures, patterns brushes and generators. With the aid of black masks, i could mask off areas to keep things neat and sometimes allow a little ”bleed” to make the transitions from colours more natural. One of the biggest challenges was finding a good bake distance to allow minimum artifacting, i eventually settled on a distance of 0.0021, as the base number of 0.1, created many artifacts.
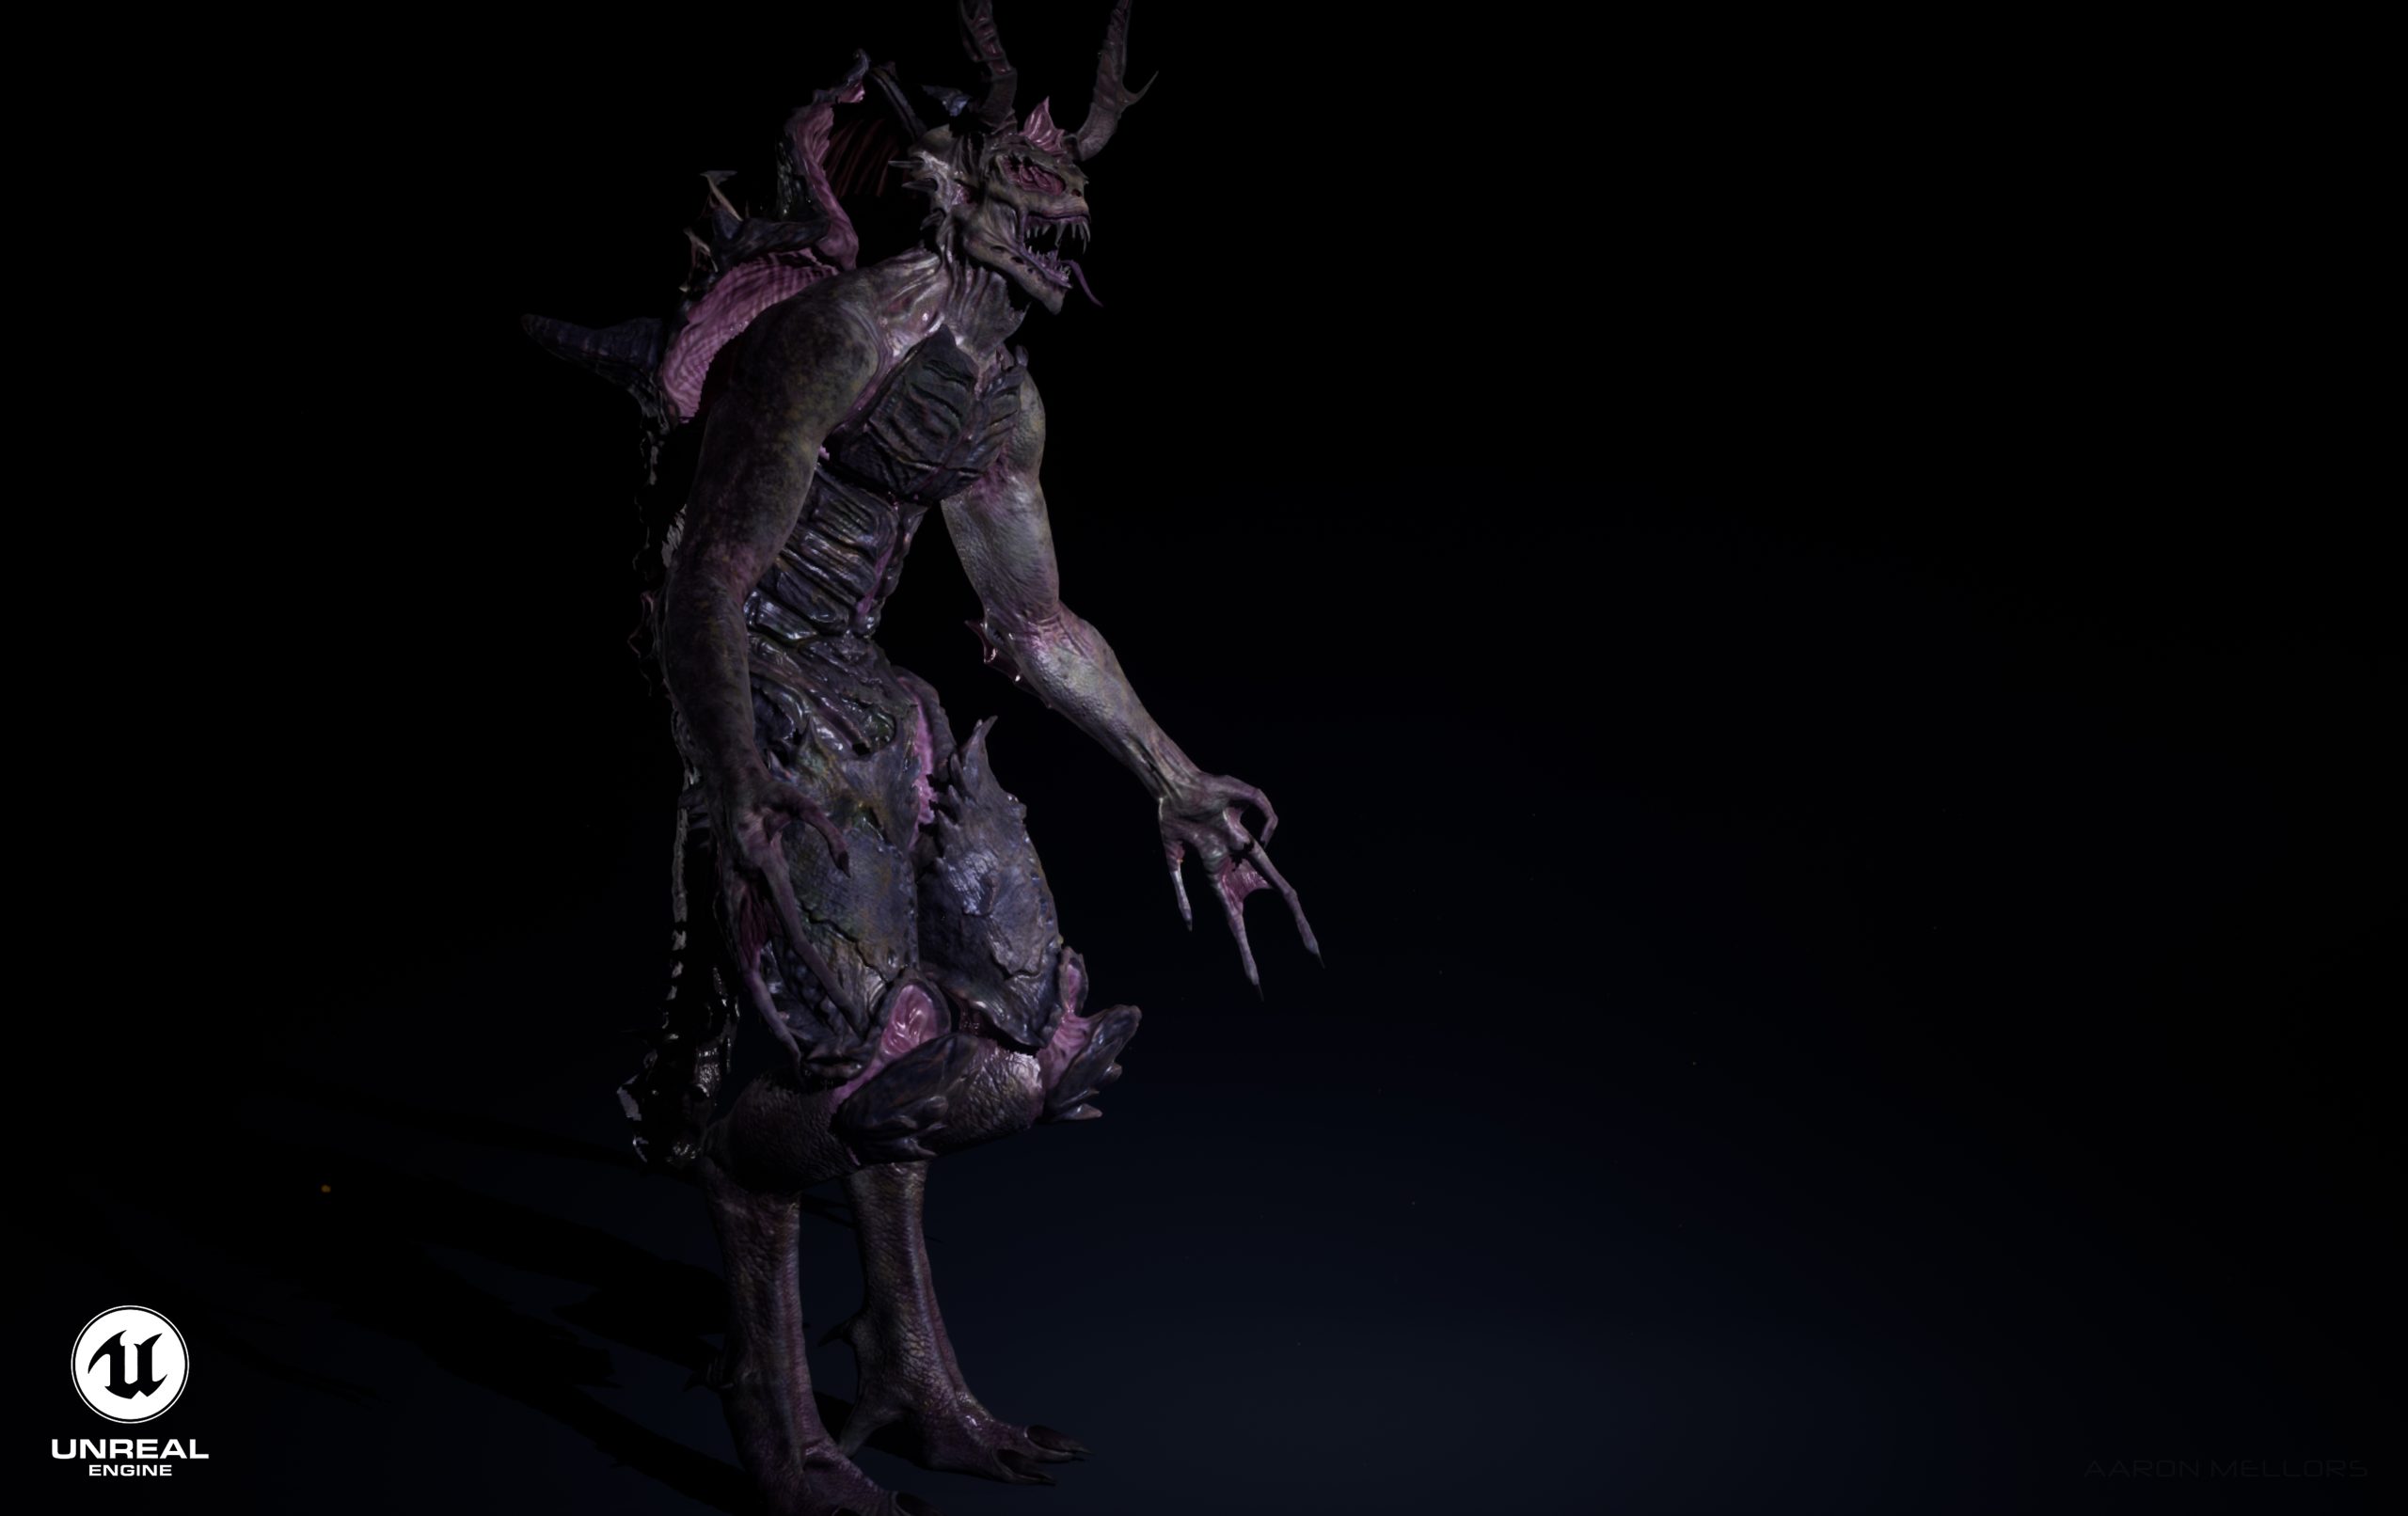
Once the texturing was complete, i saved the files and exported them to Unreal, to begin renders.

ZBrush Renders

Unreal 5 Renders
Reference
Vedmedenko, V. (n.d.). Drowner. Art Station0. Available at: https://v_vedmedenko.artstation.com/projects/yJXzY5 [Accessed 14 Nov. 2022].